MQTT 在 Elixir 中的应用

简介
最近读到一本好书,书名是通过 Elixir 和 Nerves 搭建气象站, 书中介绍了如何引入 Elixir 作为构建嵌入式应用程序的工具。
通过使用 Nerves,我们可以在支持网络的设备上运行 Elixir 代码,并且与一些控制软件交互。
上面提到的书主要关注点在 Nerves,使用 HTTP 协议进行网络交互。 尽管在许多情况下这是一个合理的选择,但我想介绍另一个广泛用于生产物联网 (IoT) 设置的选择:MQTT。
MQTT 协议
MQTT 是一种专为 (IoT) 设备通信而设计的消息传输协议。 它广泛应用于许多领域,例如银行、石油和天然气、制造业等。
MQTT 协议有很多优点,部分如下所示:
- 它是一种轻量级的二进制协议,通常在 TCP/IP 协议之上运行。
- 它专为网络不可靠的场景设计,是户外安装的理想选择。
- 它遵循发布/订阅模式,简化客户端逻辑。
我们将在设置中演示 MQTT 的一些优势。
MQTT Broker
MQTT 的一个重要特征是它简化了客户端逻辑,这对于嵌入式设备至关重要。 这是通过发布/订阅模式实现的:在 MQTT 中,没有“服务器”的概念。 相反,所有参与实体都是连接到所谓 broker 的客户端。 客户端订阅主题,向它们发布消息,broker 进行路由(以及许多其他事情)。
一个好的用于生产的 broker,如 EMQX,通常不仅提供 MQTT 路由功能,还提供许多其他有趣的功能,例如
- 其他类型的连接方法,如 WebSockets;
- 不同的认证和授权模式;
- 将数据流传输到数据库;
- 基于消息特征的自定义路由规则。
传感器设置
为简单起见,我们的设备将由一个普通的 Mix 应用程序表示:它可以轻松转换为 Nerves 应用程序。
首先,我们创建一个 Mix 项目:
mix new --sup weather_sensor
cd weather_sensor
为了与 MQTT broker 交互,我们需要一个 MQTT 客户端。 我们采用 emqtt。 将其添加到 mix.exs 作为依赖项:
defp deps do
  [
    {:emqtt, github: "emqx/emqtt", tag: "1.4.4", system_env: [{"BUILD_WITHOUT_QUIC", "1"}]}
  ]
end
我们将把所有的“传感器”代码放到主模块 WeatherSensor 中,所以我们需要将它添加到应用程序管理器 lib/weather_sensor/application.ex 中:
defmodule WeatherSensor.Application do
  @moduledoc false

  use Application

  @impl true
  def start(_type, _args) do
    children = [
      WeatherSensor
    ]

    opts = [strategy: :one_for_one, name: WeatherSensor.Supervisor]
    Supervisor.start_link(children, opts)
  end
end
现在,让我们在 lib/weather_sensor.ex 中实现主模块:
defmodule WeatherSensor do
  @moduledoc false

  use GenServer

  def start_link([]) do
    GenServer.start_link(__MODULE__, [])
  end

  def init([]) do
    interval = Application.get_env(:weather_sensor, :interval)
    emqtt_opts = Application.get_env(:weather_sensor, :emqtt)
    report_topic = "reports/#{emqtt_opts[:clientid]}/temperature"
    {:ok, pid} = :emqtt.start_link(emqtt_opts)
    st = %{
      interval: interval,
      timer: nil,
      report_topic: report_topic,
      pid: pid
    }

    {:ok, set_timer(st), {:continue, :start_emqtt}}
  end

  def handle_continue(:start_emqtt, %{pid: pid} = st) do
    {:ok, _} = :emqtt.connect(pid)

    emqtt_opts = Application.get_env(:weather_sensor, :emqtt)
    clientid = emqtt_opts[:clientid]
    {:ok, _, _} = :emqtt.subscribe(pid, {"commands/#{clientid}/set_interval", 1})
    {:noreply, st}
  end

  def handle_info(:tick, %{report_topic: topic, pid: pid} = st) do
    report_temperature(pid, topic)
    {:noreply, set_timer(st)}
  end

  def handle_info({:publish, publish}, st) do
    handle_publish(parse_topic(publish), publish, st)
  end

  defp handle_publish(["commands", _, "set_interval"], %{payload: payload}, st) do
    new_st = %{st | interval: String.to_integer(payload)}
    {:noreply, set_timer(new_st)}
  end

  defp handle_publish(_, _, st) do
    {:noreply, st}
  end

  defp parse_topic(%{topic: topic}) do
    String.split(topic, "/", trim: true)
  end

  defp set_timer(st) do
    if st.timer do
      Process.cancel_timer(st.timer)
    end
    timer = Process.send_after(self(), :tick, st.interval)
    %{st | timer: timer}
  end

  defp report_temperature(pid, topic) do
    temperature = 10.0 + 2.0 * :rand.normal()
    message = {System.system_time(:millisecond), temperature}
    payload = :erlang.term_to_binary(message)
    :emqtt.publish(pid, topic, payload)
  end
end
并在 config/config.exs 中添加一些选项:
import Config

config :weather_sensor, :emqtt,
  host: '127.0.0.1',
  port: 1883,
  clientid: "weather_sensor",
  clean_start: false,
  name: :emqtt

config :weather_sensor, :interval, 1000
让我们总结一下 WeatherSensor 中发生的事情:
- 它实现了GenServer 行为。
- 启动时,它有如下动作:
- 打开一个 MQTT 连接;
- 订阅 commands/weather_sensor/set_interval 主题以接收命令,将接收到的数据将通过
发送到进程,作为 {:publish, publish }消息。 - 以预定义的时间间隔设置计时器。
- 在定时器超时时,它发布 {Timestamp, Temperature} 元组到 reports/weather_sensor/temperature 主题。
- 在收到来自 commands/weather_sensor/set_interval 主题的消息时,它会更新计时器间隔。
由于我们的应用程序不是真正的 Nerves 应用程序,它连接了 BMP280 之类的传感器,因此我们生成温度数据。
在这里我们已经可以看到相对于 HTTP 交互的一个优势:我们不仅可以发送数据,还可以实时接收一些命令。
我们需要一个 broker 来运行节点; 我们稍后会开始。
控制台设置
由于 MQTT 中没有“服务器”,因此我们的控制台也将是一个 MQTT 客户端。 但它会订阅reports/weather_sensor/temperature主题和发布命令到 commands/weather_sensor/set_interval。
对于控制台,我们将设置 Phoenix LiveView 应用程序。
创建过程如下:
mix phx.new --version
Phoenix installer v1.6.2
mix phx.new weather_dashboard --no-ecto --no-gettext --no-dashboard --live
cd weather_dashboard
向 mix.exs 添加依赖项
  defp deps do
    [
      ...
      {:jason, "~> 1.2"},
      {:plug_cowboy, "~> 2.5"},

      {:emqtt, github: "emqx/emqtt", tag: "1.4.4", system_env: [{"BUILD_WITHOUT_QUIC", "1"}]},
      {:contex, github: "mindok/contex"} # We will need this for SVG charts
    ]
  end
向 config/dev.exs 添加一些设置:
config :weather_dashboard, :emqtt,
  host: '127.0.0.1',
  port: 1883

config :weather_dashboard, :sensor_id, "weather_sensor"

# Period for chart
config :weather_dashboard, :timespan, 60
现在我们生成一个 LiveView 控制器:
mix phx.gen.live Measurements Temperature temperatures --no-schema --no-context
这会生成很多文件,但并非都是必需的,我们需要的是一个带有图表的单页应用程序。
rm lib/weather_dashboard_web/live/temperature_live/form_component.*
rm lib/weather_dashboard_web/live/temperature_live/show.*
rm lib/weather_dashboard_web/live/live_helpers.ex
同时从lib/weather_dashboard_web.ex 中删除import WeatherDashboardWeb.LiveHelpers。
更新我们页面的模板(lib/weather_dashboard_web/live/temperature_live/index.html.heex):
<div>
  <%= if @plot do %>
    <%= @plot %>
  <% end %>
</div>

<div>
  <form phx-submit="set-interval">
    <label for="interval">Interval</label>
    <input type="text" name="interval" value={@interval}/>
    <input type="submit" value="Set interval"/>
  </form>
</div>
我们有一个图表和输入控件,用于向此页面上的“设备”发送命令。
现在更新主要部分 LiveView 控制器(lib/weather_dashboard_web/live/temperature_live/index.ex):
defmodule WeatherDashboardWeb.TemperatureLive.Index do
  use WeatherDashboardWeb, :live_view

  require Logger

  @impl true
  def mount(_params, _session, socket) do
    reports = []
    emqtt_opts = Application.get_env(:weather_dashboard, :emqtt)
    {:ok, pid} = :emqtt.start_link(emqtt_opts)
    {:ok, _} = :emqtt.connect(pid)
    # Listen reports
    {:ok, _, _} = :emqtt.subscribe(pid, "reports/#")
    {:ok, assign(socket,
      reports: reports,
      pid: pid,
      plot: nil,
      interval: nil
    )}
  end

  @impl true
  def handle_params(_params, _url, socket) do
    {:noreply, socket}
  end

  @impl true
  def handle_event("set-interval", %{"interval" => interval_s}, socket) do
    case Integer.parse(interval_s) do
      {interval, ""} ->
        id = Application.get_env(:weather_dashboard, :sensor_id)
        # Send command to device
        topic = "commands/#{id}/set_interval"
        :ok = :emqtt.publish(
          socket.assigns[:pid],
          topic,
          interval_s,
          retain: true
        )
        {:noreply, assign(socket, interval: interval)}
      _ ->
        {:noreply, socket}
    end
  end

  def handle_event(name, data, socket) do
    Logger.info("handle_event: #{inspect([name, data])}")
    {:noreply, socket}
  end

  @impl true
  def handle_info({:publish, packet}, socket) do
    handle_publish(parse_topic(packet), packet, socket)
  end

  defp handle_publish(["reports", id, "temperature"], %{payload: payload}, socket) do
    if id == Application.get_env(:weather_dashboard, :sensor_id) do
      report = :erlang.binary_to_term(payload)
      {reports, plot} = update_reports(report, socket)
      {:noreply, assign(socket, reports: reports, plot: plot)}
    else
      {:noreply, socket}
    end
  end

  defp update_reports({ts, val}, socket) do
    new_report = {DateTime.from_unix!(ts, :millisecond), val}
    now = DateTime.utc_now()
    deadline = DateTime.add(DateTime.utc_now(), - 2 * Application.get_env(:weather_dashboard, :timespan), :second)
    reports =
      [new_report | socket.assigns[:reports]]
      |> Enum.filter(fn {dt, _} -> DateTime.compare(dt, deadline) == :gt end)
      |> Enum.sort()

    {reports, plot(reports, deadline, now)}
  end

  defp parse_topic(%{topic: topic}) do
    String.split(topic, "/", trim: true)
  end

  defp plot(reports, deadline, now) do
    x_scale =
      Contex.TimeScale.new()
      |> Contex.TimeScale.domain(deadline, now)
      |> Contex.TimeScale.interval_count(10)

    y_scale =
      Contex.ContinuousLinearScale.new()
      |> Contex.ContinuousLinearScale.domain(0, 30)

    options = [
      smoothed: false,
      custom_x_scale: x_scale,
      custom_y_scale: y_scale,
      custom_x_formatter: &x_formatter/1,
      axis_label_rotation: 45
    ]

    reports
    |> Enum.map(fn {dt, val} -> [dt, val] end)
    |> Contex.Dataset.new()
    |> Contex.Plot.new(Contex.LinePlot, 600, 250, options)
    |> Contex.Plot.to_svg()
  end

  defp x_formatter(datetime) do
    datetime
    |> Calendar.strftime("%H:%M:%S")
  end

end
特别说明如下:
- 我们创建了一个 LiveView 处理程序来为我们的应用程序的主页提供服务。
- 通常,Phoenix.PubSub 用于更新 LiveView 进程状态。 但是,我们做了一个特殊设置:由于 MQTT broker 已经提供了一个发布订阅模式,我们直接从 LiveView 进程连接到它。
- 收到新的温度数据后,服务器更新温度图表。
- 收到用户的表单更新后,我们会向命令主题发送更新的时间间隔。
最后,在lib/weather_dashboard_web/router.ex 中设置路由,以便我们的控制器能够处理根页面:
  scope "/", WeatherDashboardWeb do
    pipe_through :browser

    live "/", TemperatureLive.Index
  end
模块集成
现在,我们已准备设置并运行所有内容。
我们运行一个 MQTT broker。 由于我们不需要任何特定的设置,最简单的方法是使用 docker 运行代 broker。
docker run -d --name emqx -p 1883:1883 emqx/emqx:4.3.10
现在运行我们的“设备”:
cd weather_sensor
export BUILD_WITHOUT_QUIC=1
iex -S mix
Erlang/OTP 24 [erts-12.1.2] [source] [64-bit] [smp:16:16] [ds:16:16:10] [async-threads:1] [jit] [dtrace]

....

13:17:24.461 [debug] emqtt(weather_sensor): SEND Data: {:mqtt_packet, {:mqtt_packet_header, 8, false, 1, false}, {:mqtt_packet_subscribe, 2, %{}, [{"/commands/weather_sensor/set_interval", %{nl: 0, qos: 1, rap: 0, rh: 0}}]}, :undefined}

13:17:24.463 [debug] emqtt(weather_sensor): RECV Data: <<144, 3, 0, 2, 1>>

13:17:25.427 [debug] emqtt(weather_sensor): SEND Data: {:mqtt_packet, {:mqtt_packet_header, 3, false, 0, false}, {:mqtt_packet_publish, "/reports/weather_sensor/temperature", :undefined, :undefined}, <<131, 104, 2, 110, 6, 0, 179, 156, 178, 158, 125, 1, 70, 64, 38, 106, 91, 64, 234, 212, 185>>}

13:17:26.428 [debug] emqtt(weather_sensor): SEND Data: {:mqtt_packet, {:mqtt_packet_header, 3, false, 0, false}, {:mqtt_packet_publish, "/reports/weather_sensor/temperature", :undefined, :undefined}, <<131, 104, 2, 110, 6, 0, 156, 160, 178, 158, 125, 1, 70, 64, 39, 115, 221, 187, 144, 192, 31>>}
...
我们看到我们的传感器立即开始发送报告。
现在运行我们的控制台:
cd weather_dashboard
export BUILD_WITHOUT_QUIC=1
iex -S mix phx.server
Erlang/OTP 24 [erts-12.1.2] [source] [64-bit] [smp:16:16] [ds:16:16:10] [async-threads:1] [jit] [dtrace]

[info] Running WeatherDashboardWeb.Endpoint with cowboy 2.9.0 at 127.0.0.1:4000 (http)
[info] Access WeatherDashboardWeb.Endpoint at http://localhost:4000
Interactive Elixir (1.12.3) - press Ctrl+C to exit (type h() ENTER for help)
iex(1)> [watch] build finished, watching for changes...
让我们导航到 http://localhost:4000。
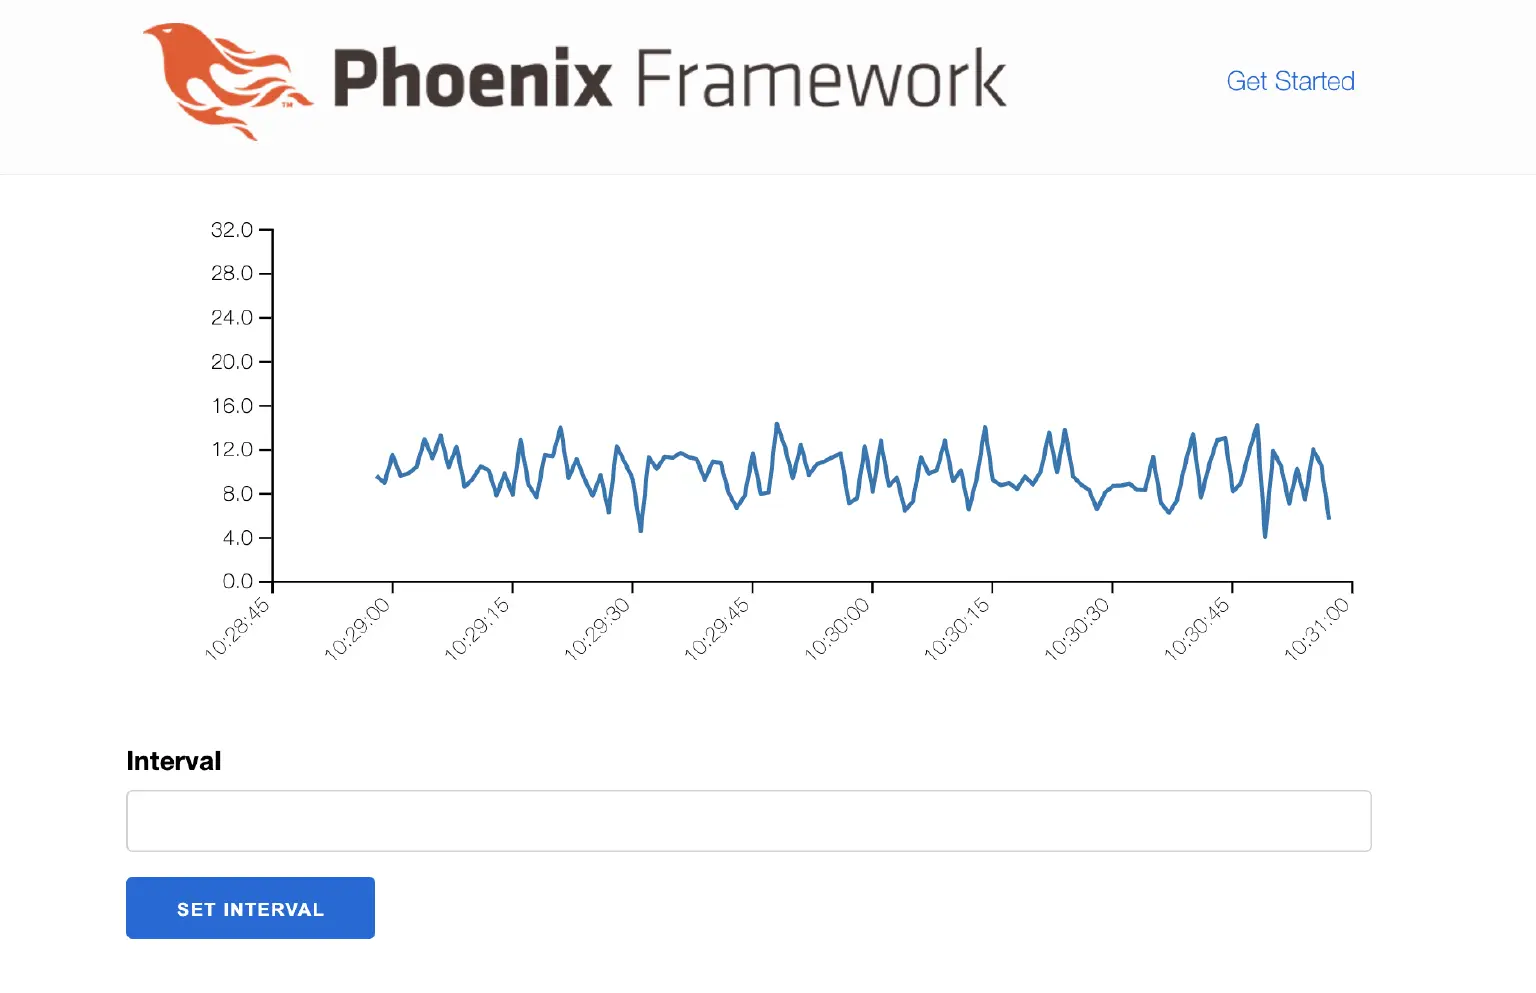
我们看到相应的 LiveView 进程挂载,连接到代理,并开始接收温度数据:
[info] GET /
[info] Sent 200 in 145ms
[info] CONNECTED TO Phoenix.LiveView.Socket in 129µs
  Transport: :websocket
  Serializer: Phoenix.Socket.V2.JSONSerializer
  Parameters: %{"_csrf_token" => "cwoROxAwKFo7NEcSdgMwFlgaZ1AlBxUa6FIRhAbjHA6XORIF-EUiIRqU", "_mounts" => "0", "_track_static" => %{"0" => "http://localhost:4000/assets/app.css", "1" => "http://localhost:4000/assets/app.js"}, "vsn" => "2.0.0"}
[debug] emqtt(emqtt-MacBook-Pro-iaveryanov-86405372ddbf17052130): SEND Data: {:mqtt_packet, {:mqtt_packet_header, 1, false, 0, false}, {:mqtt_packet_connect, "MQTT", 4, false, true, false, 0, false, 60, %{}, "emqtt-MacBook-Pro-iaveryanov-86405372ddbf17052130", :undefined, :undefined, :undefined, :undefined, :undefined}, :undefined}
[debug] emqtt(emqtt-MacBook-Pro-iaveryanov-86405372ddbf17052130): RECV Data: <<32, 2, 0, 0>>
[debug] emqtt(emqtt-MacBook-Pro-iaveryanov-86405372ddbf17052130): SEND Data: {:mqtt_packet, {:mqtt_packet_header, 8, false, 1, false}, {:mqtt_packet_subscribe, 2, %{}, [{"/reports/#", %{nl: 0, qos: 0, rap: 0, rh: 0}}]}, :undefined}
[debug] emqtt(emqtt-MacBook-Pro-iaveryanov-86405372ddbf17052130): RECV Data: <<144, 3, 0, 2, 0>>
[debug] emqtt(emqtt-MacBook-Pro-iaveryanov-86405372ddbf17052130): RECV Data: <<48, 58, 0, 35, 47, 114, 101, 112, 111, 114, 116, 115, 47, 119, 101, 97, 116,
  104, 101, 114, 95, 115, 101, 110, 115, 111, 114, 47, 116, 101, 109, 112, 101,
  114, 97, 116, 117, 114, 101, 131, 104, 2, 110, 6, 0, 180, 251, 188, 158, 125,
...
此外,该页面立即开始更新:
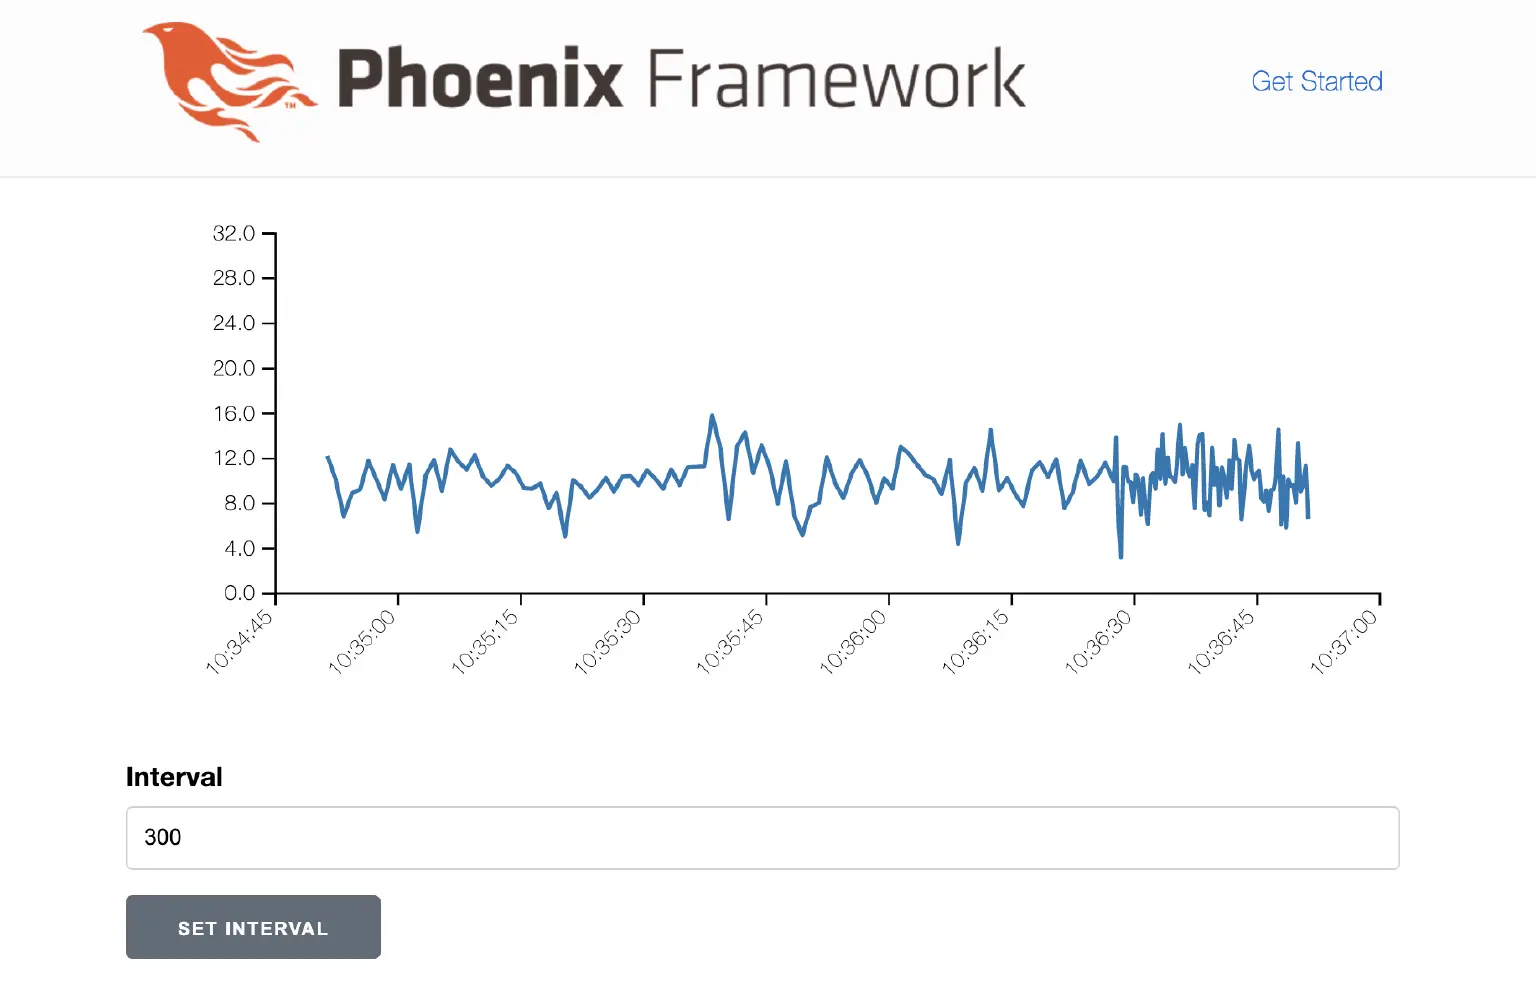
如果我们更新间隔,我们看到设备节点立即收到命令并开始更频繁地更新:
现在我们演示一件重要的事情:让我们停止我们的“设备”节点,稍等片刻,然后重新启动它。 我们看到节点继续以更新的频率发送数据。
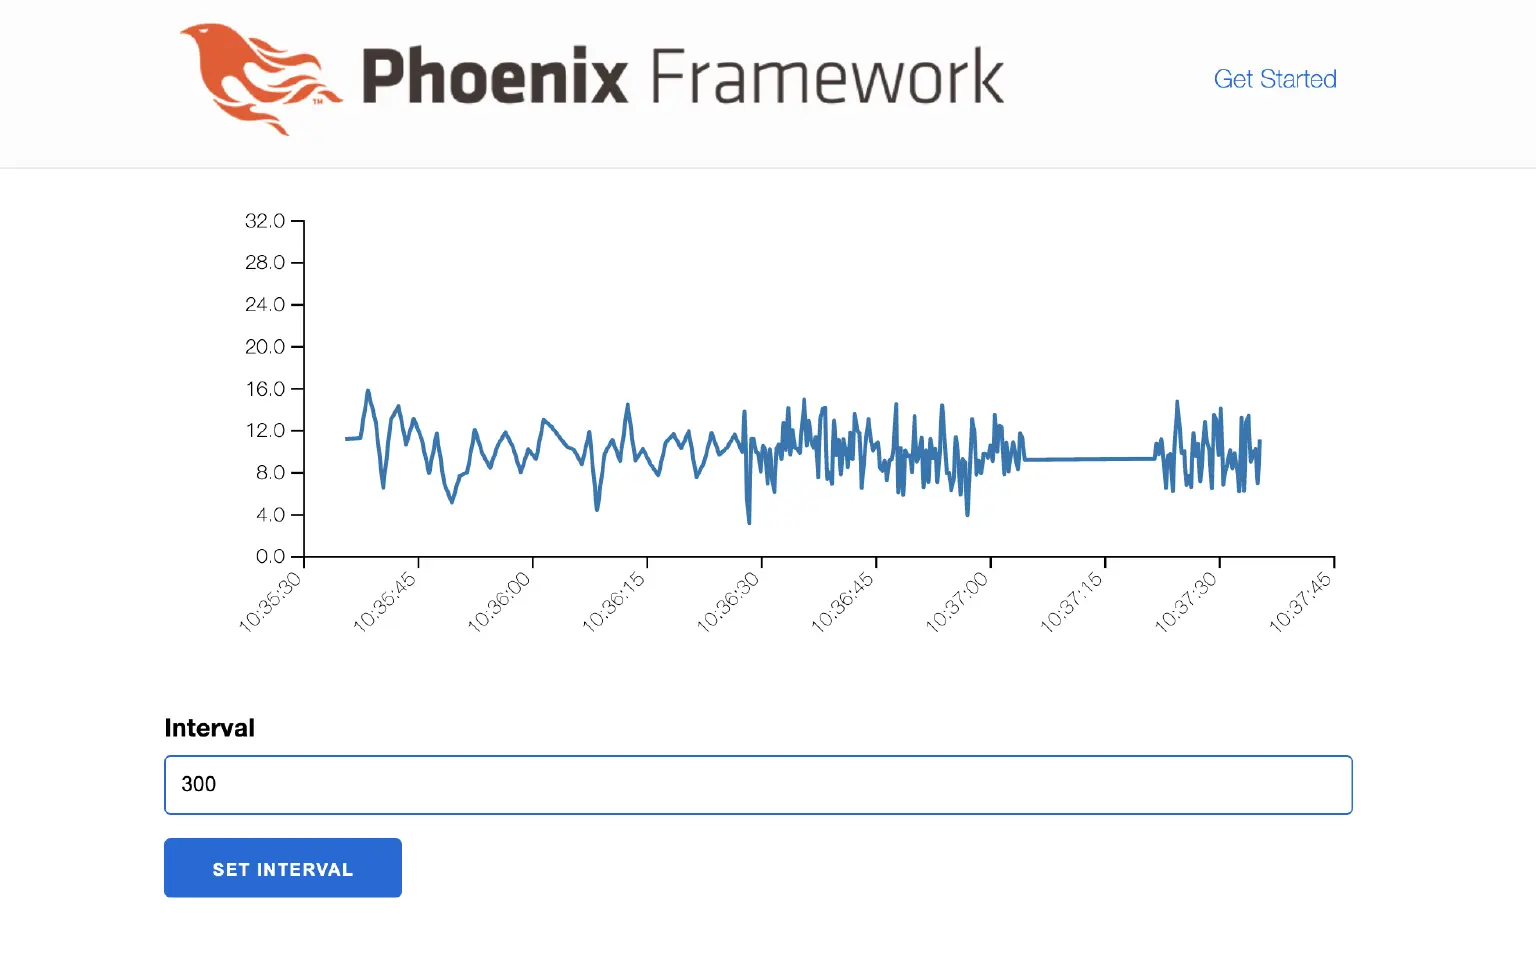
怎么会这样? 其实很简单,秘诀就在于我们发送到命令主题的命令消息的 retain 标志。
:ok = :emqtt.publish(
  socket.assigns[:pid],
  topic,
  interval_s,
  retain: true
)
当我们向主题发送带有 retain 标志的消息时,该消息也成为“默认”消息,并保留在 broker 上。该主题的每个订阅者都会在订阅时收到此消息。
对于可能经常离线且没有任何易于使用的本地存储来保持其状态的嵌入式设备,此功能非常重要。 这是在连接时正确配置它们的方法。
结论
这篇文章介绍了如下内容:
- 展示了一种与嵌入式设备交互的流行方式——MQTT 协议;
- 我们介绍了它在 Elixir 中的用法;
- 我们还展示了 MQTT 的一些优势,例如发布订阅模式和消息保留。
即使在简单的设置中,我们也可能想要使用的强大功能是:
- 将主题数据流传输到数据库中,这样我们可以显示连接历史,无需“手动”保存;
- 使用 MQTT.js 通过 WebSockets 从前端直接连接到 broker。
所有代码都可以在 https://github.com/savonarola/mqtt-article 上查阅。