Unlock Petabyte-Scale Analytics: A Guide to EMQX 6.0's Amazon Redshift Integration

EMQX 6.0 has substantially enhanced its data integration capabilities, introducing crucial connectors to major cloud data platforms, including Amazon Redshift and Google BigQuery. This expansion ensures your IoT data can be routed efficiently to the best analytics engine for your needs.
Amazon Redshift is a fully managed, petabyte-scale cloud data warehouse that enables fast, efficient querying and analysis of large structured and semi-structured datasets, making it a powerful choice for persistent IoT telemetry.
This article will provide a comprehensive, step-by-step guide on how to successfully configure and deploy the EMQX 6.0 integration with Redshift, enabling a reliable pipeline for real-time IoT data warehousing.
Part 1: Prepare the Redshift Environment
- Log in to the AWS Management Console and open Amazon Redshift Query Editor v2.
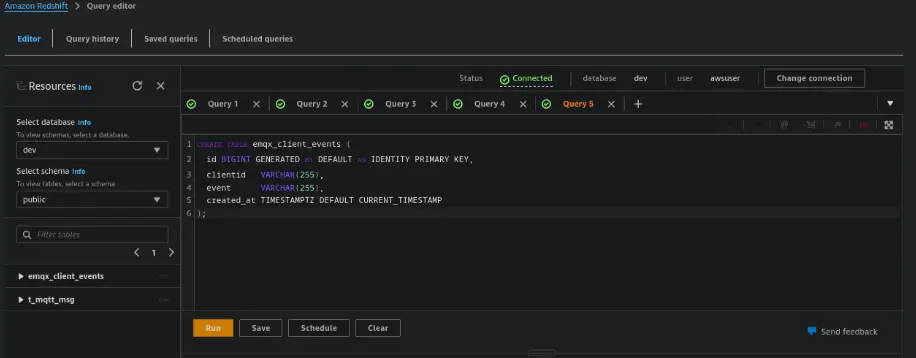
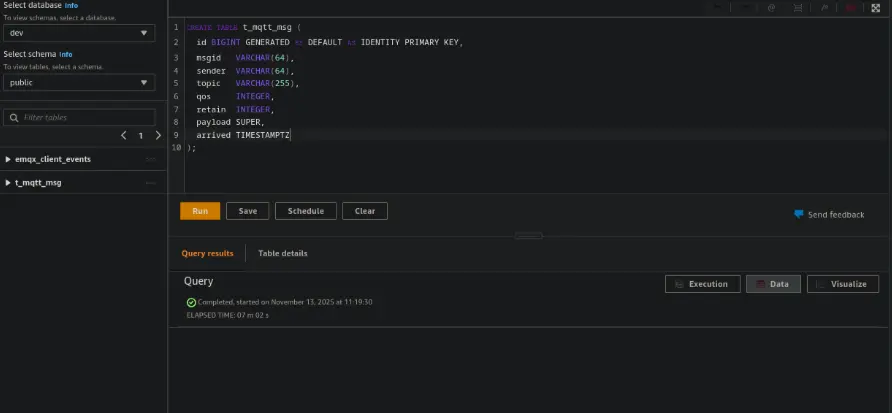
- Create a new database:
CREATE DATABASE emqx_data; - Switch to the database and create two tables:
CREATE TABLE t_mqtt_msg (
  id BIGINT GENERATED BY DEFAULT AS IDENTITY PRIMARY KEY,
  msgid   VARCHAR(64),
  sender  VARCHAR(64),
  topic   VARCHAR(255),
  qos     INTEGER,
  retain  INTEGER,
  payload SUPER,
  arrived TIMESTAMPTZ
);
CREATE TABLE emqx_client_events (
  id BIGINT GENERATED BY DEFAULT AS IDENTITY PRIMARY KEY,
  clientid   VARCHAR(255),
  event      VARCHAR(255),
  created_at TIMESTAMPTZ DEFAULT CURRENT_TIMESTAMP
);
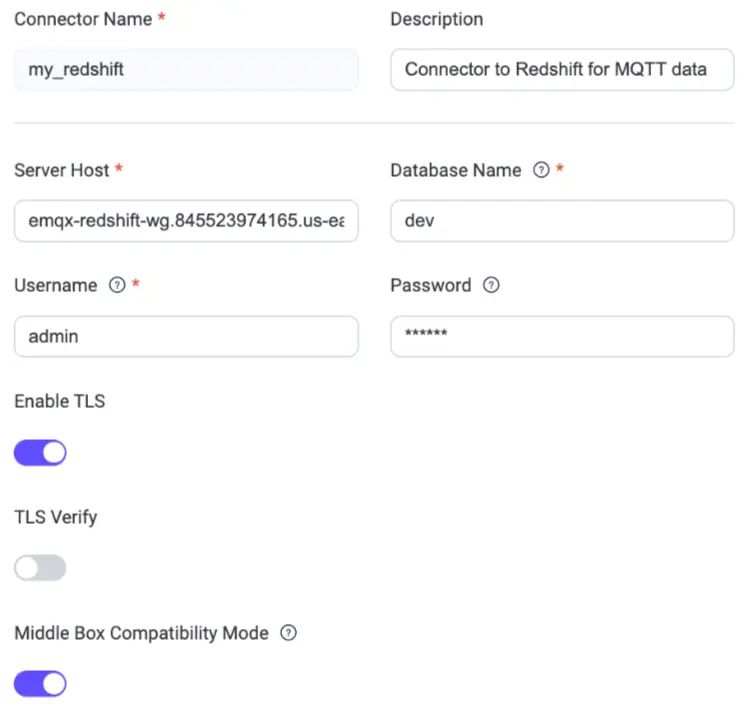
Part 2: Configure the Redshift Connector in EMQX
- Open the EMQX Dashboard
- Navigate to Integration → Connectors → Create
- Select Amazon Redshift as the connector type and click Next
- Fill in your Redshift endpoint, credentials, and test the connection
- Save the connector
Part 3: Create a Rule to Ingest MQTT Messages
Step 1. Define the Rule SQL
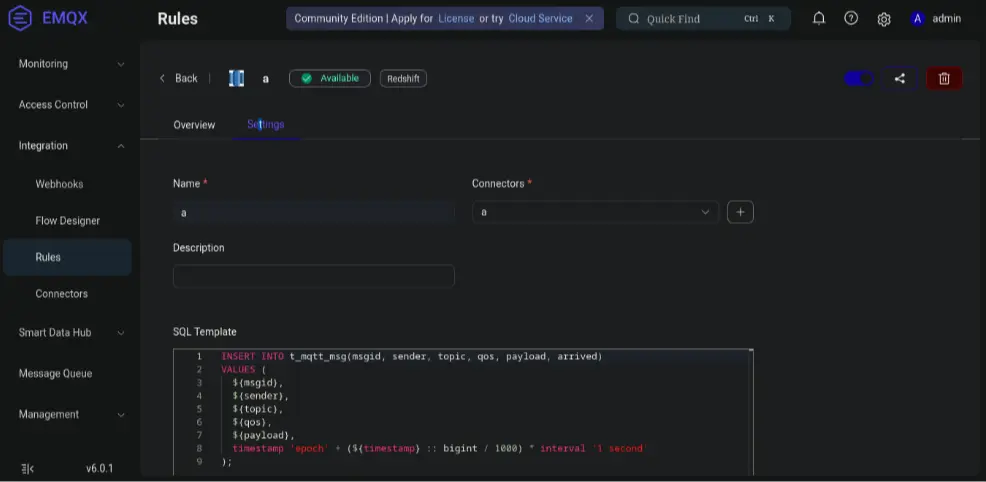
Navigate to Integration → Rules → Create, then set:
- Rule ID:
store_mqtt_msg - Rule SQL:
SELECT
  id as msgid,
  clientid as sender,
  topic,
  qos,
  payload,
  timestamp
FROM
  "sensors/#"
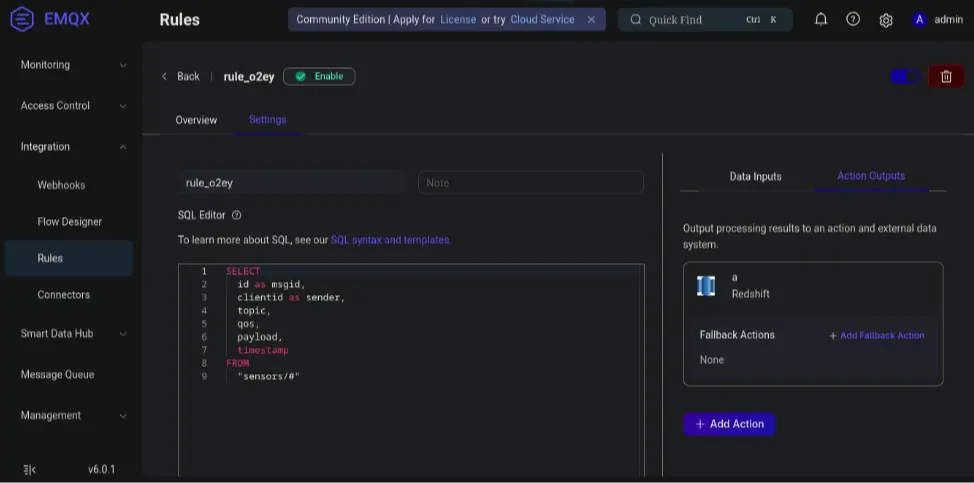
Step 2. Add the Redshift Action
- Click Add Action → Redshift → Create New Action.
- Configure the following:
INSERT INTO t_mqtt_msg(msgid, sender, topic, qos, payload, arrived) VALUES ( ${msgid}, ${sender}, ${topic}, ${qos}, ${payload}, timestamp 'epoch' + (${timestamp} :: bigint / 1000) * interval '1 second' - Click Test Connection → Create → Add to Rule → Save.
In the Rules → Overview page, increased Matched and Success (with Failed = 0) indicate the message reached EMQX and the rule was executed successfully.
Part 4: Test the Integration
Step 1. Publish a Test MQTT Message
Use MQTTX to send a test message:
- Open MQTTX and connect to your EMQX broker.
- Create a new Publish tab.
- Set the Topic to
sensors/a. - Set the Payload to
hello. - Click Publish to send the test message.
Step 2. Verify Data in Redshift
Run this query in the Redshift Query Editor:
SELECT sender, topic, payload, arrived
FROM t_mqtt_msg
ORDER BY arrived DESC
LIMIT 5;
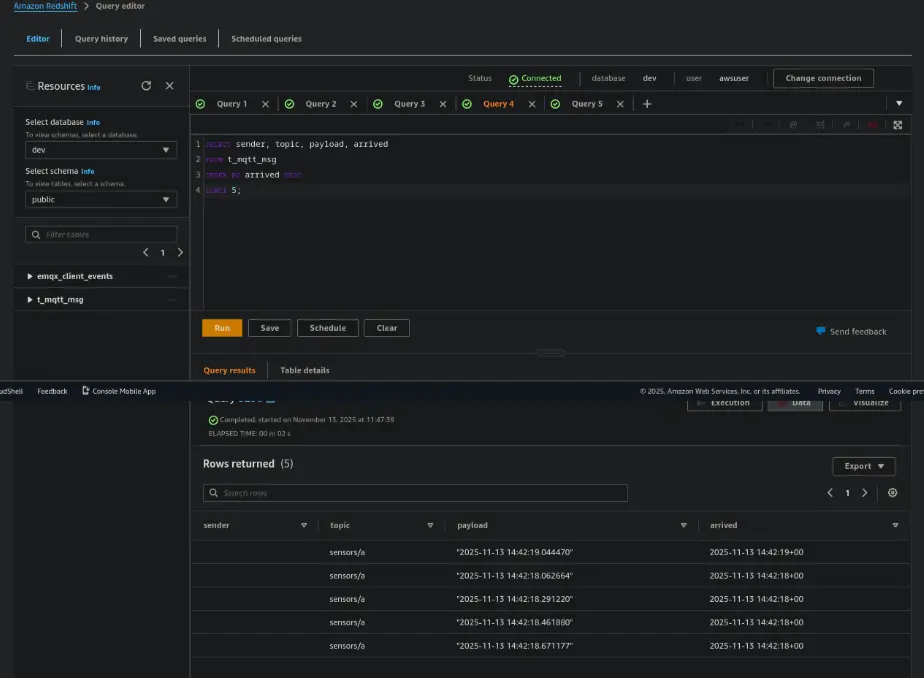
You should now see the message ingested into Redshift in real time.
Summary
You’ve now built a fully operational, real-time data pipeline from MQTT → EMQX → Redshift, without needing heavy ETL tools or complex transformations. With EMQX's built-in Redshift connector, IoT data flows seamlessly into your analytics platform, ready for dashboards, machine learning, or operational monitoring.
Unlock the full value of your streaming MQTT data and start making smarter, faster decisions powered by real-time insights.