A Guide on Accessing CoAP Devices with EMQX
Introduction
CoAP is an IoT protocol that facilitates communication among low-consumption, low-power devices typically found on constrained networks. Due to these factors, CoAP is designed to be concise and utilizes the UDP protocol for data transmission, making it well-suited for constrained network environments. CoAP works with abstracted resources in an M2M network, similar to HTTP operations, allowing for synchronous and asynchronous information exchange between constrained devices in a simple and efficient manner.
CoAP works well in constrained networks. However, it doesn't adapt well when these networks need to communicate with external networks. Additionally, since CoAP is mainly designed for M2M networks, it lacks support for resource management centers (addressed in the CoAP-based LwM2M protocol with concepts like resource registration and services).
This problem can be solved using the EMQX message broker. This article describes how to use EMQX to access the CoAP protocol and enable the communication of CoAP devices with external networks.
CoAP Protocol Access Methods in EMQX 5.0
For CoAP devices that need to communicate with external networks, using EMQX as a broker makes it easy to:
- Authenticate devices and reject data from untrustworthy devices.
- Manage resource permissions, including specifying different resource read/write permissions for different devices.
- Establish a data transfer hub between CoAP devices on different networks.
- Integrate with other applications, such as CoAP management applications, data analysis applications, and data access between CoAP devices and networks.
EMQX offers two different CoAP access methods to accommodate a wide range of CoAP business scenarios. These methods provide straightforward access and robust support without requiring any modifications to the CoAP protocol. The cost of accessing EMQX is also minimal for current CoAP devices and applications.
Connection Mode
In EMQX 5.0, Connection Mode is provided to support the life cycle management of CoAP clients. For example:
- Use
clientid,username, andpasswordto create an authenticated CoAP Connection, and return an authorized Token. - Use
clientidandtokento destroy a CoAP connection.
The format of its URI address is:
{Method} {Type}://{Host}:{Port}/mqtt/connection?{QueryString}
For example, create a CoAP connection using a username and password:
POST coap://127.0.0.1:5683/mqtt/connection?clientid=test&username=user1&password=pwd
Connection Mode is optional when there is no need to manage the CoAP Client. However, it is useful when the CoAP client and EMQX communicate over a public network. By using the username and password provided during connection creation, a certain level of security can be ensured.
PubSub Mode
This mode allows interoperability between the CoAP client and the MQTT protocol in EMQX. This includes:
- The CoAP client publishes a message to a specific topic.
- The CoAP client subscribes to a topic and receives messages from that topic.
In this mode, the format of the URI address is:
{Method} {Type}://{Host}:{Port}/ps/{topic}?{QueryString}
For instance, to publish a Hello, CoAP! message to the test/topic topic, the CoAP client would use this request format:
POST coap://127.0.0.1:5683/ps/test/topic?qos=1

Hello, CoAP!
The request format for the CoAP client to subscribe and receive messages from the test/topic topic is:
GET coap://127.0.0.1/ps/test/test
This mode is the main way for EMQX to provide CoAP Client with communication with MQTT Protocol.
Configuring CoAP Gateway in EMQX
In EMQX 5.0, the CoAP gateway can be configured and enabled through the Dashboard, HTTP API, and configuration file emqx.conf. This section will illustrate the operating steps by using the Dashboard configuration as an example.
Default Configuration for Unencrypted Communication Scenarios
On the EMQX Dashboard, click Extensions -> Gateways on the left navigation menu. On the Gateway page, all supported gateways are listed. Locate CoAP and click Setup in the Actions column. Then, you will be directed to the Initialize CoAP page.

On this Basic Configuration page, we can choose whether to enable the Connection mode. The default is off Connection Required = false.
After confirming the connection mode, you can continue with the settings. If you don't need extensive customization, you can enable the CoAP Gateway in just 3 clicks:
- Click Next in the Basic Configuration tab to accept all the default settings.
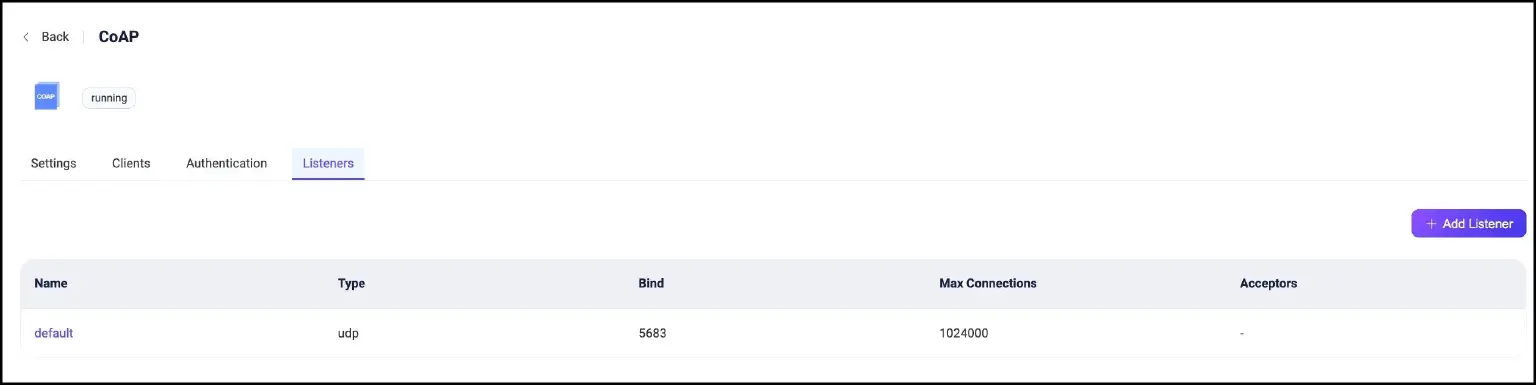
- Then you will be directed to the Listeners tab, where EMQX has pre-configured a UDP listener on port
5683. Click Next again to confirm the setting. - Then click the Enable button to activate the CoAP Gateway.
Encrypted Communication Scenarios
By default, one UDP listener with the name of default is already configured on port 5683, which only supports plain UDP data transport. EMQX’s CoAP protocol gateway also supports the DTLS secure transport layer protocol, which can be configured with one-way/bidirectional authentication.
Starting from EMQX 5.0, it is very simple to configure it via the EMQX Dashboard. You can click the Settings button of CoAP Gateway for more customized settings. Then click Add Listener to add a new listener.
For example, we added a DTLS type listener named default-tls and bound it to port 5684:
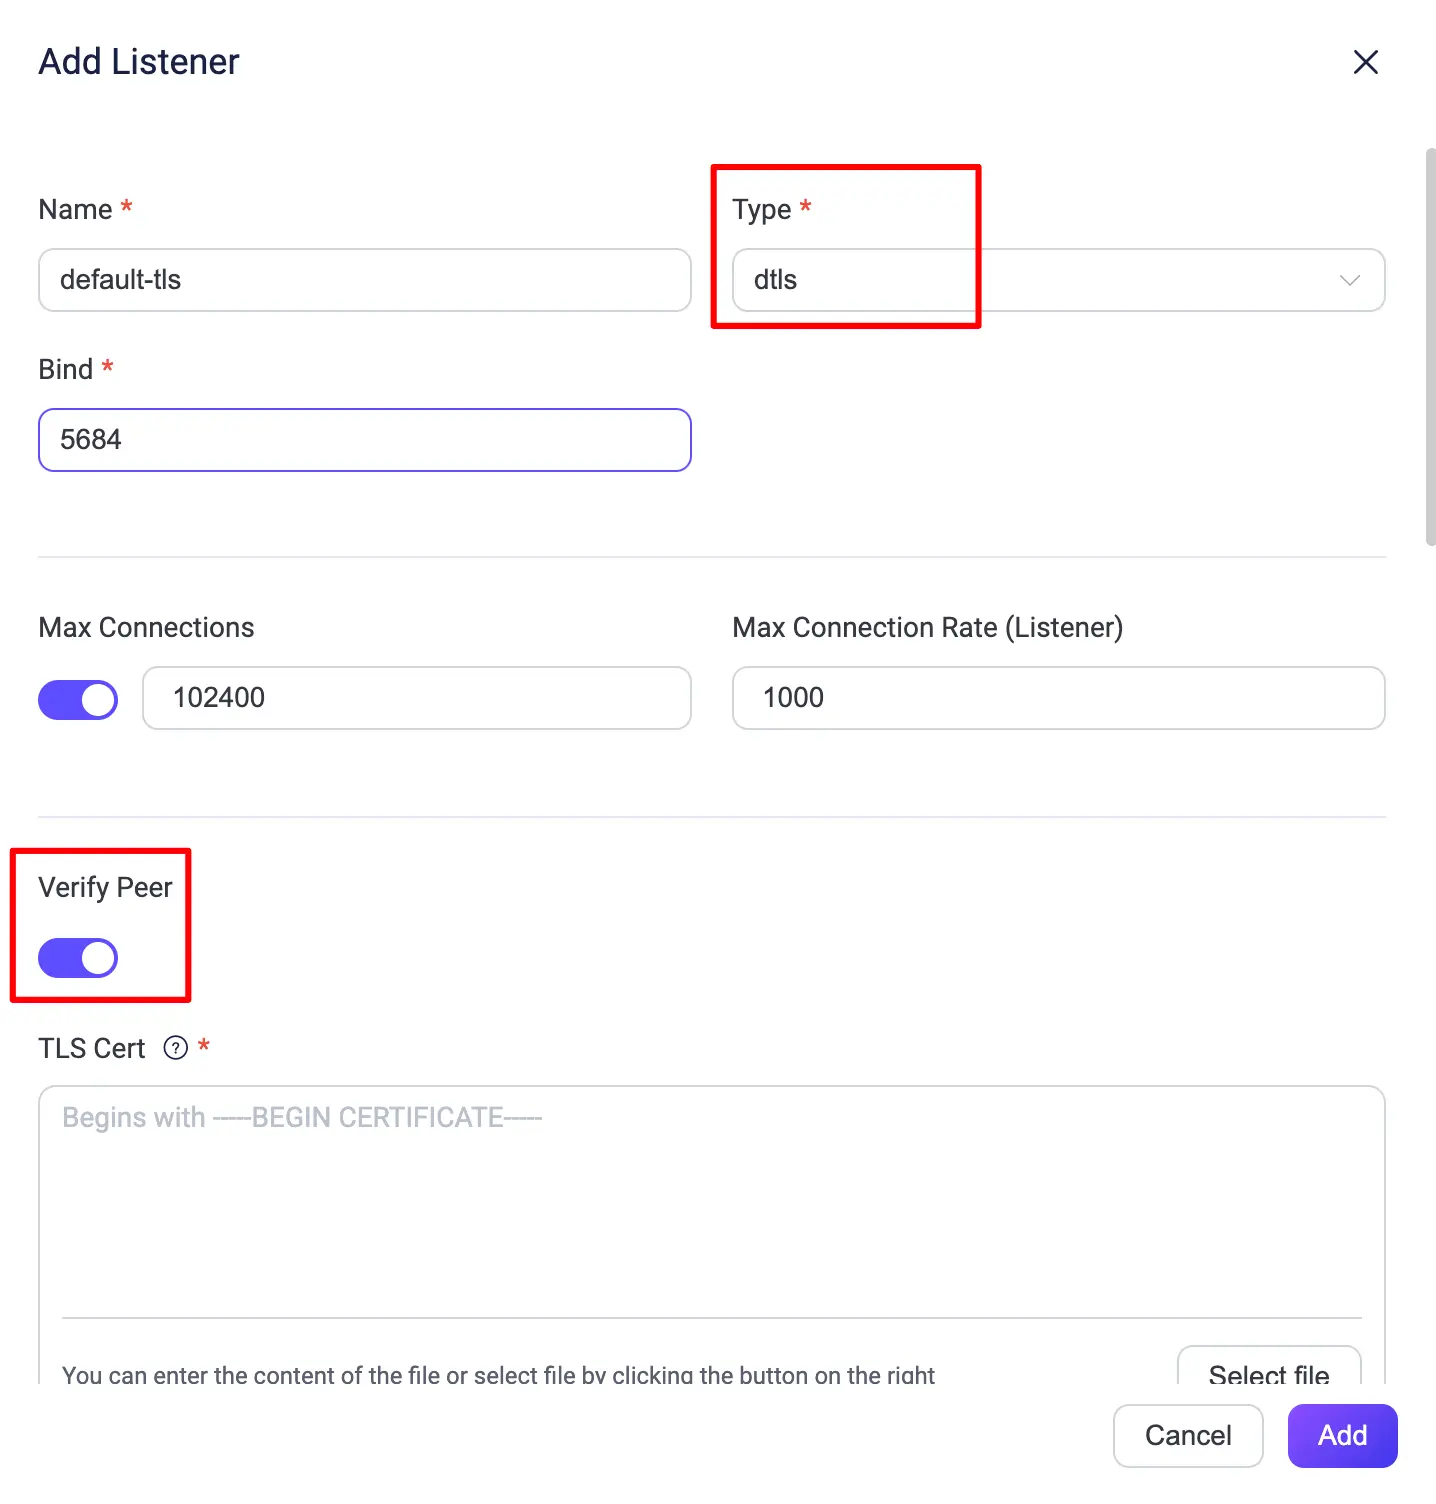
You can set whether to enable the Verify Peer by setting the toggle switch to enable bidirectional authentication or not. But before that, you need to configure the related TLS Cert, TLS Key, and CA Cert information by entering the file's content or uploading with the Select File button.
Testing and Verification
Installing the CoAP Test Client
coap.me
If a public IP is configured on EMQX’s CoAP protocol gateway, you can use the online website coap.me to test it. Refer to the website for details on how to use this.
libcoap
libcoap is a C library with full support for all CoAP-related standards. This comes with a client application and has generally been regarded as the standard validation client for CoAP.
On most Linux systems, this can be installed using the system package manager. On macOS, it can be installed using brew. On other platforms, this may require manual compilation of the source code.
In this example, we use a pre-compiled libcoap image:
$ docker run -it --rm --name libcoap --network host heeejianbo/my-libcoap:1.0
By running the coap-client command within it, we can see the version of the CoAP Client currently used:
$ coap-client
coap-client v4.3.1 -- a small CoAP implementation
Copyright (C) 2010-2022 Olaf Bergmann <bergmann@tzi.org> and others

Build: v4.3.1-4-g02b7647
TLS Library: OpenSSL - runtime 1.1.1t, libcoap built for 1.1.1t
(DTLS and TLS support; PSK, PKI, PKCS11, and no RPK support)
Installing MQTT Client
In order to test the interaction between the CoAP Client and the MQTT protocol, we also need to install an MQTT client. It is recommended to use MQTTX CLI.
For the installation method, see: MQTTX Download
Testing the PubSub Mode
Publish Messages
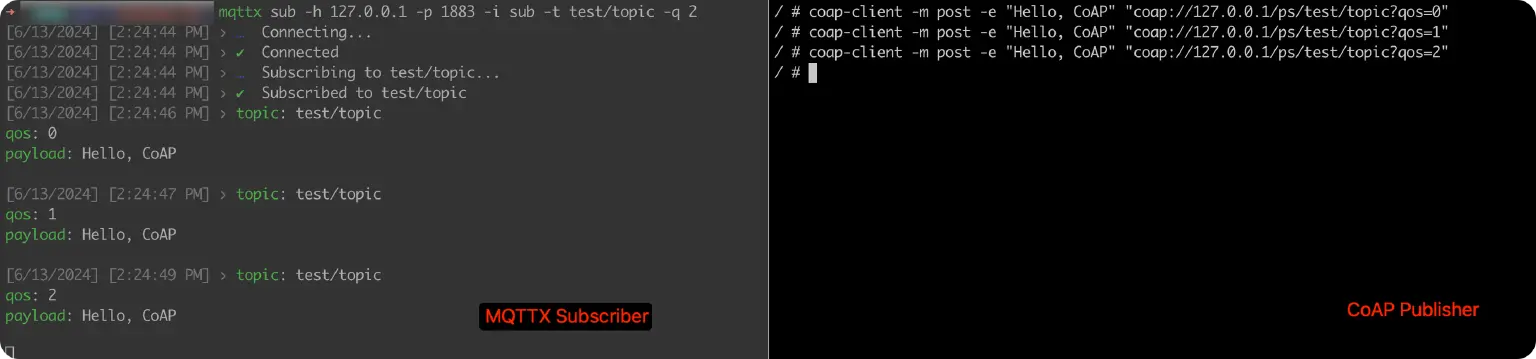
We can test the situation where CoAP sends messages as a publisher and MQTTX receives messages as a subscriber.
Create a client for MQTTX with the following command and subscribe to the test/topic:
mqttx sub -h 127.0.0.1 -p 1883 -i sub -t test/topic -q 2
Then use coap-client to publish 3 messages to test/topic:
coap-client -m post -e "Hello, CoAP" "coap://127.0.0.1/ps/test/topic?qos=0"
The test results are shown in the figure below. As we can see from the left picture, mqttx, as a subscriber, successfully received these three messages of different QoS levels.
Receive Messages
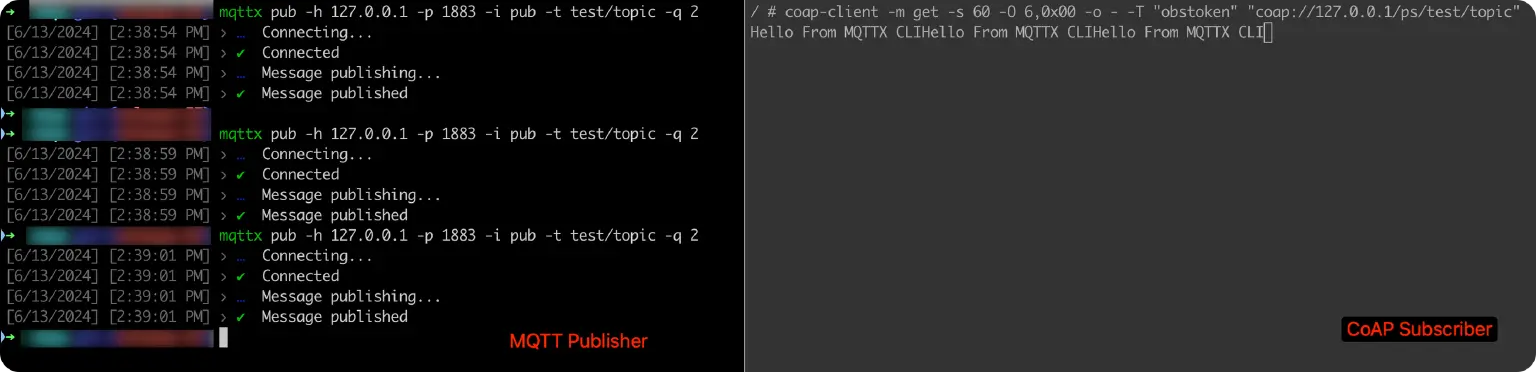
Similarly, we can also test MQTTX as a publisher, with CoAP Client as the subscriber receiving messages.
Firstly, use the following command to create a CoAP subscriber, and wait for 60s to receive messages on the test/topic topic:
coap-client -m get -s 60 -O 6,0x00 -o - -T "obstoken" "coap://127.0.0.1/ps/test/topic"
Then, perform three message publications to the test/topic topic through MQTTX:
mqttx pub -h 127.0.0.1 -p 1883 -i pub -t test/topic -q 2
The test results are shown in the figure below, the CoAP Client on the right received these three Hello From MQTTX messages:
Testing the Connection Mode
In connection mode, the CoAP Client needs to create a Connection with EMQX and obtain an authorized credential for subsequent message publish and receive, otherwise, it will get a permissions error.
Enable Connection Mode
Enter the Settings page of the CoAP Gateway, modify Connection Required to true to enable the connection mode, and click the Update button to save the configuration.

Create a Connection
The CoAP Client can create a connection by requesting /mqtt/connection, for example:
coap-client -m post -e "" "coap://127.0.0.1/mqtt/connection?clientid=123&username=adm
in&password=public"
After the connection is successfully created, a Token will be returned. As shown in the figure below, the Token is 769721171

Send Messages in Connection Mode
Sending messages in connection mode requires Token and ClientId parameters, for example:
coap-client -m post -e "Hi, Connection Mode" "coap://127.0.0.1/ps/test/topic?clientid=123& token=769721171"
The test results are as follows:

If an incorrect Token is used, it will return 4.01 indicating that the operation has not been authorized:

Conclusion
The process of integrating CoAP and MQTT protocol devices with EMQX has been successfully completed. EMQX, a robust open-source distributed cloud-native MQTT platform, offers comprehensive support for the CoAP and LwM2M protocols in addition to the MQTT protocol. This inclusive support facilitates seamless access to a diverse range of end devices, enhancing the system's versatility and accessibility.
For more details on using EMQX, please refer to the EMQX Enterprise documentation.