Microduck × Device Agent: Giving the Robot a Cloud-Based Brain (Part 1)

Introduction
Microduck is a compact bipedal robot designed for Physical AI, reinforcement learning, and robotics development. It can walk, turn, and perform a variety of movements using reinforcement learning policies, enabling a range of interesting applications.
This series explores how to extend Microduck with Device Agent, connecting it via MQTT to cloud-hosted LLMs, web or mobile applications, and other services to enable more advanced and engaging edge-cloud collaboration scenarios.
We will first introduce Microduck’s hardware and software architecture, then conduct a basic MQTT-based robot control experiment in the MuJoCo simulation environment: sending control commands from a third-party client to make the robot move in the simulated environment. We will then discuss how to extend the same design to a physical robot through an on-device adapter service, mqttd.
In this first part of the series, you will:
- Set up the Microduck simulation environment
- Connect to the EMQX Public Broker and publish velocity commands using a Python script
- Understand the architecture and security mechanisms required to move from simulation-based control to physical robot control
Getting to Know Microduck
Before getting started, let’s take a closer look at Microduck’s components and how a movement command is ultimately translated into robot motion.
Product and Specifications
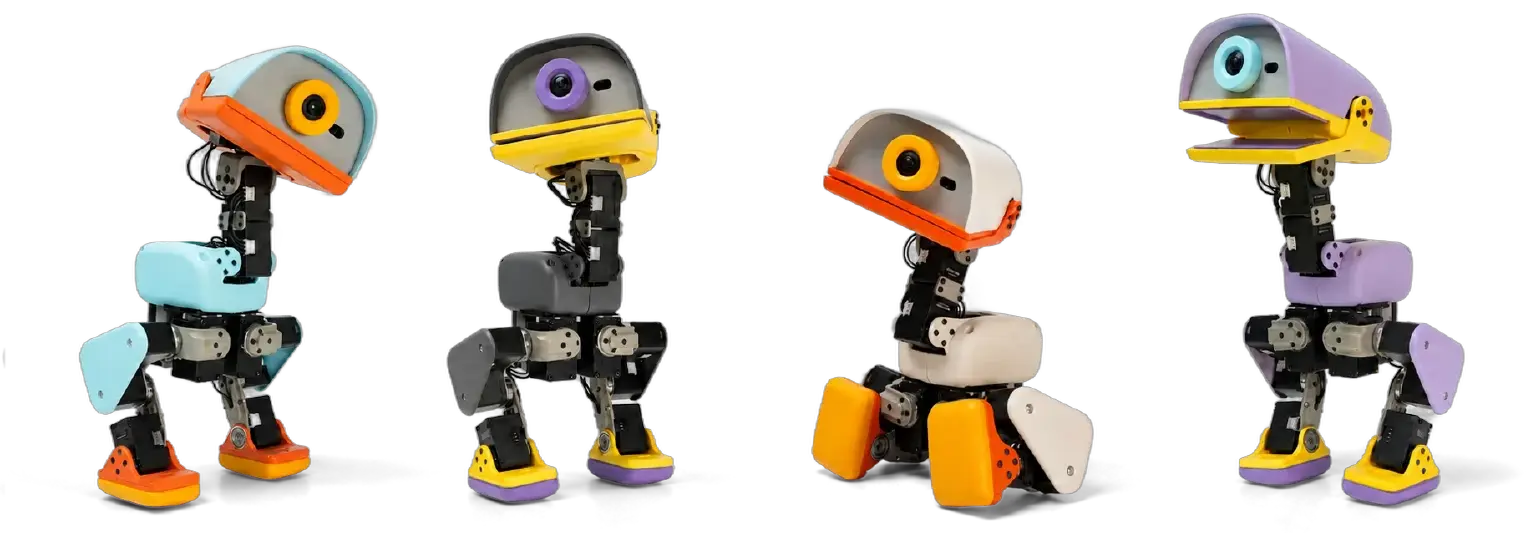
Microduck is a compact bipedal robot developed by Pollen Robotics. It stands approximately 25cm tall and weighs less than 800g. It uses a Rockchip RK3566 with an AI accelerator as its computing platform and runs Linux.
| Component | Public Specifications | Role |
|---|---|---|
| Computing Platform | Rockchip RK3566, 1 GB RAM, 32 GB storage | Runs policy inference, robot services, and networking programs |
| Joint Actuators | 15 motors | Drive the legs, head/neck, and mouth mechanisms; the motion policy outputs actions for 14 joints |
| Motion Sensors | 2 IMUs, located in the body and head | Provide robot orientation and head motion data |
| Vision | Front-facing camera | Provides visual input and remote video capabilities |
| Distance Sensing | 8×8 ToF LiDAR | Provides distance data across multiple regions |
| Audio | Microphone and speaker | Supports audio input and sound playback |
| Near-Field Interaction | 2 NFC antennas, located in the head and mouth | Enables interaction with tags and objects |
| Power | Removable NP-F550 battery | Provides approximately one hour of runtime, depending on workload |
According to Pollen Robotics’ current public information, specifications such as camera resolution and field of view, LiDAR measurement range, and wireless connectivity are still being finalized. Therefore, this article focuses on officially confirmed capabilities rather than specific sensor models used in development prototypes.
The Microduck servos and body IMU communicate over the same hardware bus, which means the real-time control process must have exclusive access to the bus. Other programs send movement commands through a local control interface rather than accessing the serial port directly.
Capabilities and Motion
Microduck’s motion interface supports forward/backward movement, lateral movement, and rotational velocity. Depending on the loaded policy, it can also perform actions such as sitting and standing, recovering from a fall, lowering its head to pick up objects, kicking a ball, performing a forward roll, and roller skating. However, the ability to express a particular movement through the interface does not guarantee that every policy can perform it reliably. Actual capabilities depend on the loaded model.
For this experiment, continuous velocity control is the most suitable starting point. A control client, such as a cloud management console or mobile application, continuously sends forward velocity and angular velocity commands over MQTT. The motion policy then translates these movement intents into joint actions in real time.
One-shot skills can also be triggered through MQTT, but they should be introduced gradually after basic velocity control, access control, and safety mechanisms are in place.
Software Architecture
Microduck’s software stack can be understood as three layers:
Training & Policy: microduck_rl [MuJoCo / PPO / ONNX]
                              ↓
Robot Runtime: robotd [Observations / Policy Inference / Safety / 50 Hz Control]
                              ↓
Hardware: Motors [IMU / Camera / Audio / ToF]
At the training and policy layer, microduck_rl uses MuJoCo to build a digital model of Microduck. MuJoCo is an open-source physics simulator that models dynamics such as joints, actuators, gravity, and contact, allowing policies to be repeatedly trained and validated in a virtual environment.
Microduck’s gait is learned through reinforcement learning. A policy can be understood as a function that maps observations to actions:
- Input: Robot orientation, joint states, target velocity, and other relevant information.
- Output: Joint actions for the next control cycle.
MuJoCo executes the actions and generates a new state. A reward function evaluates the result based on factors such as whether the robot remains stable and follows the target velocity. PPO (Proximal Policy Optimization) is the reinforcement learning algorithm used to train the policy. It updates the neural network parameters based on trajectories and rewards collected through interactions between the policy and simulation environment, while limiting the size of each update to improve training stability.
Through repeated optimization, the policy gradually learns to translate velocity targets into coordinated joint movements.
Once training is complete, the policy is exported as an ONNX model. ONNX is an open machine learning model representation format that stores a neural network’s computation graph and parameters, allowing the model to be deployed independently of the training framework. At runtime, only model inference is performed; PPO training is no longer involved.
At the robot runtime layer, robotd reads IMU and joint states at 50 Hz, constructs the model input, and performs ONNX inference. The resulting outputs are then converted into joint targets with filtering and safety constraints applied.
At the hardware layer, the motors execute the joint targets, while the sensors provide updated state information for the next control cycle. In simulation, MuJoCo replaces the physical actuators, sensors, and environment while preserving the same closed-loop process: observation → policy inference → action.
MQTT, as introduced in this article, operates outside the real-time control loop. It carries movement intents such as target velocities rather than directly controlling individual joints or motors. The motion policy is responsible for translating these intents into coordinated gaits.
In the following sections, we will first connect MQTT to the MuJoCo environment and visually validate the complete control path.
Controlling the Simulated Robot via MQTT
In this section, we use the open-source project hjianbo/microduck_demo_part1 to launch the Microduck MuJoCo simulation and publish velocity commands using Paho MQTT.
Architecture Overview
In this simulation, MQTT carries movement intents from a third-party control client to the Microduck policy. Before starting the simulation, let’s first look at the control flow and message format used by the demo.
The simulation control path consists of a Python control script, an EMQX Broker, and an MQTT simulation adapter:
- Python control script publishes velocity intents via MQTT.
- EMQX Broker forwards the messages.
- MQTT simulation adapter updates the latest velocity intent.
- Microduck ONNX policy generates joint actions.
- MuJoCo simulator executes the actions.
The control client does not need to understand MuJoCo’s simulation loop or call the policy directly. As long as it uses the Topic and Payload generated for the same session, it can send control commands from another computer or application.
The demo uses the following default configuration:
Broker: broker.emqx.io
Port: 1883
Topic: microduck/demo/{sessionId}/cmd/velocity
QoS: 0
Retain: false
During initialization, the project generates a random
sessionIdand stores it locally in.demo/session.env. This prevents different users from interfering with each other when using the public MQTT broker.
The velocity message contains three fields:
| Field | Description | Unit | Positive Direction | Allowed Range |
|---|---|---|---|---|
vx | Forward velocity | m/s | Forward | 0–0.25 |
vy | Lateral velocity | m/s | Left | Fixed at 0 for the current policy |
yaw | Angular velocity | rad/s | Counterclockwise | -0.8–0.8; must be combined with positive vx |
For example, the following message commands the robot to move forward at a target velocity of 0.25 m/s:
{
  "vx": 0.25,
  "vy": 0.0,
  "yaw": 0.0
}
These values represent movement intent, not a guarantee of the robot’s actual velocity. The BEST_alpha_walking.onnx policy used in this article has been validated for forward movement and turning while moving forward, but it does not reliably support backward movement or turning in place. The official Simulator also disables lateral movement input. Therefore, the demo project exposes only movement combinations that have been validated in practice.
broker.emqx.io:1883is a public, unencrypted demo service. Messages may be visible to other users and should only be used for prototyping. For production deployments, use a private broker with TLS, dedicated device credentials, Client ID-based identity binding, and strict Topic-level access control.
Setup and Startup
Before you begin, make sure you have Git, Python 3.12, uv, and a desktop environment capable of opening a MuJoCo window.
Clone the demo project:
git clone --recurse-submodules \
  https://github.com/hjianbo/microduck_demo_part1.git
cd microduck_demo_part1
Then initialize the environment with a single command:
./scripts/bootstrap.sh
The initialization script downloads the pinned versions of microduck_rl and the Microduck Simulator, installs the Python dependencies specified by the official lockfile, downloads and verifies the ONNX walking policy, installs Paho MQTT, and generates a random session configuration. Re-running the command preserves the existing sessionId.
Start the simulation in the first terminal:
./scripts/run_simulator.sh
Once started successfully, the terminal displays the 61-dimensional policy input, 14-dimensional action output, broker address, and current session Topic. A MuJoCo window will also open and display the Microduck robot.
Sending Control Commands
In a second terminal, send a forward command for three seconds:
./scripts/send.sh forward --duration 3
The script uses MQTT to publish velocity intents at a default rate of 10 Hz. In addition to moving straight ahead, the robot can turn left or right while moving forward:
./scripts/send.sh forward-left --duration 3
./scripts/send.sh forward-right --duration 5
./scripts/send.sh stop
For example, the forward-right preset continuously publishes velocity commands for 5 seconds:

To adjust the speed and turning rate, you can override vx and yaw:
./scripts/send.sh forward \
  --duration 3 \
  --vx 0.2 \
  --yaw 0.5
Both the publisher and the simulation receiver validate the parameters. Negative vx, non-zero vy, and turning commands without positive vx are explicitly rejected. This prevents the demo from presenting movements that the current policy cannot reliably perform as supported capabilities.
How It Works
The demo project does not modify Microduck’s motion policy. Instead, it adds an MQTT adapter layer around the official simulation program. The implementation can be understood through four key components:
| Component | Key Files | Responsibility |
|---|---|---|
| Environment Initialization | scripts/bootstrap.sh | Fetches pinned submodule versions, installs Python packages, prepares the ONNX model, and generates the session configuration |
| MQTT Publisher | scripts/send.sh, send_velocity.py | Parses movement parameters and publishes velocity messages using Paho MQTT |
| MQTT Receiver | mqtt_control.py | Subscribes to the session Topic, parses JSON messages, and stores the latest movement intent |
| Simulation Adapter Runner | build_runner.py, generated mqtt_infer_policy.py | Connects the MQTT receiver to the official MuJoCo inference loop |
When bootstrap.sh runs, it performs the following steps:
- First, it initializes the pinned versions of the
microduck_rland Microduck Simulator submodules. - It then installs dependencies using the lockfile included with
microduck_rl. Because the simulation models are stored in Git LFS, the script also downloads the specified ONNX model file and verifies its SHA-256 checksum. This prevents an LFS pointer file from being mistakenly loaded as the model. - Finally, it generates a random
sessionIdin.demo/session.env. Both the publisher and receiver read this configuration, so they automatically use the same Broker and Topic.
send.sh provides a convenient command-line entry point. After loading the session configuration, it:
- Calls the
microduck-sendcommand, which maps to themain()function insend_velocity.py. - Connects to the Broker and converts preset actions such as
forwardandforward-leftintovx,vy, andyawvalues. These values are encoded as JSON and published to the velocity Topic for the current session. The publisher does not import MuJoCo or directly invoke the motion policy. - Once connected, the simulation-side
mqtt_control.pysubscribes to the same MQTT Topic. - The MQTT network thread receives messages and performs JSON parsing, field validation, and velocity clamping. It only handles incoming data; it does not advance MuJoCo or execute the policy in the network thread.
- The latest command is written to a thread-safe Mailbox.
The MuJoCo simulation and MQTT network loop run in separate threads. On each iteration, the simulation control loop checks the Mailbox. When a new command is available, it passes the movement intent to the official policy interface.
The following diagram illustrates the flow:
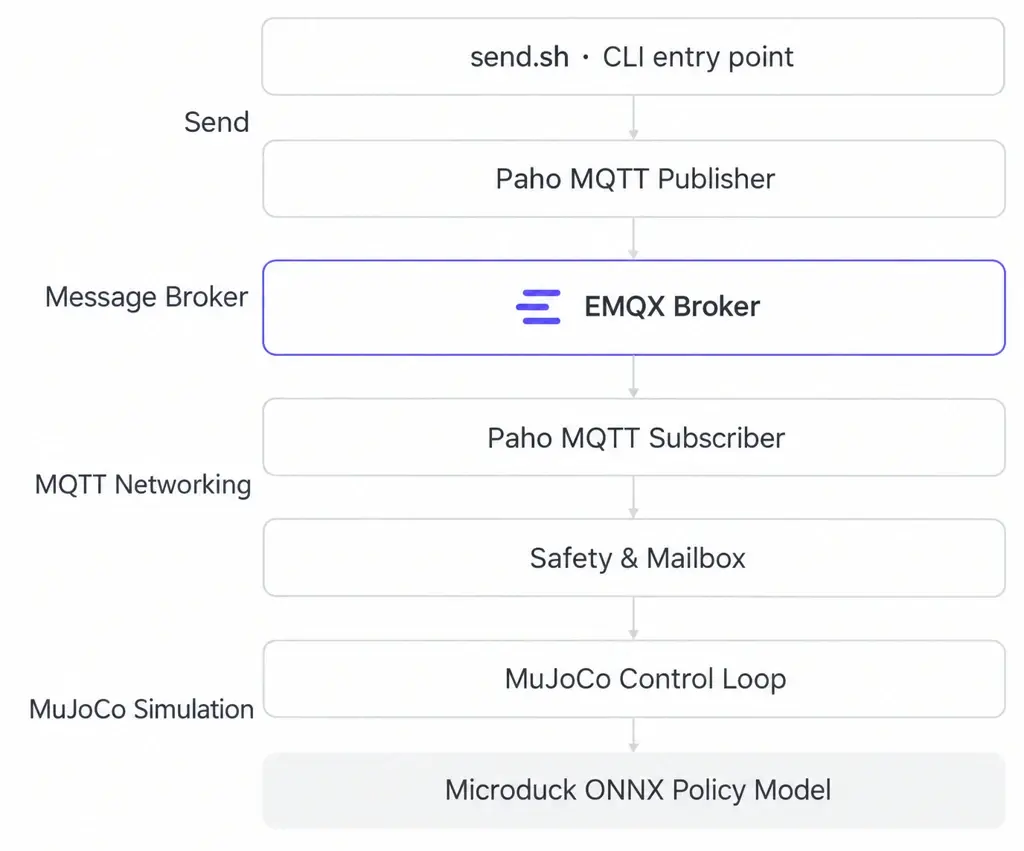
The Mailbox stores only the latest velocity intent, so the simulation loop does not need to handle MQTT connections, JSON parsing, or message queue details. This separation also makes the example a true MQTT-based control architecture: there are no direct function calls between the sending script and MuJoCo; the two communicate exclusively by exchanging messages through a Topic on the Broker.
To keep the demo reproducible, the project does not modify the upstream submodules directly. Instead, build_runner.py generates the MQTT adapter runner based on the pinned version of the official infer_policy.py. During generation, it checks for expected code markers. If the upstream script structure changes in the future, initialization will fail explicitly and indicate that the adapter needs to be updated. This prevents the demo from running against incompatible code.
From Edge Control to Edge-Cloud Collaboration: mqttd + Device Agent
The simulation experiment demonstrates how MQTT can be used to control a robot’s movement and direction. To apply this approach to a more formal Microduck runtime environment, we also need a device-side adapter service that respects the existing runtime boundaries. In this article, we refer to this proposed, yet-to-be-implemented component as mqttd.
According to Microduck’s current official architecture, a unified remote session is established through WebRTC:
- Audio and video are transmitted through Media Tracks.
- Remote control requests are sent through reliable, ordered DataChannels.
- High-frequency telemetry is transmitted through low-latency, unreliable DataChannels.
The official Remote Access Design also outlines plans for robot accounts, remote discovery, and a rendezvous service, allowing users to access Microduck from outside the local network. This design is still evolving.
The proposed mqttd is not intended to replace WebRTC. Instead, it adds an MQTT access path alongside the existing local control interface, enabling device capability modeling, state reporting, cloud applications, and integration with Device Agent.
WebRTC vs. Device Agent
Device Agent is an EMQX product designed to enable natural-language device control powered by MQTT and LLMs, device data collection and reporting, and multimodal interactions such as voice-based control.
Compared with Microduck’s current WebRTC-based approach, Device Agent offers several advantages:
- MQTT is purpose-built for IoT connectivity. As a widely adopted IoT messaging protocol, MQTT is better suited to device data reporting, secure device control, low-latency messaging, and device management than WebRTC.
- Device Agent provides a structured model of robot capabilities and data. This gives the LLM clear context about Microduck, enabling more accurate control through natural-language commands.
- Device Agent supports lightweight audio and video integration over WebSocket. This enables users to interact with Microduck directly through voice and other conversational interfaces.
- Device Agent provides A2A capabilities. Microduck can communicate directly with other devices, enabling scenarios where robots can interact with and control other devices through natural-language conversations.
In the next article, we will explore how to use Device Agent + mqttd to extend Microduck and build richer edge-cloud interaction scenarios.
Conclusion
Starting with Microduck’s capabilities and software architecture, this article defined a simple MQTT-based velocity control protocol and demonstrated the complete workflow, from environment setup and Broker connectivity to robot motion control.
In the next part of this series, we will follow Microduck’s standard extension approach to implement mqttd, an adapter service for extending its control interface. We will also explore how EMQX Device Agent can enable LLM-powered control, voice-based interactions, and other conversational capabilities, as well as device-to-device collaboration through the A2A protocol.
References
- Demo project: GitHub - hjianbo/microduck_demo_part1: Reproducible MQTT control demo for the official Microduck MuJoCo walking policy