Microduck × Device Agent: Giving the Robot a Cloud-Based Brain (Part 2)

In the previous article, we added MQTT-based control for Microduck in the MuJoCo simulation environment. This article explores how to integrate Microduck with Device Agent and use its built-in LLM, ASR, TTS, and other AI services to enable intelligent user interactions and automated behaviors.
Users can control Microduck through text or voice commands, as well as describe their requirements in natural language, allowing the LLM to orchestrate sequences of actions based on device events, or use scheduled tasks to have Microduck execute commands at specific times.
In this article, you will:
- Build a device specification to connect Microduck to Device Agent
- Control Microduck to walk, turn, and kick a ball using natural language
- Use Device Agent workflows and scheduled tasks to orchestrate and automate robot actions
Connecting Microduck to Device Agent
The previous article enabled Microduck to receive velocity commands over MQTT. However, controlling the robot still required users to understand MQTT-specific details, including Topics, field names, and valid value ranges.
Device Agent adds a semantic layer on top of MQTT. An AI model can interpret a user’s natural-language intent, use the device specification to select a valid command and fill in the required parameters, and then send the resulting structured command to the device over MQTT.
Microduck’s recommended Remote Access Design uses WebRTC to establish a real-time remote session: audio and video are transmitted through Media Tracks, while control requests and high-frequency telemetry are carried over different types of Data Channels. The core purpose is to enable remote users to connect to and control the robot in real time.
Device Agent addresses the layer above that: understanding device capabilities and deciding what to do. A cloud-based LLM can interpret user intent and use the device to retrieve data, execute actions, or run automated tasks. Device Agent also provides device data reporting and action control, along with built-in capabilities such as speech recognition and synthesis, workflows, and scheduled tasks. Together, these capabilities give Microduck a cloud-based brain for intelligent interaction and automation.
DeviceSpec
The DeviceSpec defines the capability contract between a device and Device Agent. It consists of four main components:
- Name + Description: Basic information about the device.
- Commands: The operations the device supports and the parameters required for each operation, such as movement direction, duration, or kicking foot.
- Properties: Device state reported continuously, such as whether the robot is moving, its current action, and the result of the most recent action.
- Events: Discrete events reported by the device, such as action completion, failure, or communication timeout.
DeviceSpec also provides an initial safety boundary between the LLM and the device. The model can only invoke commands declared by the device. At the same time, the device should continue to perform its own parameter validation and safety checks rather than trusting a command simply because it came from an Agent.
Designing the Microduck DeviceSpec
The example project, microduck_demo_part1, includes an importable Microduck DeviceSpec at src/device_agent_integration_demo/device-spec.json. It abstracts the underlying velocity control and reinforcement learning policy into higher-level capabilities that are easier for users to interact with.
Device Commands
| Command | Parameters | Description |
|---|---|---|
move | direction; duration_s (optional) | Move forward or make a curved left/right turn while moving forward |
stop | None | Stop the current walking action |
kick | foot | Execute the kicking policy with the left or right foot |
place_ball | position (optional) | Reposition the ball in the simulation for debugging and maintenance demonstrations |
The move command exposes high-level directions such as forward, left, right, and backward. The adapter translates these into velocity combinations supported by the current policy. Left and right mean curved turns while moving forward, not lateral movement or in-place rotation.
The current walking policy does not reliably support backward movement, so backward returns an explicit unsupported response.
Device Properties
motion_state,vx,vy,yaw: Current motion state and movement intentactive_action,kick_side: Current high-level action and the most recently requested kicking football_state,last_action_result: Ball state and the result of the most recent actioncommand_timeout_s: The timeout that stops movement when the MQTT connection is lost
These properties are reported to the cloud over MQTT and stored in a database. Device Agent can then answer questions such as “Is Microduck still moving?” or “Did the last kick succeed?” by querying the device’s reported state rather than inferring the answer from conversation history.
Device Events
action_completed: A movement, ball placement, or kicking action has completedaction_failed: An action failed or is not supported by the current policycommand_timeout: The MQTT connection was interrupted beyond the safety threshold, causing the current movement to stop
These events can be surfaced as execution results in Device Agent or used to trigger workflows.
With this semantic layer in place, Microduck is no longer just an MQTT client that receives commands. It becomes a device with defined capabilities, observable state, and the ability to report execution results.
Controlling the Simulated Robot with Device Agent
Installing and Configuring Device Agent
Before you begin, prepare a desktop environment that can open the MuJoCo window, along with Python 3.12, Git, and uv.
Visit the Device Agent product page and follow the installation instructions for your operating system. On macOS or Linux, you can install and start Device Agent with:
curl -fsSL https://emqx.sh/device-agent | sh
device-agent
Once Device Agent starts, open http://127.0.0.1:3000 in your browser. On first use, complete the following three configurations.
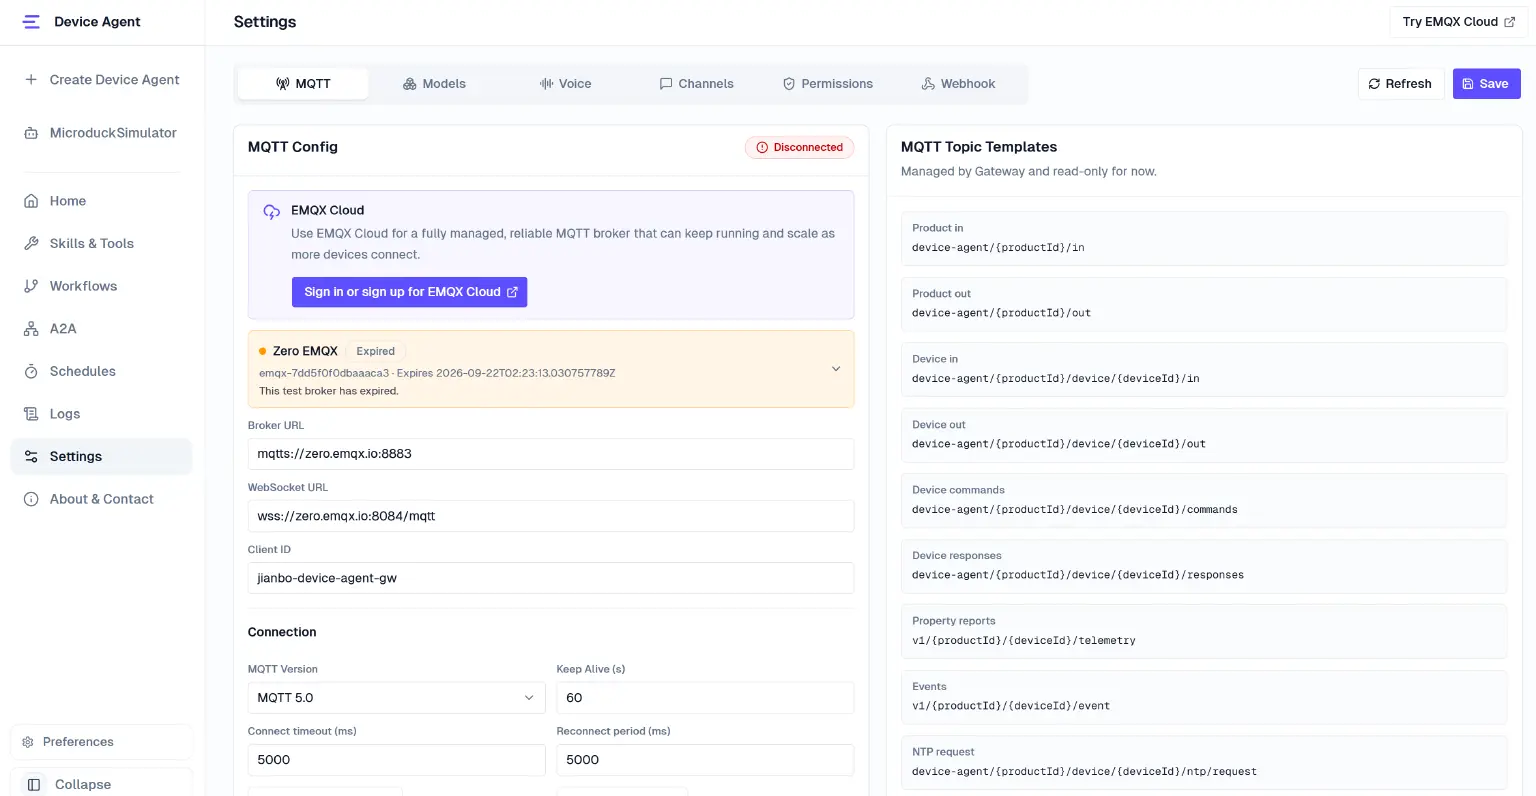
Configure the MQTT Broker
Go to Settings → MQTT to configure the MQTT Broker that Device Agent will connect to.
For a quick test, you can use the Zero MQTT Broker provided by Device Agent. After creating a Broker, Device Agent automatically provides the required MQTT configuration, which you can save directly.
For long-running deployments, you can switch to a self-hosted EMQX instance or an EMQX Cloud deployment.
Configure the LLM
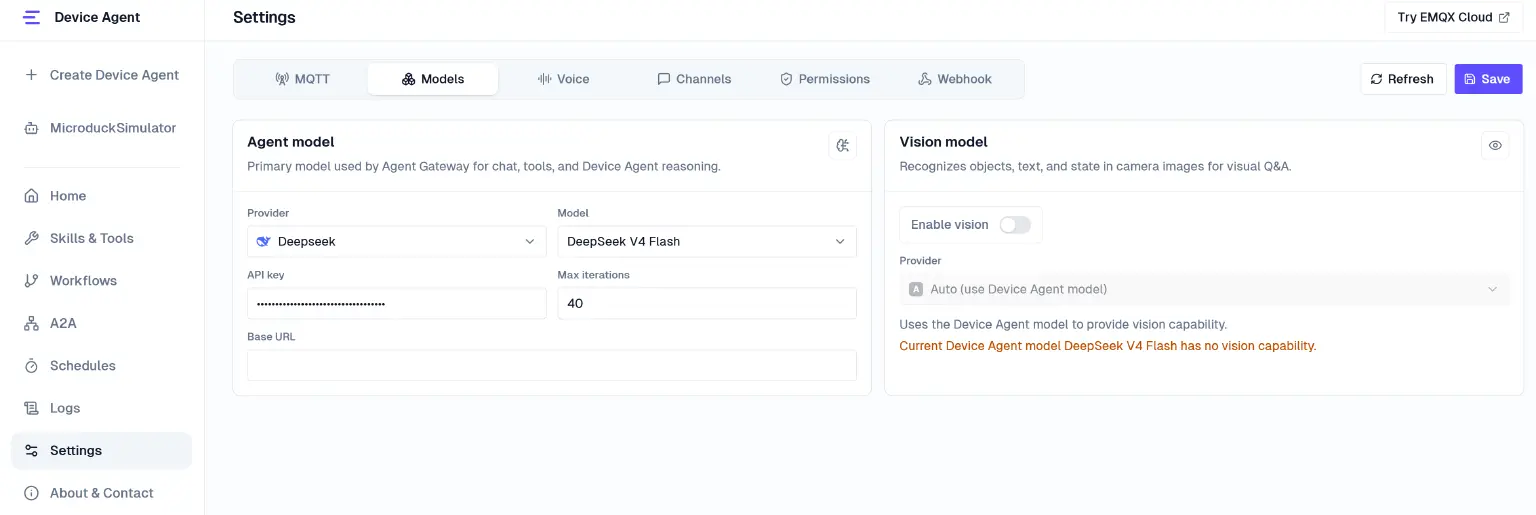
Under Settings → Models, select a model service that supports tool calling, then enter the model name and access credentials. Device Agent uses the model to understand user intent, select tools, and organize the steps required to complete a task.
The example below uses the DeepSeek v4 Flash model.
Configure Voice Models
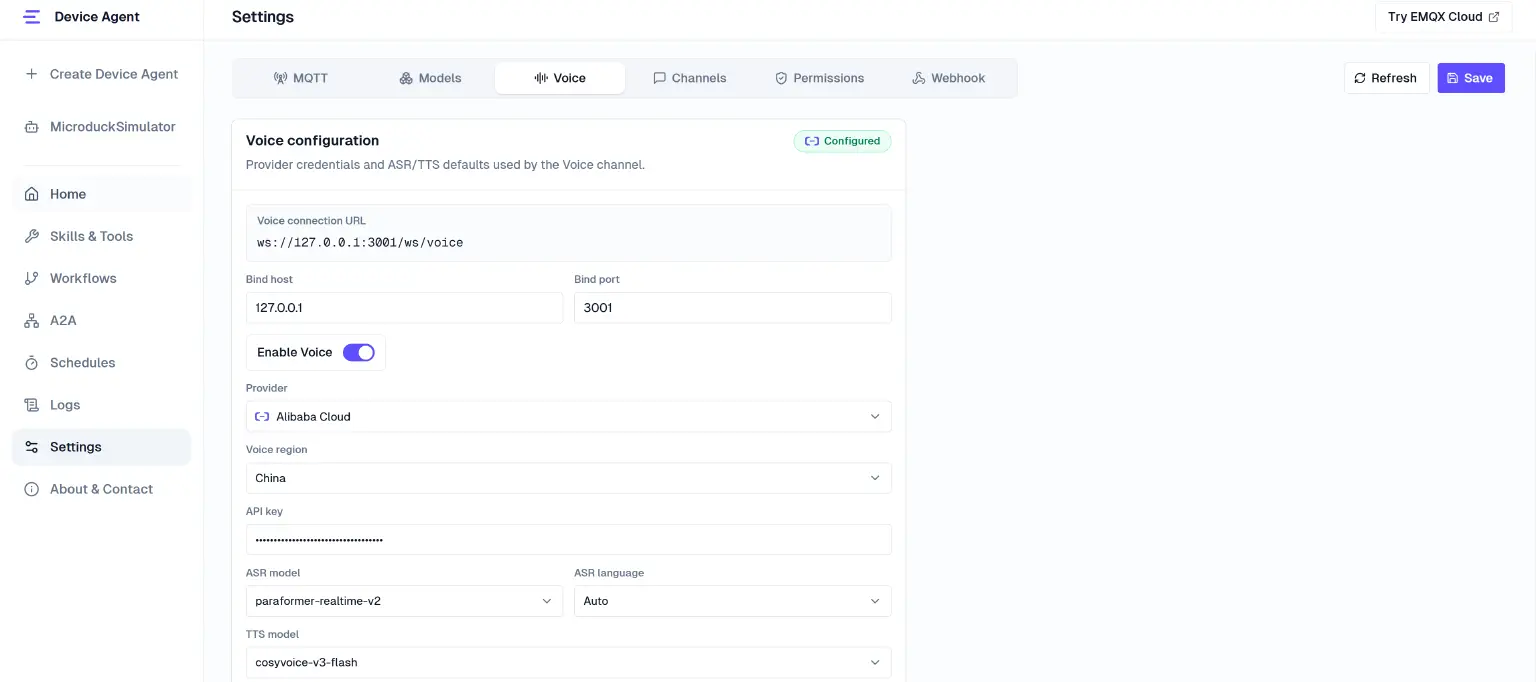
Go to Settings → Voice, enable voice capabilities, and select a provider. Configure the models and credentials required for speech recognition and synthesis.
Once configured, Device Agent can convert voice input to text and synthesize its responses as speech.
Connecting the Simulated Robot
Clone the example project and initialize it:
git clone --recurse-submodules https://github.com/hjianbo/microduck_demo_part1.git
cd microduck_demo_part1
./scripts/bootstrap.sh
bootstrap.sh fetches the pinned versions of the Microduck reinforcement learning project and Simulator, installs the Python dependencies, downloads and verifies the ONNX policies, and generates .demo/device-agent.env for local testing. This directory is ignored by Git and is used to store the actual Broker and device credentials.
Next, in the Device Agent web console, go to Create Device Agent, select Import Device Description, and upload the DeviceSpec from the cloned repository:
src/device_agent_integration_demo/device-spec.json
Verify that the commands, properties, and events recognized by Device Agent match those described earlier, then create the device agent.
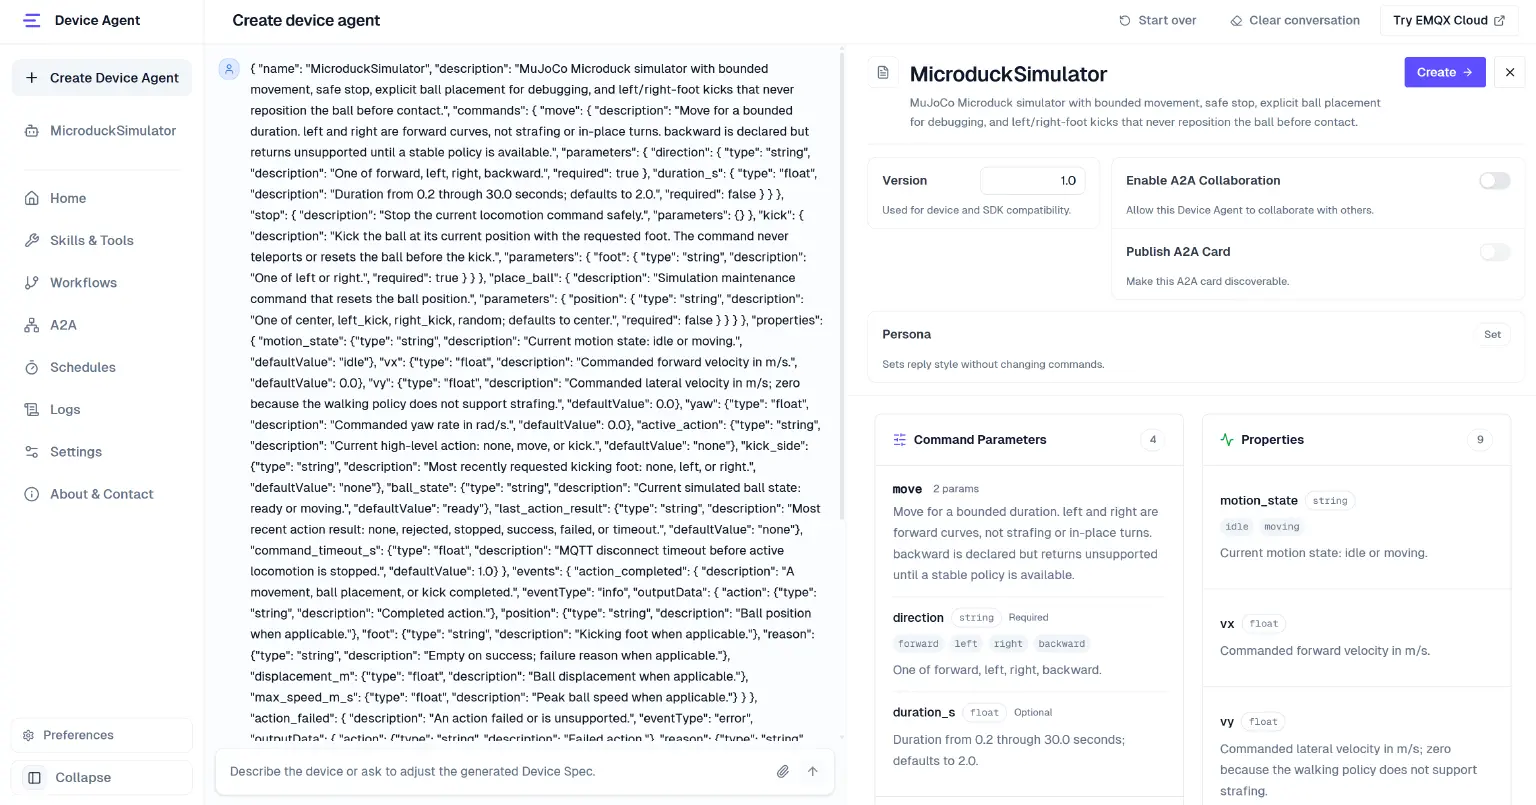
In the Connect Device guide, copy the Broker, Product ID, Device ID, and authentication credentials into .demo/device-agent.env:
DEVICE_AGENT_BROKER=mqtts://zero.emqx.io:8883
DEVICE_AGENT_PRODUCT_ID=<product-id>
DEVICE_AGENT_DEVICE_ID=<device-id>
DEVICE_AGENT_USERNAME=<username>
DEVICE_AGENT_PASSWORD=<password>
DEVICE_AGENT_MQTT_QOS=1
DEVICE_AGENT_MQTT_KEEPALIVE=30
DEVICE_AGENT_COMMAND_TIMEOUT=1.0
Once the configuration is complete, start the Microduck simulation:
./scripts/run_device_agent_integration_demo.sh
You should see logs similar to:
Loading walking policy from: .. BEST_alpha_walking.onnx
Loading kick_left policy from: .. ball_kick_left.onnx
Loading kick_right policy from: .. ball_kick_right.onnx
...
Device Agent MQTT: connecting to zero.emqx.io:8883; commands=device-agent/.../device/../commands
Device Agent MQTT: connected and subscribed to device-agent/../device/../commands
This indicates that the robot has:
- Loaded the three trained policies:
BEST_alpha_walking.onnx,ball_kick_left.onnx, andball_kick_right.onnxfor walking, left-foot kicking, and right-foot kicking. - Successfully connected to the configured MQTT server and subscribed to the relevant Topics.
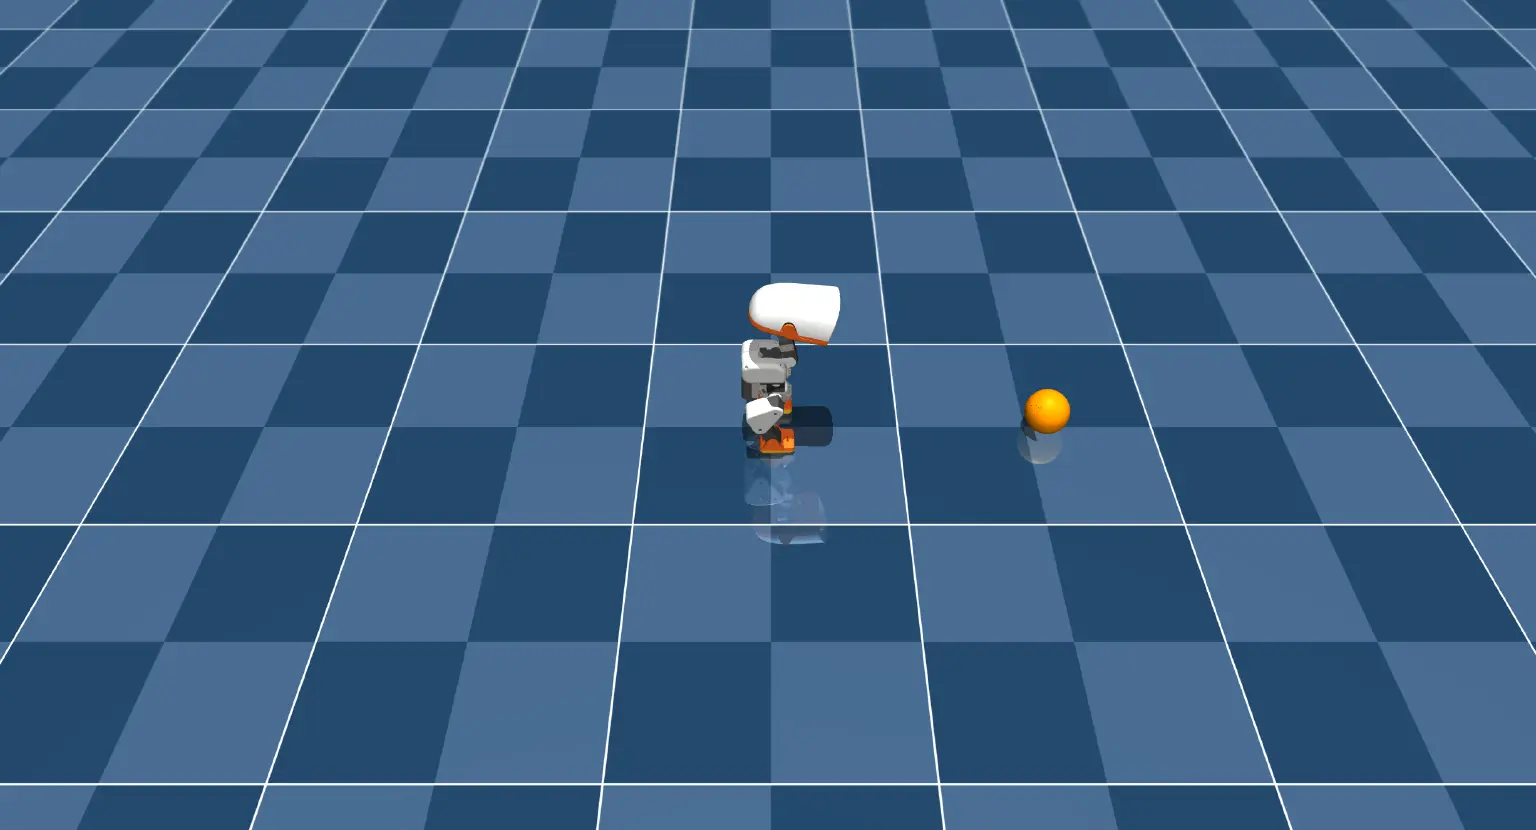
The Microduck simulation window will also open.
In the Device Agent console, open the corresponding MicroduckSimulator device agent. The newly connected device and its current state should appear there.
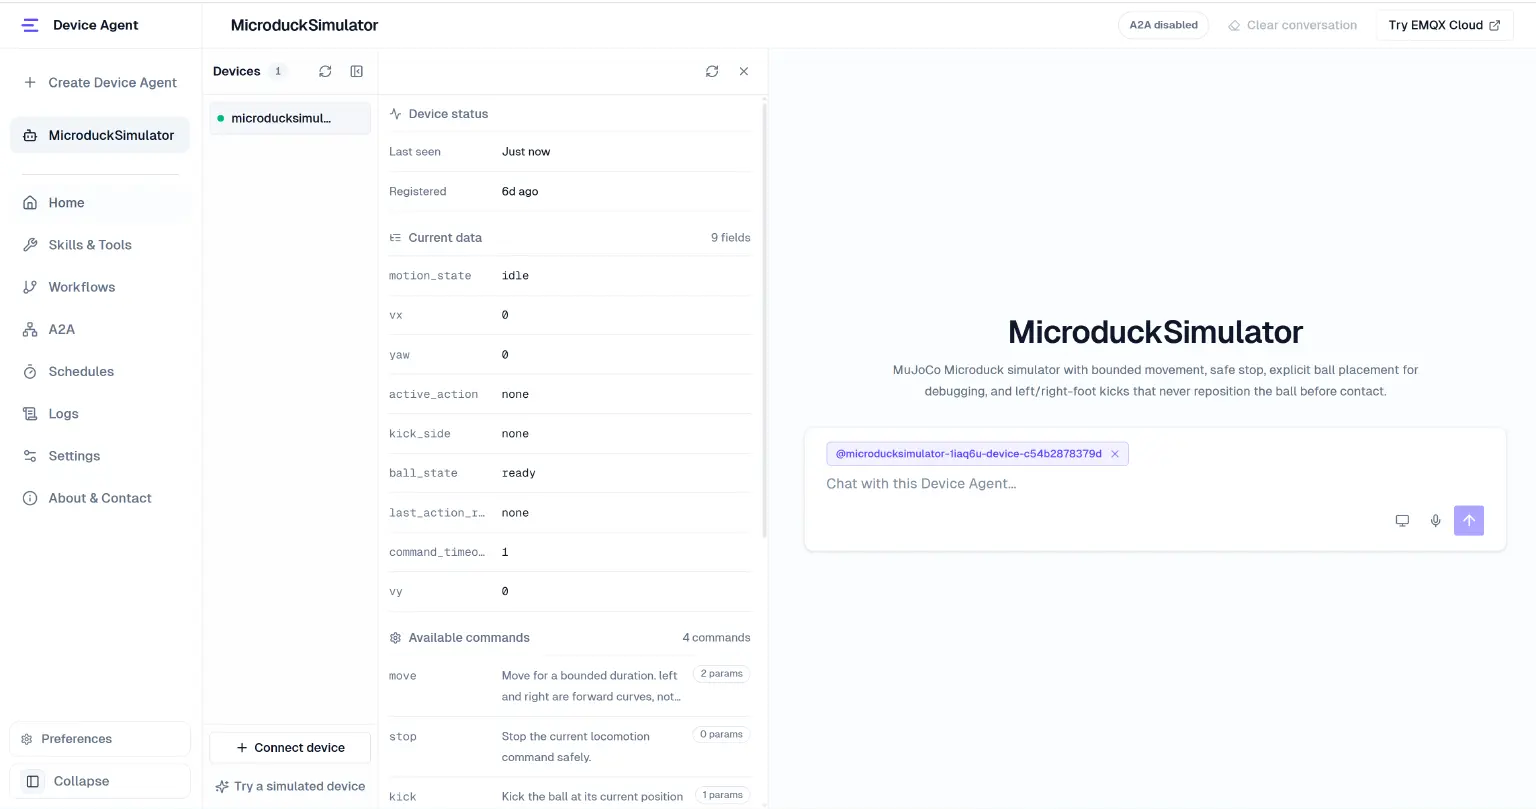
At this point, Microduck is connected to Device Agent.
Control Examples
Voice Control for Walking and Kicking
Open the Microduck workspace, enable the voice interface, and allow the browser to access your microphone. You can try commands such as:
- Walk forward for two seconds.
- Turn left for three seconds.
- Stop.
- Kick the ball with your right foot.
- What is Microduck's current status?
For example, say:
Move forward for 10 seconds.
Device Agent uses the DeviceSpec to convert the voice command into a structured command and sends it to the robot over MQTT:
{
  "cmd": "move",
  "params": {
    "direction": "forward",
    "duration_s": 10
  },
  "requestId": "...",
  "ts": 1710000000000,
  "metadata": {
    "productId": "..."
  }
}
Placing and Kicking the Ball
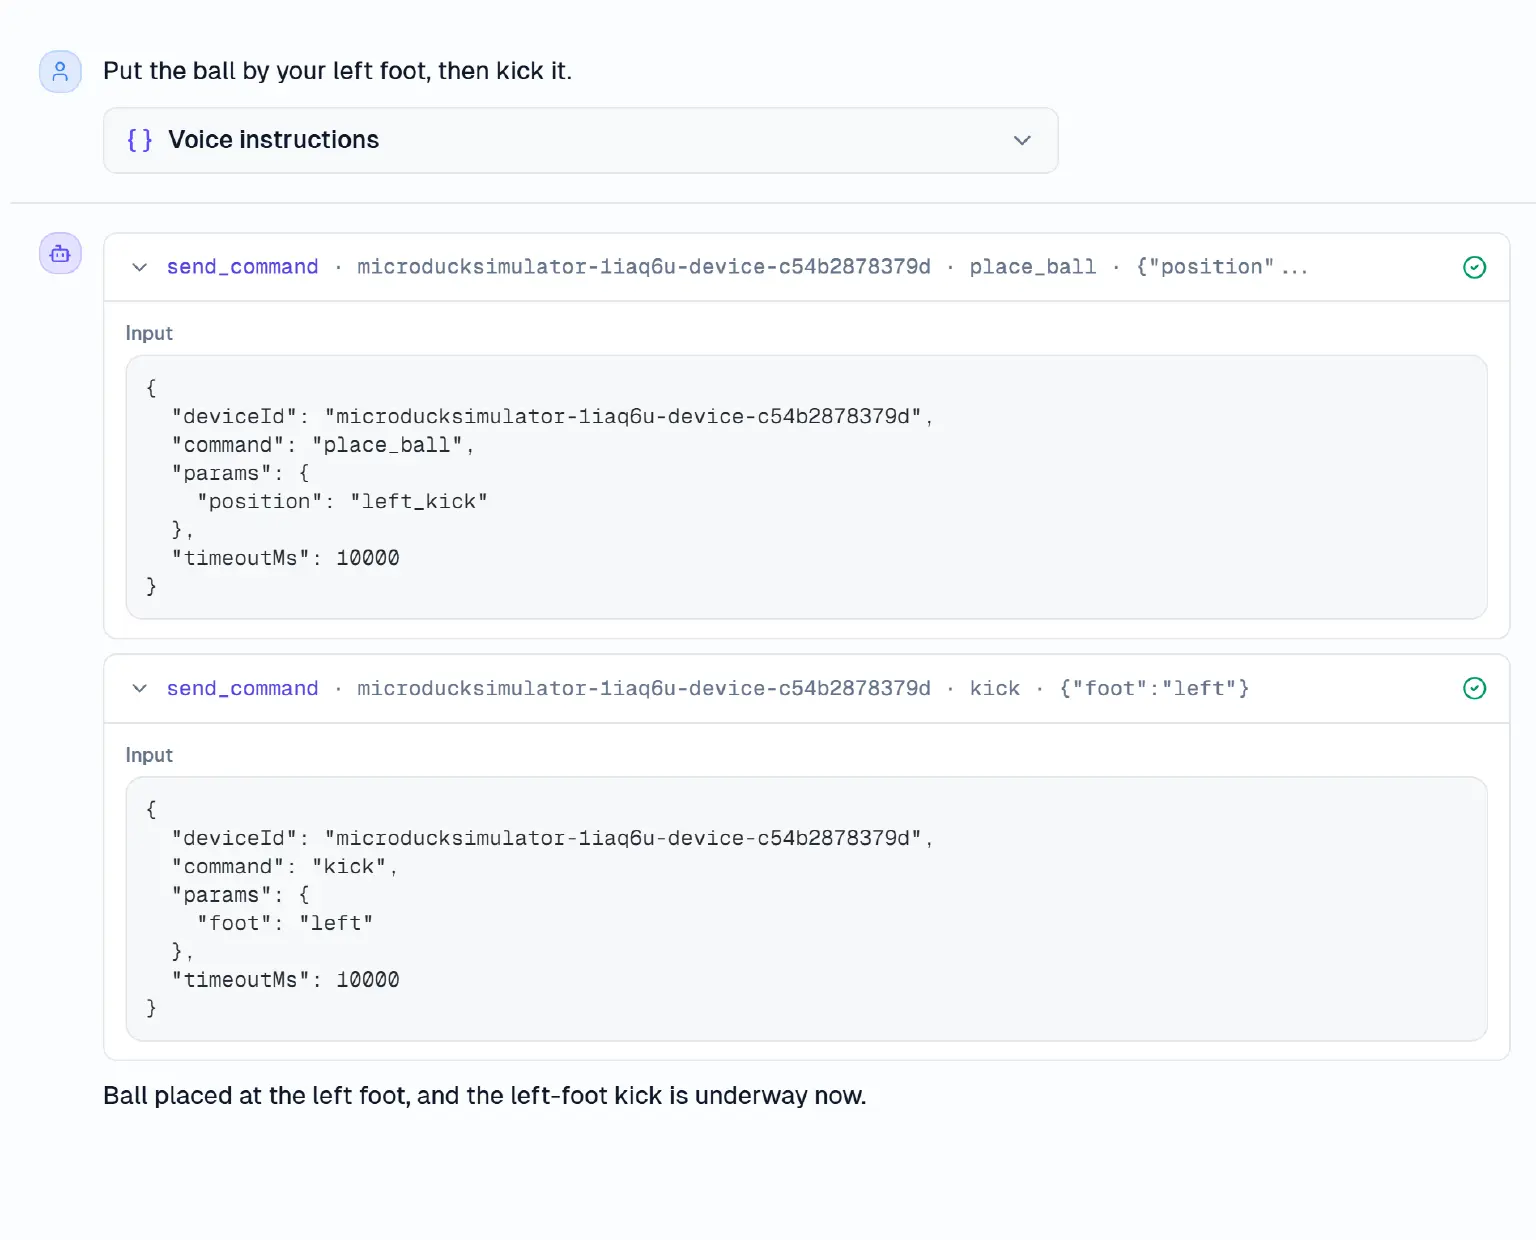
You can also return to the device conversation and see that, in this example, Device Agent sends two commands to complete the requested action.
Automating Actions with Workflows and Scheduled Tasks
Voice interaction provides a natural way for users to control the device. Workflows and scheduled tasks allow the device to act without requiring a continuous stream of manual commands.
Use a Workflow to Chain Actions
For example, open the device conversation and enter:
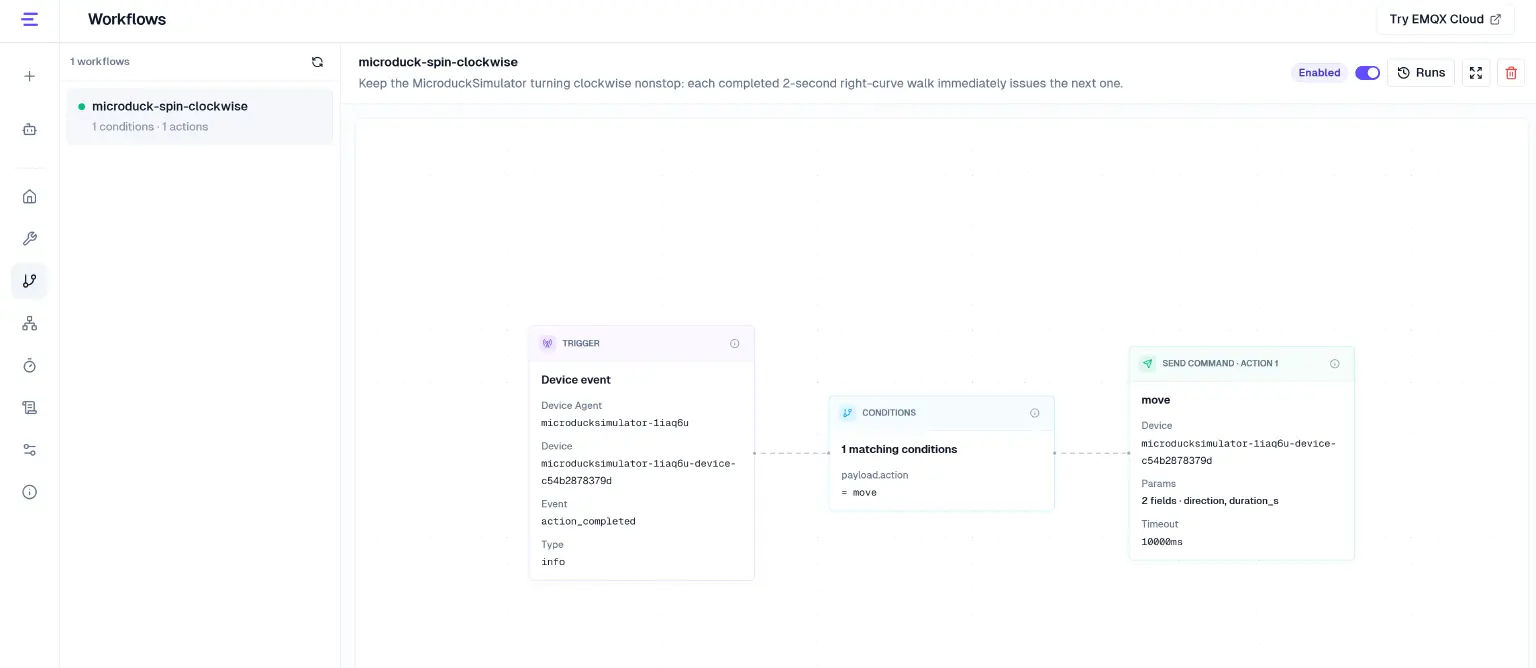
Create a workflow that makes the robot move in a clockwise loop.
The robot will repeatedly move forward and to the right to follow a clockwise path, while the Device Agent window on the left displays its current movement state.
You can also open the workflow page to view the workflow created by Device Agent and its trigger logic.
Use Scheduled Tasks to Schedule Actions
Workflows are triggered by device events or state changes, while scheduled tasks are triggered by time. Scheduled tasks are useful for actions that need to run in the future, at fixed intervals, or on a daily schedule.
For example:
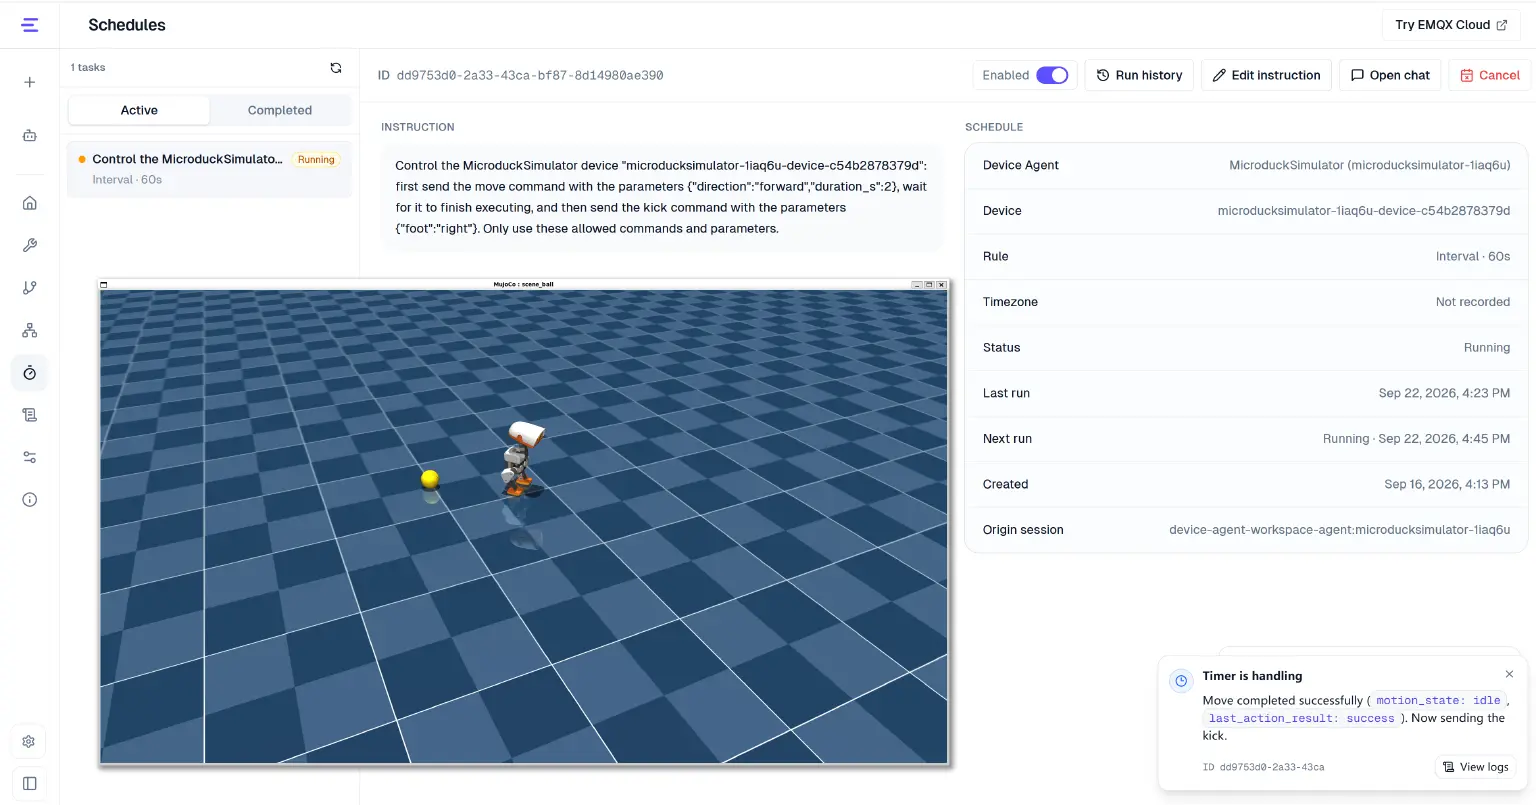
Move forward for 5 seconds every minute, then kick with the right foot.
Device Agent saves the task and returns its next scheduled run time. When the scheduled time arrives, Device Agent starts an independent execution and invokes the device's move command. Once the movement is complete, it triggers the kicking action, creating a complete sequence from scheduled departure to reaching the ball and kicking it automatically.
The Scheduled Tasks page shows the task status, next run time, and execution history. Tasks can also be paused, resumed, or canceled.
Scheduled tasks can also be used for queries, for example:
Every day at 4 PM, check whether Microduck is online and summarize the result of its most recent action.
How It Works
From the moment a user speaks a command to the moment the robot starts moving in MuJoCo, the complete flow is as follows:
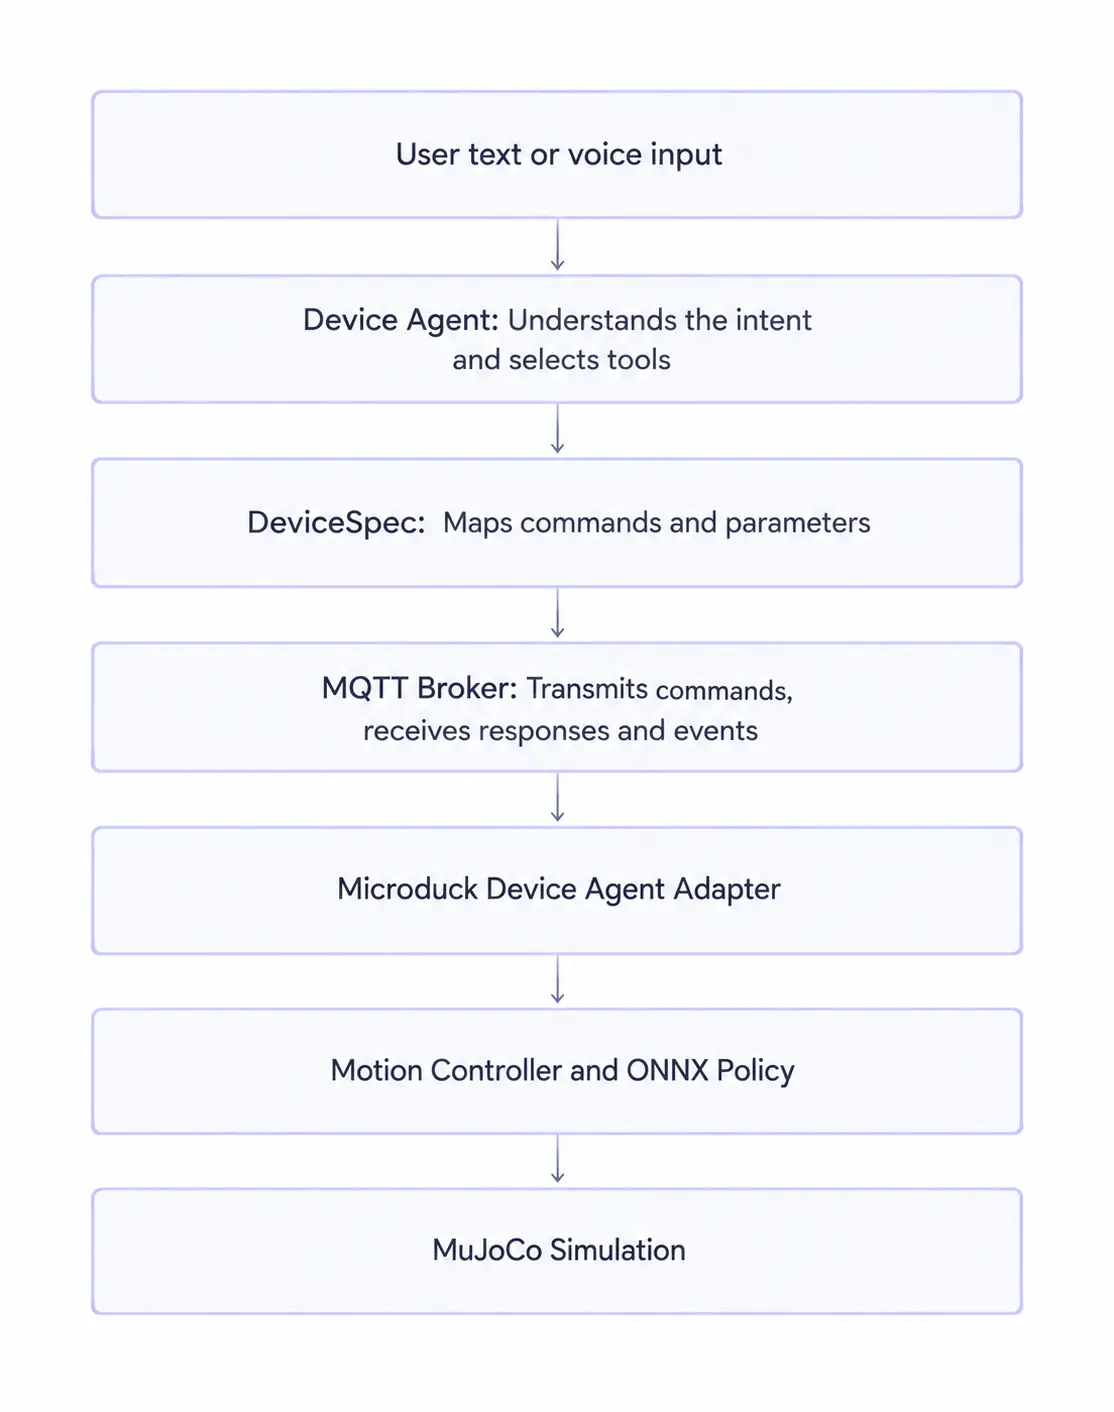
The voice channel handles speech recognition and synthesis, while MQTT handles device connectivity, command execution, and state reporting. Device Agent and the simulator communicate through four types of Topics:
| Direction | Topic | Purpose |
|---|---|---|
| Device Agent → Device | device-agent/{productId}/device/{deviceId}/commands | Send structured device commands |
| Device → Device Agent | device-agent/{productId}/device/{deviceId}/responses | Return the command response associated with the requestId |
| Device → Device Agent | v1/{productId}/{deviceId}/telemetry | Report online status and device properties |
| Device → Device Agent | v1/{productId}/{deviceId}/event | Report action completion, failure, and timeout events |
The MQTT network thread only parses incoming messages, validates the basic message envelope, and places commands into a thread-safe Mailbox. The MuJoCo control loop retrieves commands on the main thread and passes them to the action controller, preventing network callbacks from directly modifying the simulation state.
The action controller uses a deterministic single-action state machine. A movement command sets the velocity and deadline, then automatically stops when the deadline is reached. stop can immediately terminate walking. While a kicking action is in progress, new movement or kicking commands are rejected to prevent the policy from being switched mid-action. Once a command is accepted, a response is returned immediately, while the final result is reported later through device properties and events.
Regardless of whether a command comes from text, voice, a Workflow, or a scheduled task, it goes through the same device-side safeguards:
- Parameter allowlist: Only commands and fields defined in the DeviceSpec are accepted, with parameter types and ranges validated.
- Bounded movement: Every movement command must specify a finite duration, after which the velocity is automatically set to zero.
- Stop on disconnect: If the MQTT connection is interrupted for more than the default one-second threshold, any ongoing movement is stopped on the MuJoCo main thread.
- Idempotent processing: Each command must include a non-empty
requestId. The most recent 128 completed requests are cached, so QoS retransmissions do not cause the robot to kick twice. - Lifecycle state: The device reports its online status after connecting, while unexpected disconnections are reported as offline through the MQTT Last Will.
This layered design keeps device integration separate from the interaction layer. When moving from MuJoCo to a physical Microduck, the DeviceSpec, Device Agent, workflows, scheduled tasks, and MQTT protocol can all remain in place. The main change is the device-side execution layer: a control service running on the physical robot receives movement intents and continues to handle policy inference, joint control, and real-time safety.
Next Step: Using a Physical Robot
In the previous article, we referred to the MQTT device-side adapter for a physical Microduck as mqttd. It is designed to run on the physical device, translating MQTT device commands into movement intents that can be executed through the robot’s existing control interfaces, while also reporting device state and events.
At the time of writing, only the simulation environment was available to the author. However, the architecture described in this article is designed to remain consistent with a physical Microduck, allowing the same approach to be migrated to the real robot with minimal changes.
Summary
In this article, we turned Microduck into an intelligent device that Device Agent can understand and control through natural language, conversations, and automated workflows.
DeviceSpec turns the robot’s commands, properties, and events into structured capabilities. This allows Device Agent to reliably map natural-language requests such as “Walk forward for five seconds” or “Kick the ball with your left foot” to device commands. Voice interaction makes control more direct, workflows connect device events into sequences of actions, and scheduled tasks add time-based automation. Regardless of how a command is initiated, it ultimately passes through the same device-side validation, state machine, and safety boundaries.
Microduck is a simple and engaging starting point, but this approach is not limited to robots. As long as a device can receive commands and report properties and events through MQTT or an SDK, Device Agent can expose its capabilities to natural language, voice interaction, and automated workflows.
You can start with this open-source demo to connect your own robot or IoT device to Device Agent, taking it from simply being connected to being understood, conversational, and orchestrated.
Device Agent also provides A2A capabilities, which open up possibilities for more interesting scenarios, such as enabling Microduck to collaborate with other robots or devices.
References
- Demo project: GitHub - hjianbo/microduck_demo_part1: Reproducible MQTT control demo for the official Microduck MuJoCo walking policy
- Install Device Agent: Installation | Device Agent Docs
- Define a Device Agent: Define a Device Agent | Device Agent Docs
- Voice Interaction: Voice Interaction | Device Agent Docs
- Workflows: Workflows | Device Agent Docs
- Scheduled Tasks: Scheduled Tasks | Device Agent Docs