Bridging TwinCAT Data to MQTT: Introduction and Hands-on Tutorial

This blog will provide a comprehensive guide on bridging TwinCAT data to MQTT. We will use Neuron to collect data from TwinCAT, upload the collected data to EMQX, and view it using MQTTX.
The Architecture of TwinCAT to MQTT Bridging
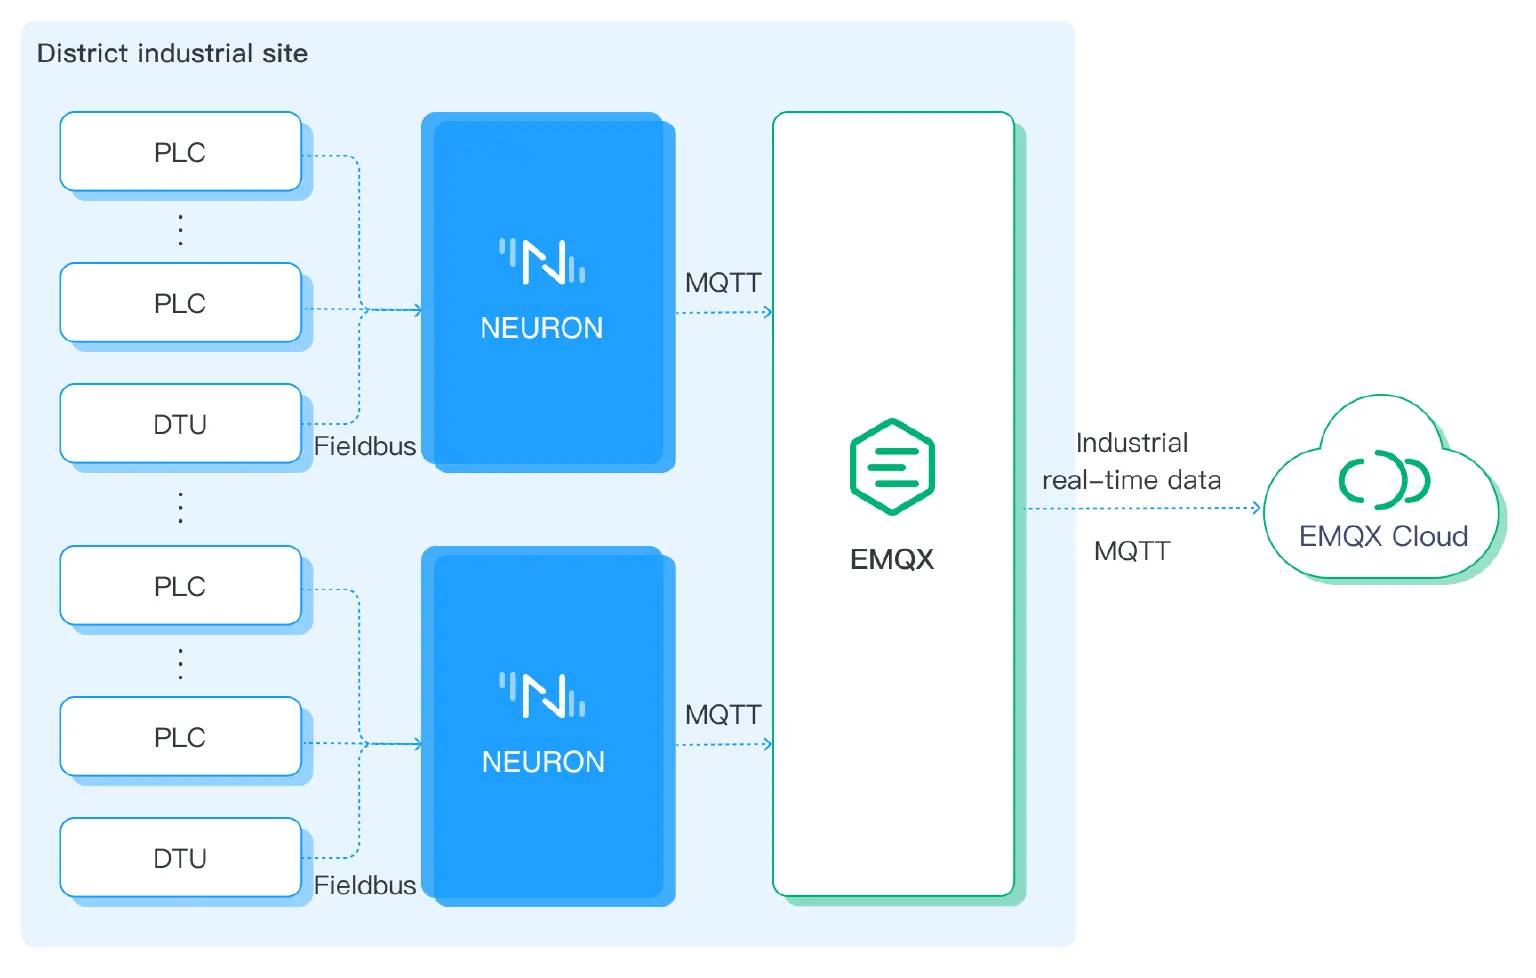
Neuron for Converting TwinCAT into MQTT
Neuron is an industry IoT gateway software that enables industrial devices with essential IoT connectivity capabilities. With minimal resource utilization, Neuron can communicate with diverse industrial devices through standard or dedicated protocols, realizing the multiple device connections to the Industrial IoT platform.
From the very beginning, Neuron has supported MQTT as one of its communication protocols. The Neuron MQTT plugin allows users to quickly build IoT applications that use MQTT communication between devices and the cloud.
Neuron provides a Beckhoff ADS plugin from version 2.2.0. The Neuron Beckhoff ADS plugin implements the ADS protocol over TCP. It supports communication with Beckhoff TwinCAT PLCs, further enriching Neuron’s connectivity capabilities and resolving user needs.
With the Beckhoff ADS plugin, users can collect data from TwinCAT PLCs easily. Together with the MQTT plugin, users can push collected data to industrial IoT platforms such as the EMQX platform, or publish messages back to TwinCAT PLCs, triggering device actions such as turning on or off lights, motors, and other equipment.
EMQX for Handling MQTT Messages
EMQX is the world’s leading open-source distributed IoT MQTT broker with high performance and scalability. It provides efficient and reliable connections for massive IoT devices, enabling high-performance real-time movement and processing of the message and event flow data, helping users quickly build IoT platforms and applications for critical business.
EMQX is the broker component in the bridging architecture, while Neuron collects data from TwinCAT PLCs and transmits the data in MQTT messages to the broker. After receiving the MQTT messages from Neuron, EMQX will then forward the data or perform further processing.
EMQX has a rich and powerful feature set, such as the SQL-based rules engine to extract, filter, enrich, and transform IoT data in real-time, and data integration to connect EMQX to external data systems like databases.
Bridging TwinCAT to MQTT via Neuron
We use two PCs connected to a local area network. One is a Linux machine for installing EMQX, MQTTX, and Neuron; the other is a Windows machine with TwinCAT 3 installed.
| PC 1 | PC 2 | |
|---|---|---|
| Operating System | Linux | Windows |
| IP address | 192.168.1.152 | 192.168.1.107 |
| AMS Net ID | 192.168.1.152.1.1 | 192.168.1.107.1.1 |
| Software | EMQX, MQTTX, Neuron | TwinCAT 3 |
| Network | Connected | Connected |
EMQX Quick Start
EMQX provides multiple installation methods, and users can check the detailed installation methods in the documentation. This example uses container deployment to quickly experience EMQX.
Run the following command to obtain the Docker image:
docker pull emqx/emqx:5.1.0
Run the following command to start the Docker container:
docker run -d --name emqx -p 1883:1883 -p 8081:8081 -p 8083:8083 -p 8084:8084 -p 8883:8883 -p 18083:18083 emqx/emqx:5.1.0
Access the EMQX Dashboard by visiting http://localhost:18083/ (replace “localhost” with your actual IP address) through a web browser. This allows you to manage device connections and monitor related metrics. Keep the Docker container running for this tutorial. You can refer to the documentation to experience more features in the Dashboard.
Initial username: admin, initial password: public
TwinCAT Setup
Refer to the Beckhoff TwinCAT website to download and install TwinCAT.
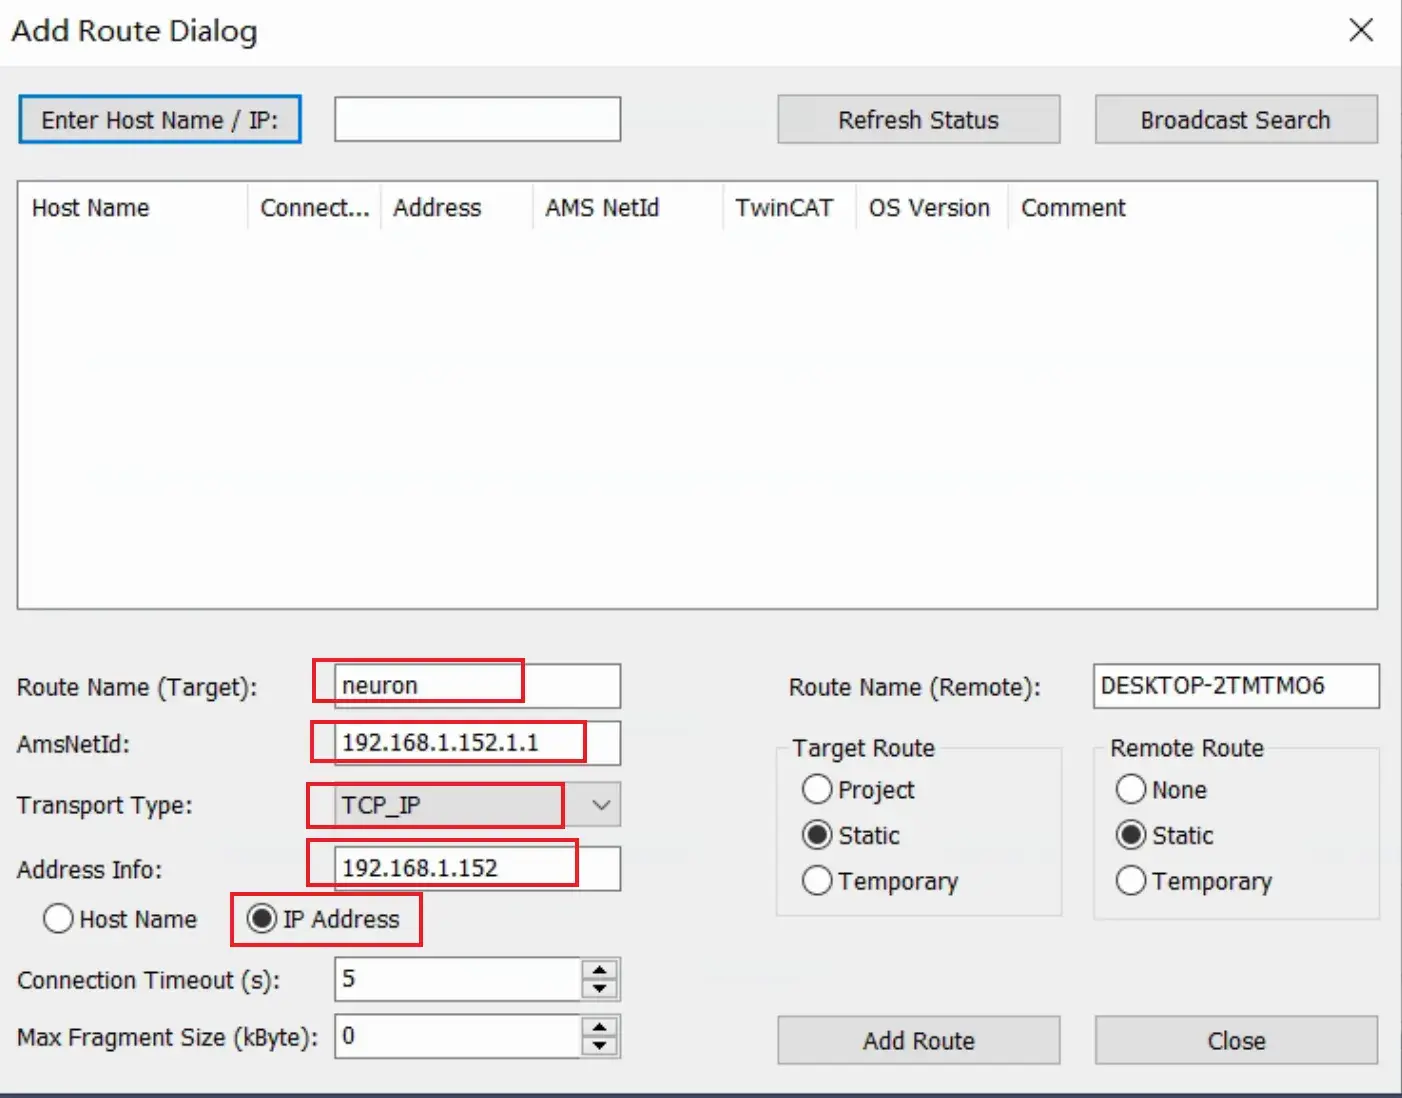
In order for Neuron and the TwinCAT PLC to communicate with each other, we first need to add a static route for Neuron in TwinCAT. Open the TwinCAT Static Routes dialog, and provide the information as highlighted in the following image. Note that the AmsNetId is the IP address of the Neuron PC appended with ".1.1".
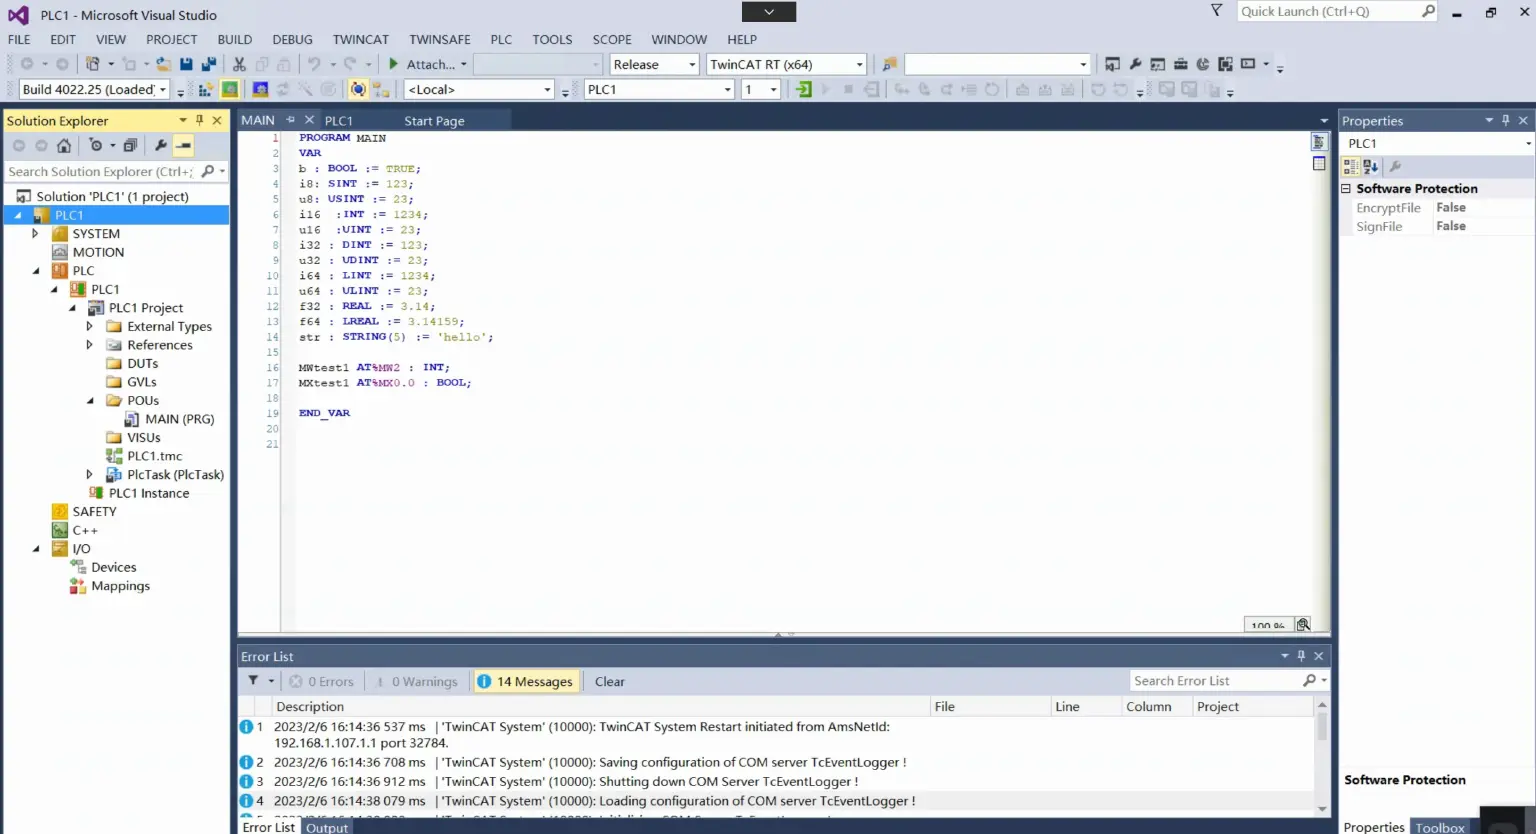
We use the following TwinCAT PLC program, which defines enough variables for demonstration purposes.
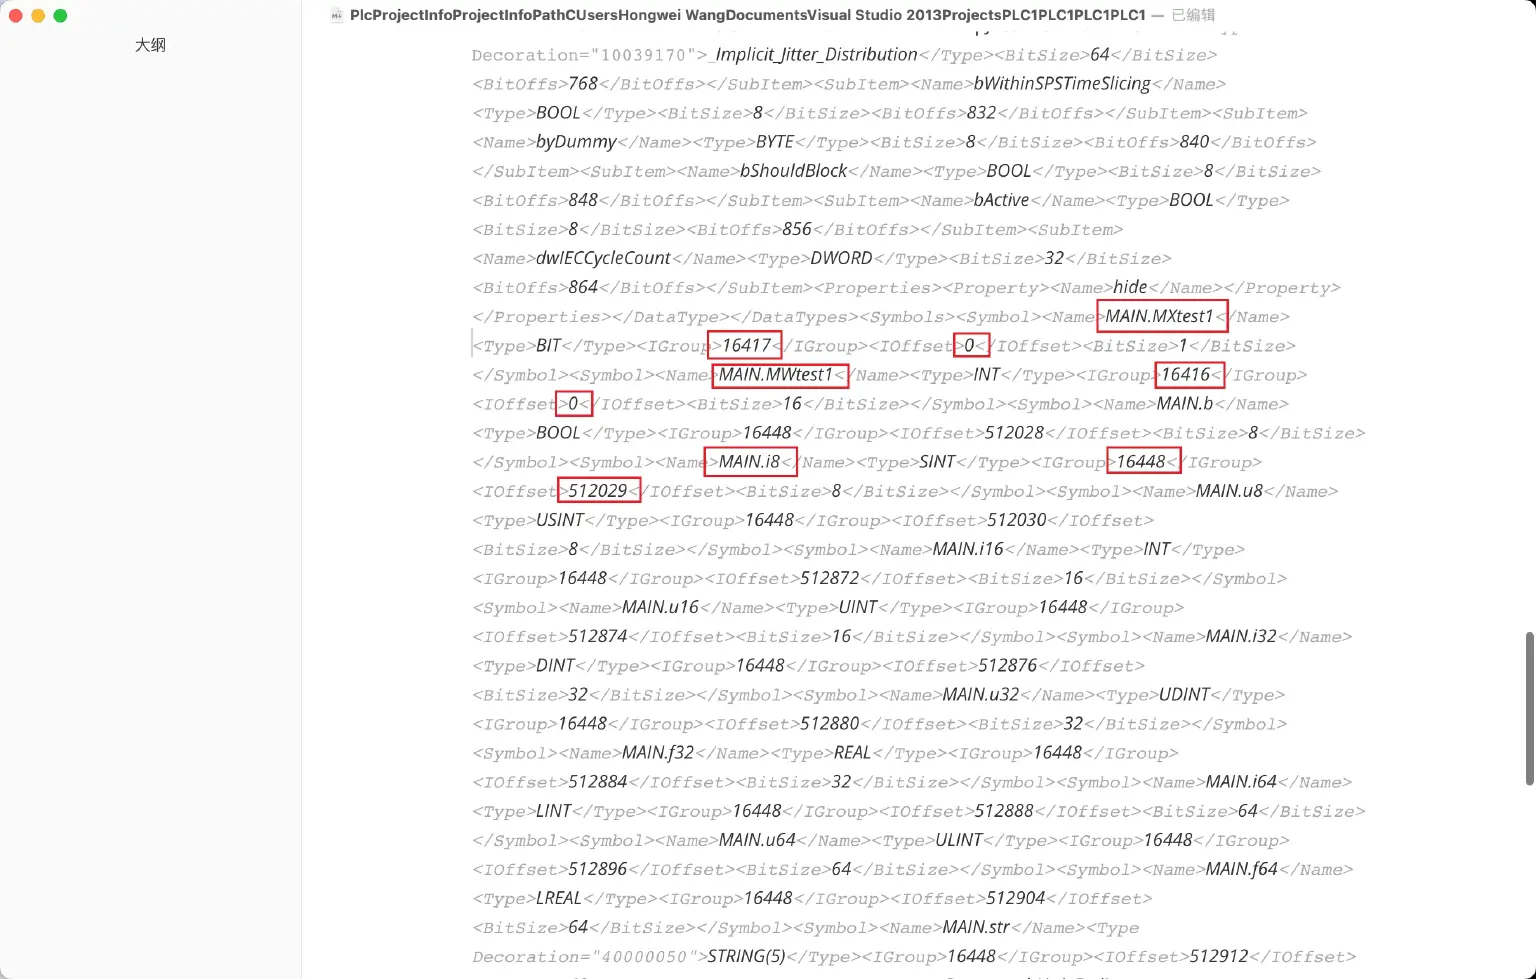
Open the TPY file in the TwinCAT project directory. It contains the index group and index offset of each variable defined in the PLC program, which is used for tag addresses in Neuron.
Neuron Quick Start
Consult the installation instruction on how to install Neuron. After Neuron is installed, you can access the dashboard through your browser at http://localhost:7000 (replace "localhost" with your actual IP address).
Step 1. Login
Log in with the initial username and password:
- Username:
admin - Password:
0000
Step 2. Add a south device
In the Neuron dashboard, click Configuration -> South Devices -> Add Device to add an ads node.

Step 3. Configure the ads node
Configure the newly created ads node like the following image shows.

Step 4. Create a group in the ads node
Click the ads node to enter the Group List page, and click Create to bring up the Create Group dialog. Fill in the parameters and submit:
- Group Name: grp.
- Interval: 1000.
Step 5. Add tags to the group
For some variables in the aforementioned TwinCAT PLC program, we add a corresponding tag to the ads node in the grp group. The tag addresses are composed of the index group and index offset of the variables.

Step 6. Data monitoring
In the Neuron dashboard, click Monitoring -> Data Monitoring, and see that tag values are read correctly.

Step 7. Add an MQTT north app
In the Neuron dashboard, click Configuration -> North Apps -> Add App to add an mqtt node.

Step 8: Configure the mqtt node
Configure the mqtt node to connect to the EMQX broker set up earlier.

Step 9. Subscribe the mqtt node to the ads node
Click the newly created mqtt node to enter the Group List page, and click Add subscription. After a successful subscription, Neuron will publish data to the topic /neuron/mqtt/ads/grp.

View Data Using MQTTX
Now you can use an MQTT client to connect to EMQX and view the reported data. Here we use MQTTX, a powerful cross-platform MQTT client tool, which can be downloaded from the official website.
Launch MQTTX, and add a new connection to the EMQX broker set up earlier, then add a subscription to the topic /neuron/mqtt/ads/grp. After a successful subscription, you can see that MQTTX continues to receive data collected and reported by Neuron. As shown in the following figure.

Conclusion
In this blog, we introduced the overall process of bridging TwinCAT data to MQTT using Neuron.
As a widely used platform for industrial automation, TwinCAT is adopted in a variety of industries, including automotive, aerospace, food and beverage, and more. Neuron, with its powerful connectivity for Industrial IoT, facilitates the data collection from TwinCAT PLCs and seamless transmission of the acquired data to the cloud for convenient remote control and monitoring whenever necessary.
Neuron also supports other industrial protocols like Modbus, OPC UA, SIEMENS, and more. For more bridging tutorials, read our post: Bridging Modbus Data to MQTT for IIoT: A Step-by-Step Tutorial.