Encoding and Decoding Messages Using Schema Registry in EMQX Dedicated

Introduction
The Schema Registry offers a centralized solution for managing and validating message data for topics, as well as for serializing and deserializing data over the network. MQTT topic publishers and subscribers can utilize the Schema to maintain data consistency and compatibility. As a crucial part of the rule engine, the Schema Registry can be tailored to various device access and rule design scenarios, ensuring data quality, compliance, efficient application development, and optimal system performance.
In the latest version of EMQX Dedicated, users can configure schemas using Avro, Protobuf, and JSON Schema in the EMQX Platform Console. This blog will demonstrate this feature by encoding and decoding Protobuf messages between MQTTX and a Dedicated deployment.
Step 1: Set up an EMQX Dedicated Deployment
Register for an EMQX account to access a 14-day free trial of an EMQX Dedicated deployment. No credit card is required.
1. Create a Dedicated Deployment
Log in to the EMQX Platform Console and click the ‘New Deployment’ button. Select the ‘Dedicated’ plan and configure a Dedicated deployment.
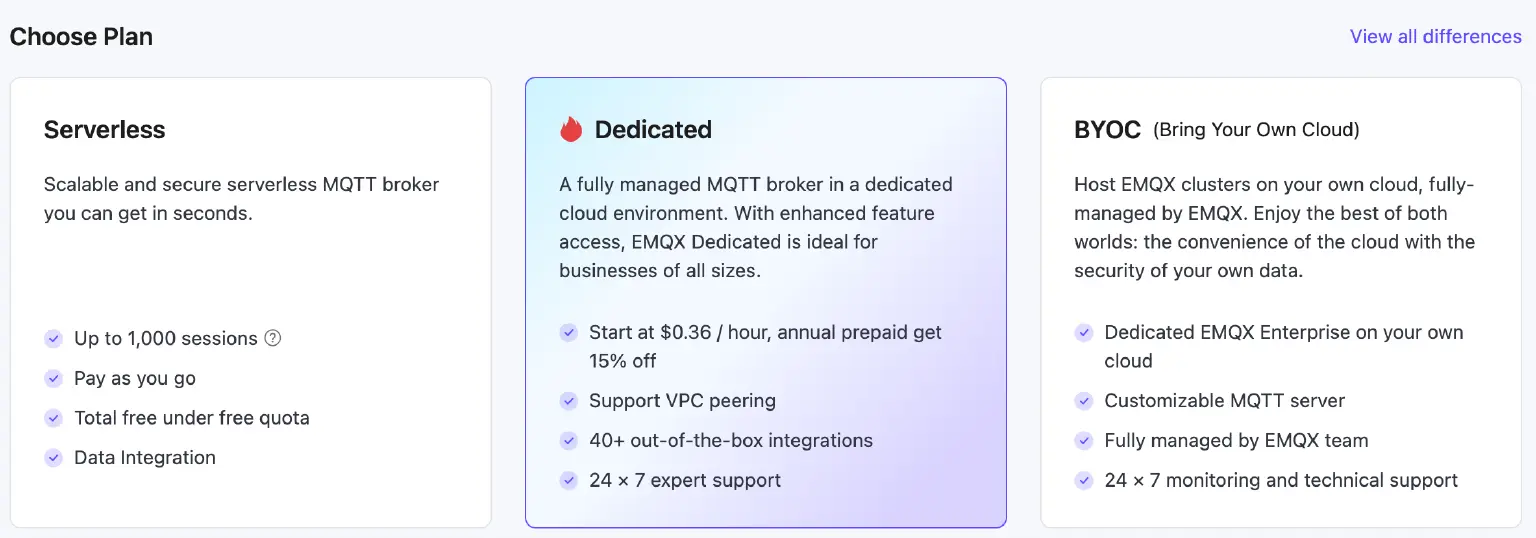
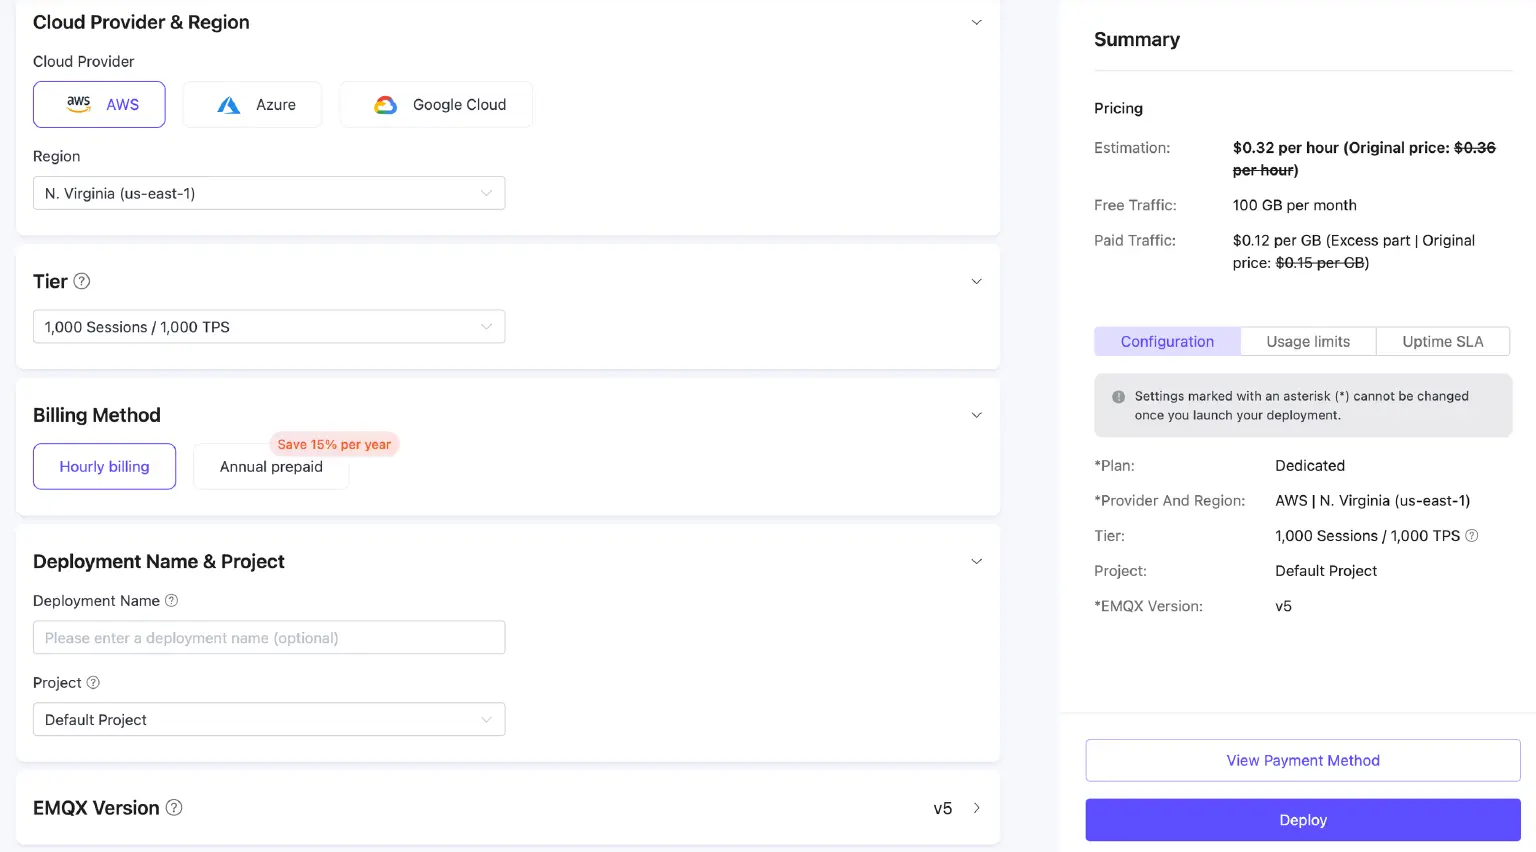
For this tutorial, choose the N.Virginia region and the 1,000 tier, leave the EMQX version as the default setting (v5) and then click the 'Deploy' button.
Schema Registry is available in both v5 and v4 deployments (new created). In v5, you can set schema of Avro, Protobuf, and JSON Schema. In v4, you can set schema of Avro and Protobuf.
2. Add a Credential for the MQTT Connection
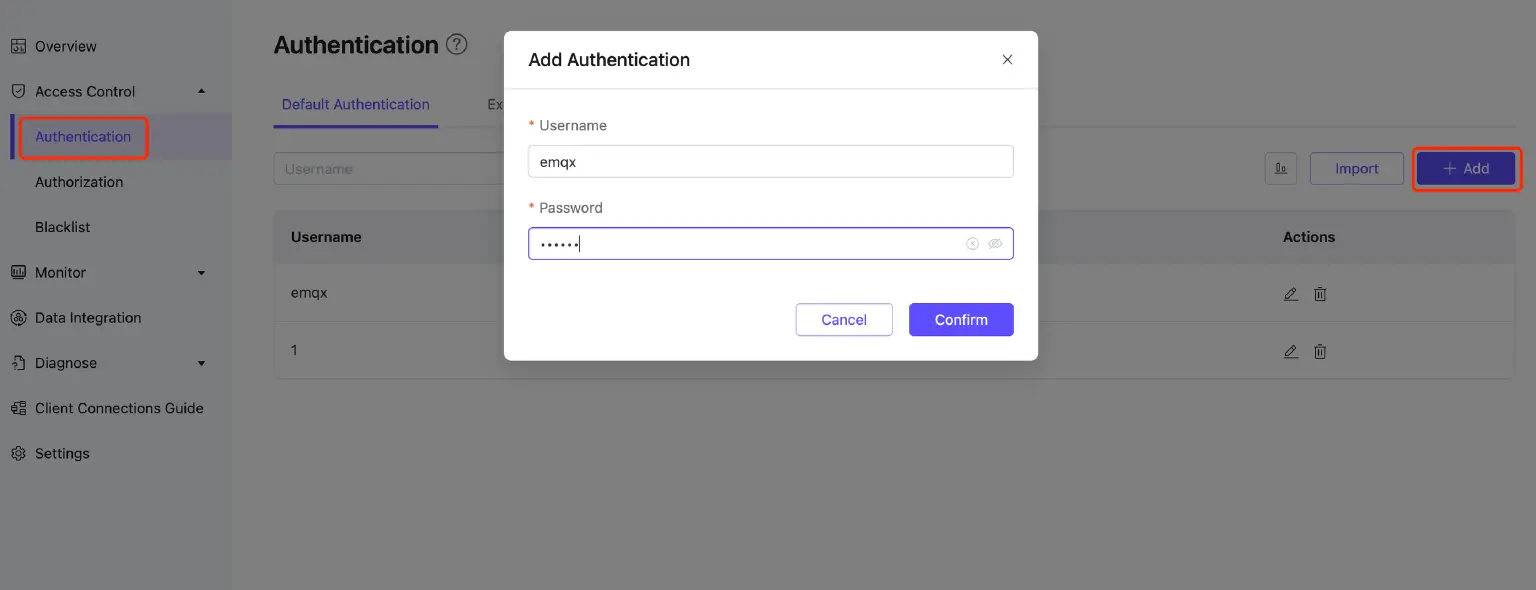
When the deployment is created, navigate to ‘Access Control’ in the deployment console, then click Authentication in the submenu. Click the ‘Add’ button on the right and provide a username and password for the MQTT connection. For this example, we will use "emqx" as the username and "public" as the password for the MQTT client connection.
Your MQTT broker is now operational and ready for use. Let’s now proceed to Step 2.
Step 2: Use MQTTX to Set up Protobuf Schema
MQTTX provides desktop and CLI that support Protobuf message transmission. Visit the MQTTX official website to download the appropriate version based on your requirements.
Use Protobuf Messages with MQTTX Desktop
The latest version of the MQTTX desktop client features an optimized Schema section, with new custom functions and Schema scripting capabilities. These improvements significantly enhance the ease of handling and viewing data in the Protobuf format.
1. Navigate to the Schema Script Page
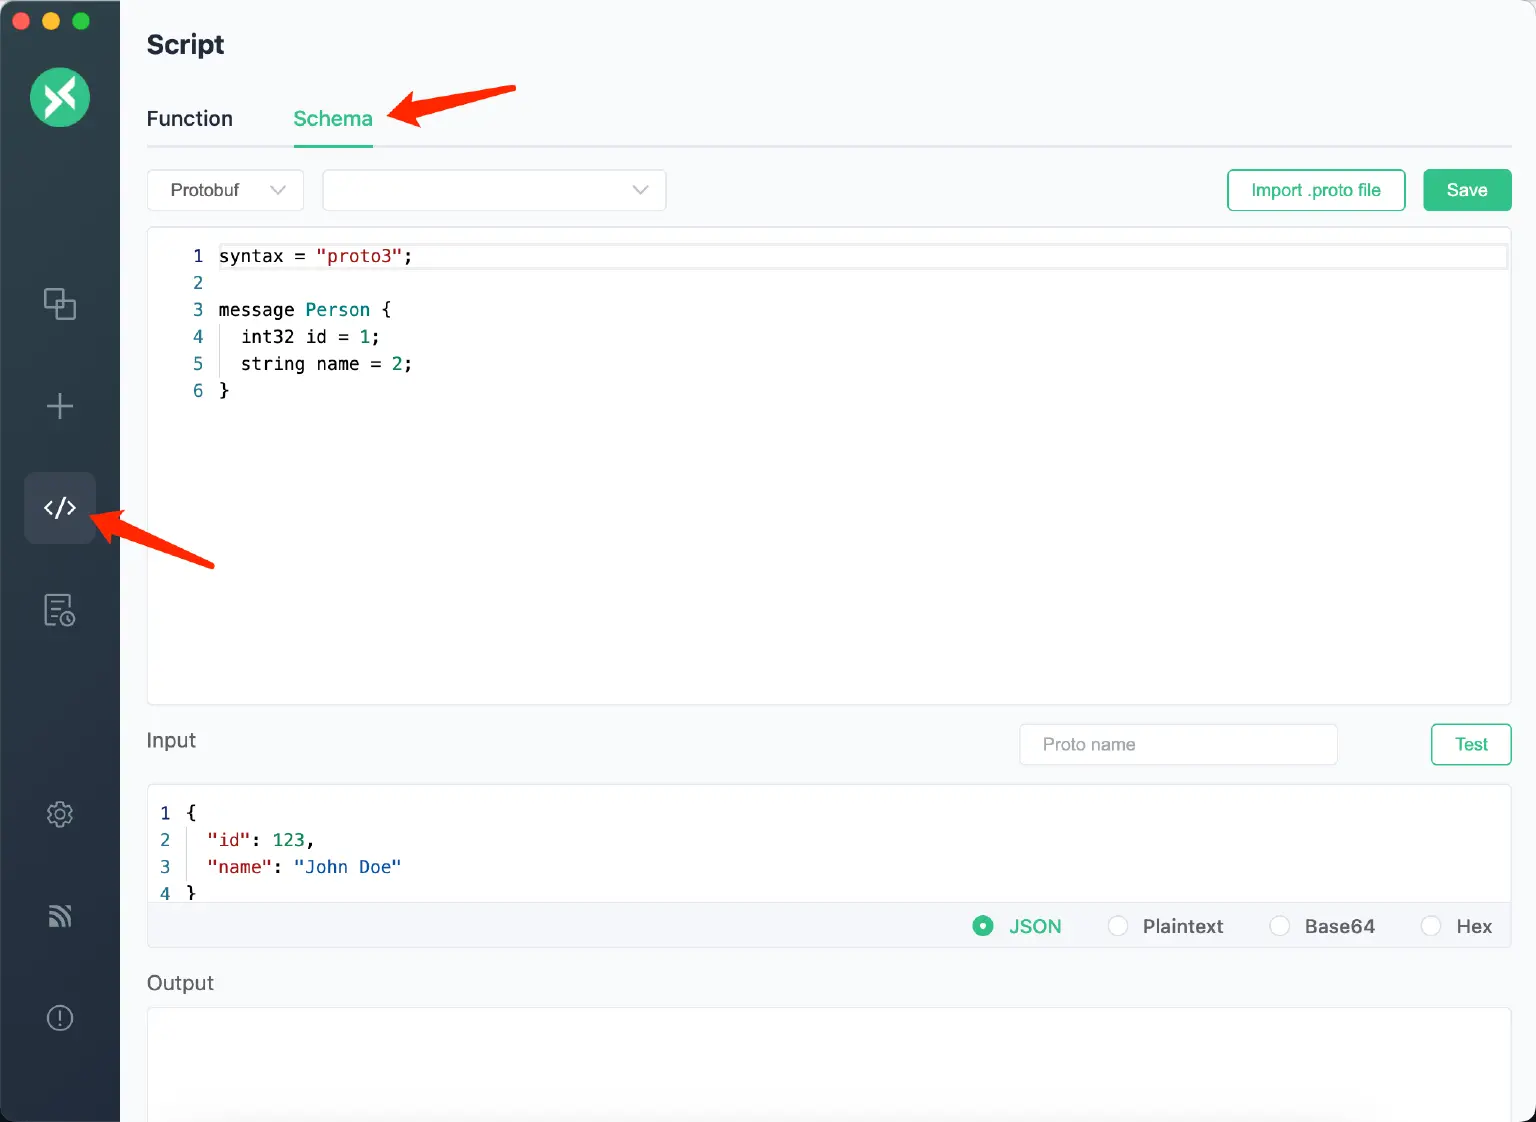
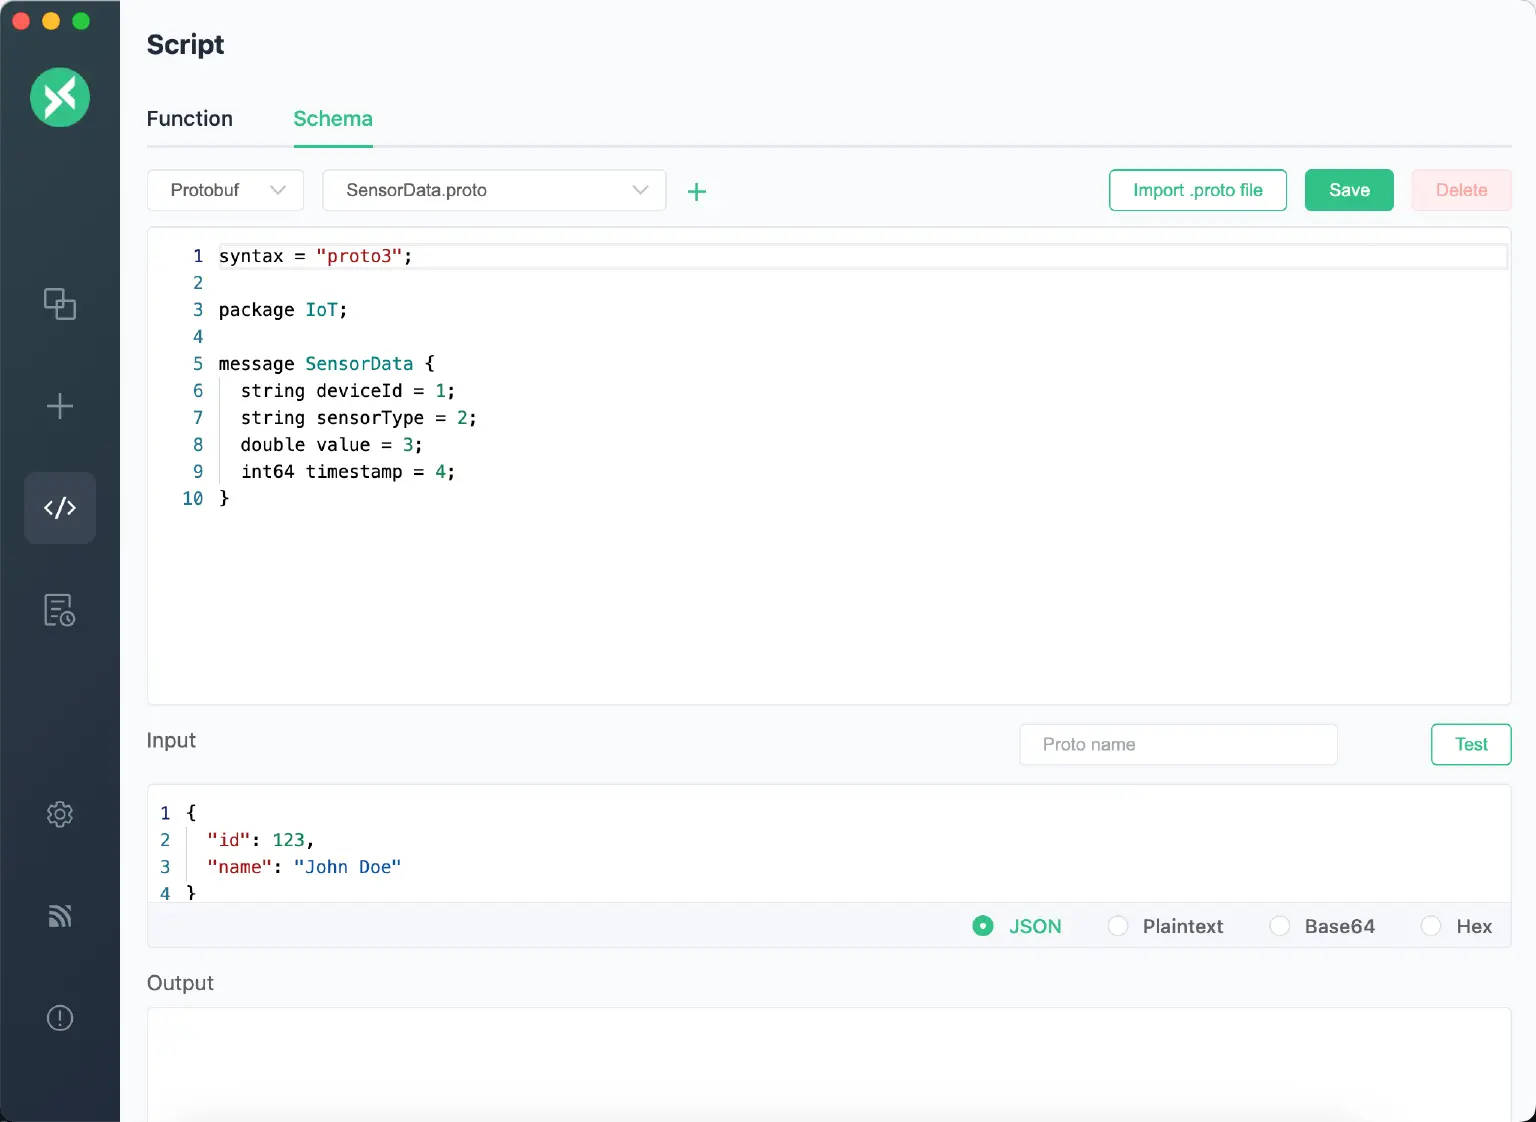
Start the MQTTX client, click the “Scripts” icon in the left menu bar, then select the “Schema” tab. Upon entering this page, there’s a simple default example.
2. Input or Import a .proto File
You can enter the content of a proto file directly in the editor, as demonstrated in the example below. After that, click the "Save" button in the top-right corner to create a new proto Schema in MQTTX. If you have a pre-existing .proto file, you can simply click the "Import .proto File" button in the top right to upload it.
Here’s a commonly used proto format in IoT:
syntax = “proto3”;

package IoT;

message SensorData {
  string deviceId = 1;
  string sensorType = 2;
  double value = 3;
  int64 timestamp = 4;
}
This proto file defines a SensorData message, including device ID, sensor type, sensor value, and timestamp.
3. Connect to the Deployment and Run the Script
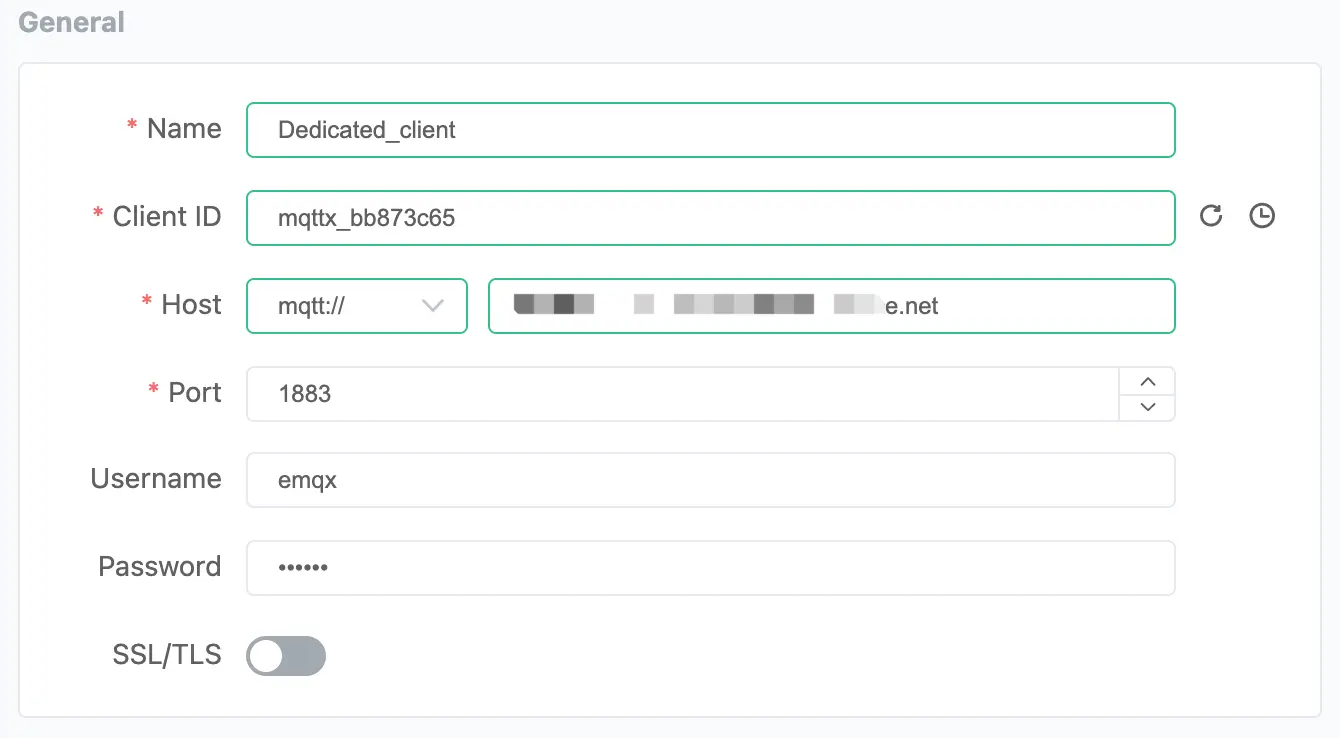
In MQTTX, click “New Connection” and complete the connection form:
- Name: Enter a connection name of your choice.
- Host: This is the MQTT broker connection address, available on the EMQX Dedicated overview page.
- Port: The MQTT broker connection port, also found on the EMQX Dedicated overview page.
- Username/Password: Use the username and password specified in the Authentication settings.
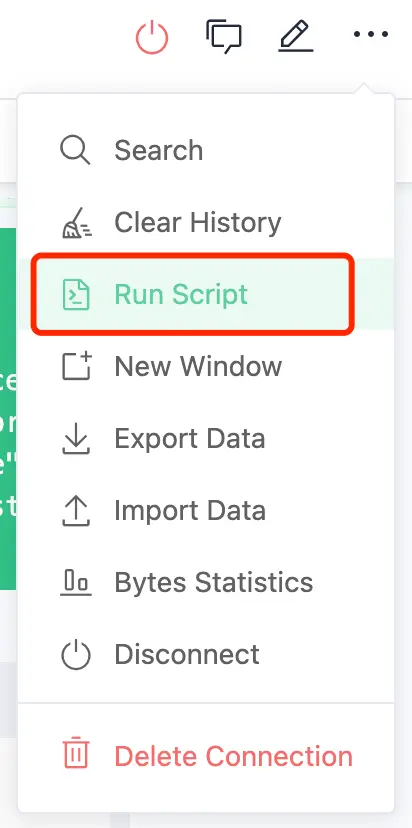
After the connection is established, click the dropdown in the connection page’s top right corner and choose “Run Script”.
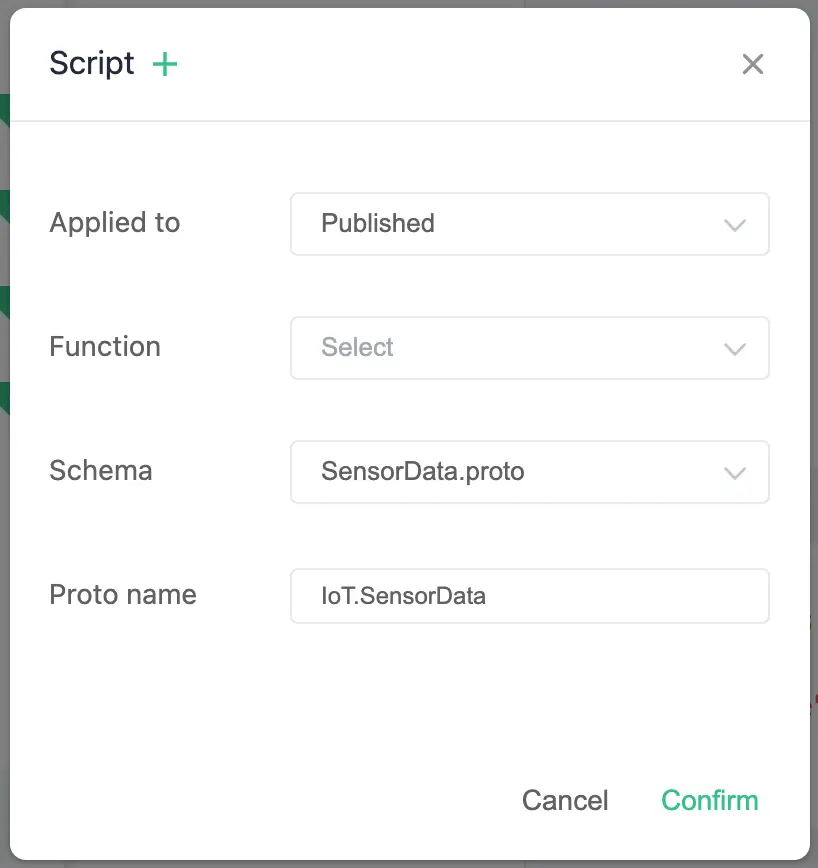
- Apply to Publish or Subscribe: In the pop-up interface, you can decide whether to apply the Schema to message publishing, subscription, or both. For this example, we’ll choose “Published“ to encode the message.
- Select the Schema Script and Set the Proto Name: In the dropdown, choose the proto file you created or imported. In the “Proto Name” input box, enter the message name you defined in the proto file, such as
IoT.SensorData. Ensure all settings are correctly configured before confirming.
3. Publish a Message
After configuring the Protobuf Schema feature in the MQTTX client, you can verify by publishing a message.
- Publish a Message: In the message input box, input the desired JSON data, like:
{ "deviceId": "Device001", "sensorType": "Temperature", "value": 23.5, "timestamp": 1677328490320 } - View the Message: In the message dialogue, you can see the published message marked with "Used SensorData.proto Schema," indicating that this message is encoded using the selected schema.
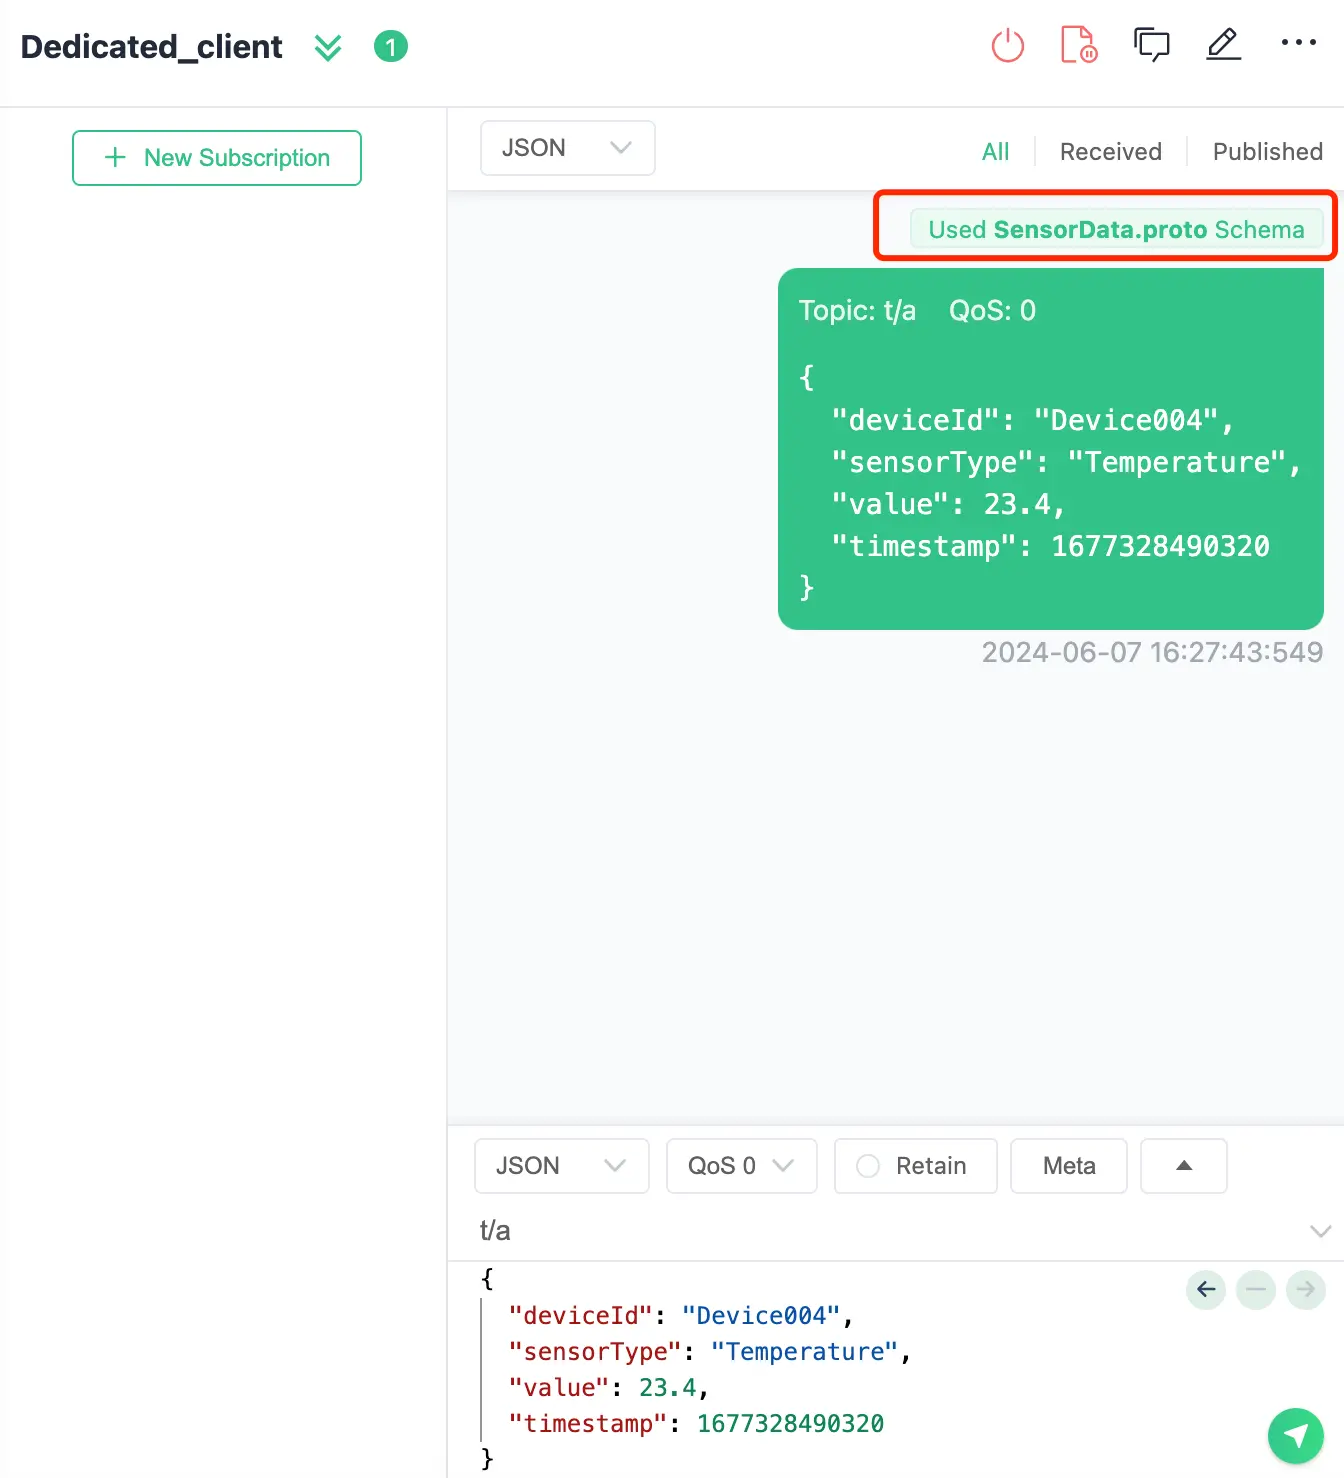
With these settings, MQTTX is ready to use.
Step 3: Set up Data Integration
In Data Integration, the Rule Engine will process the Protobuf messages and republish them to a new topic to demonstrate the Schema Registry feature.
1. Create a Message Republish
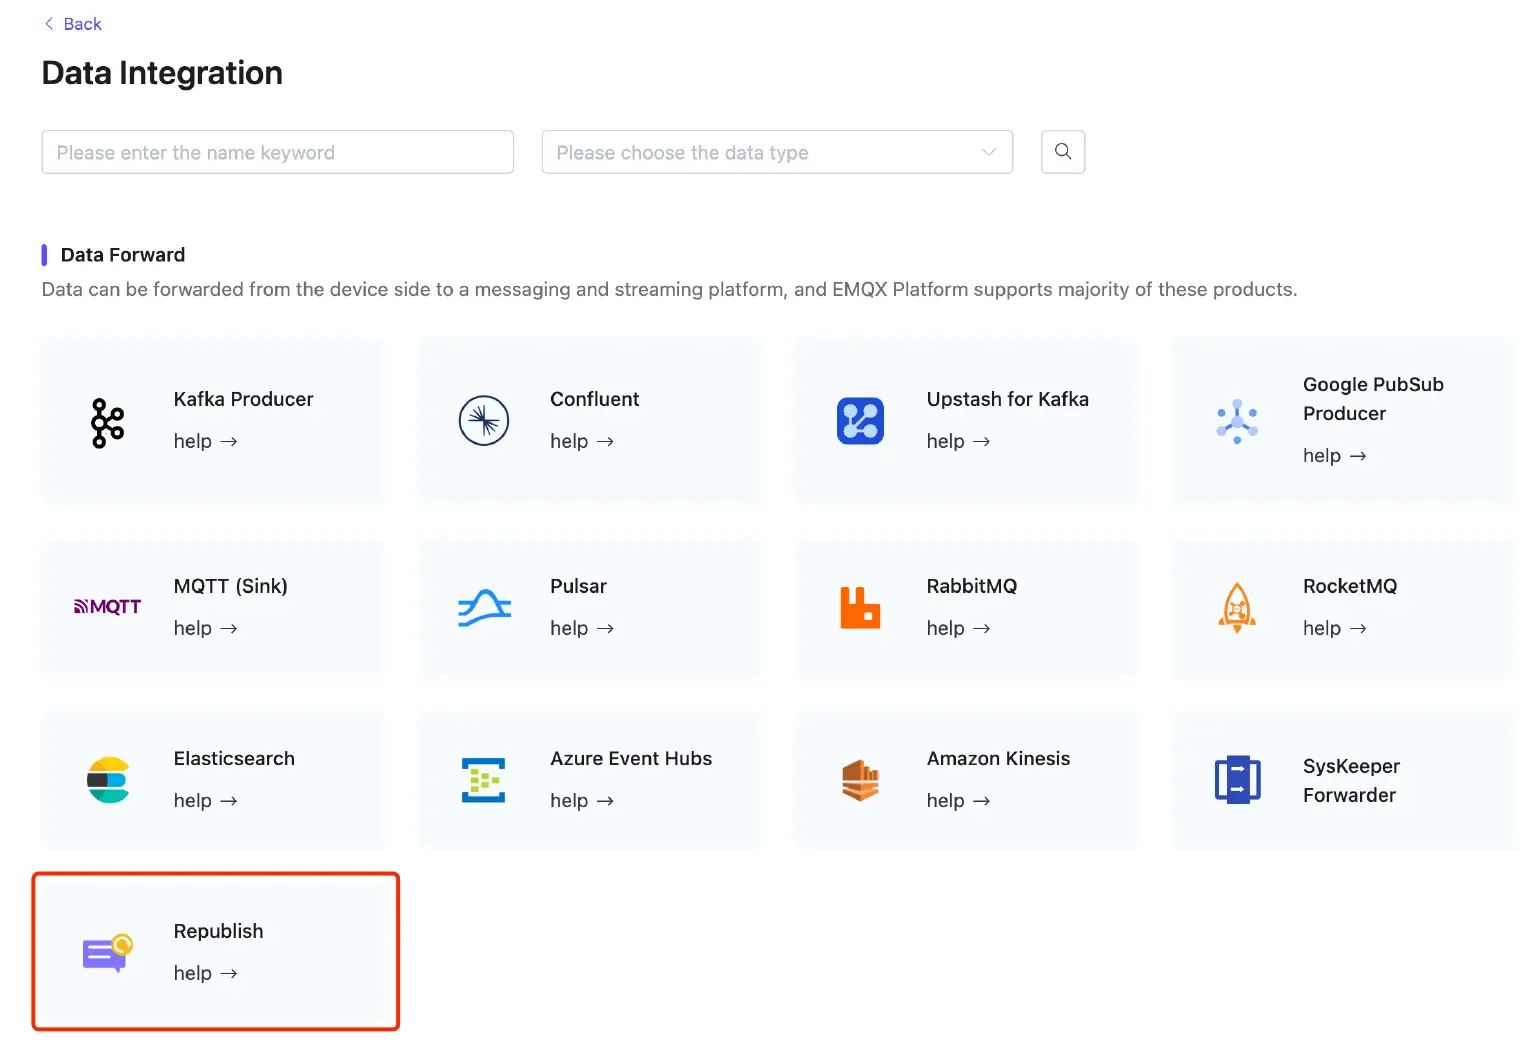
Go to the Data Integrations page and select “Republish” under the “Data Forward” category.
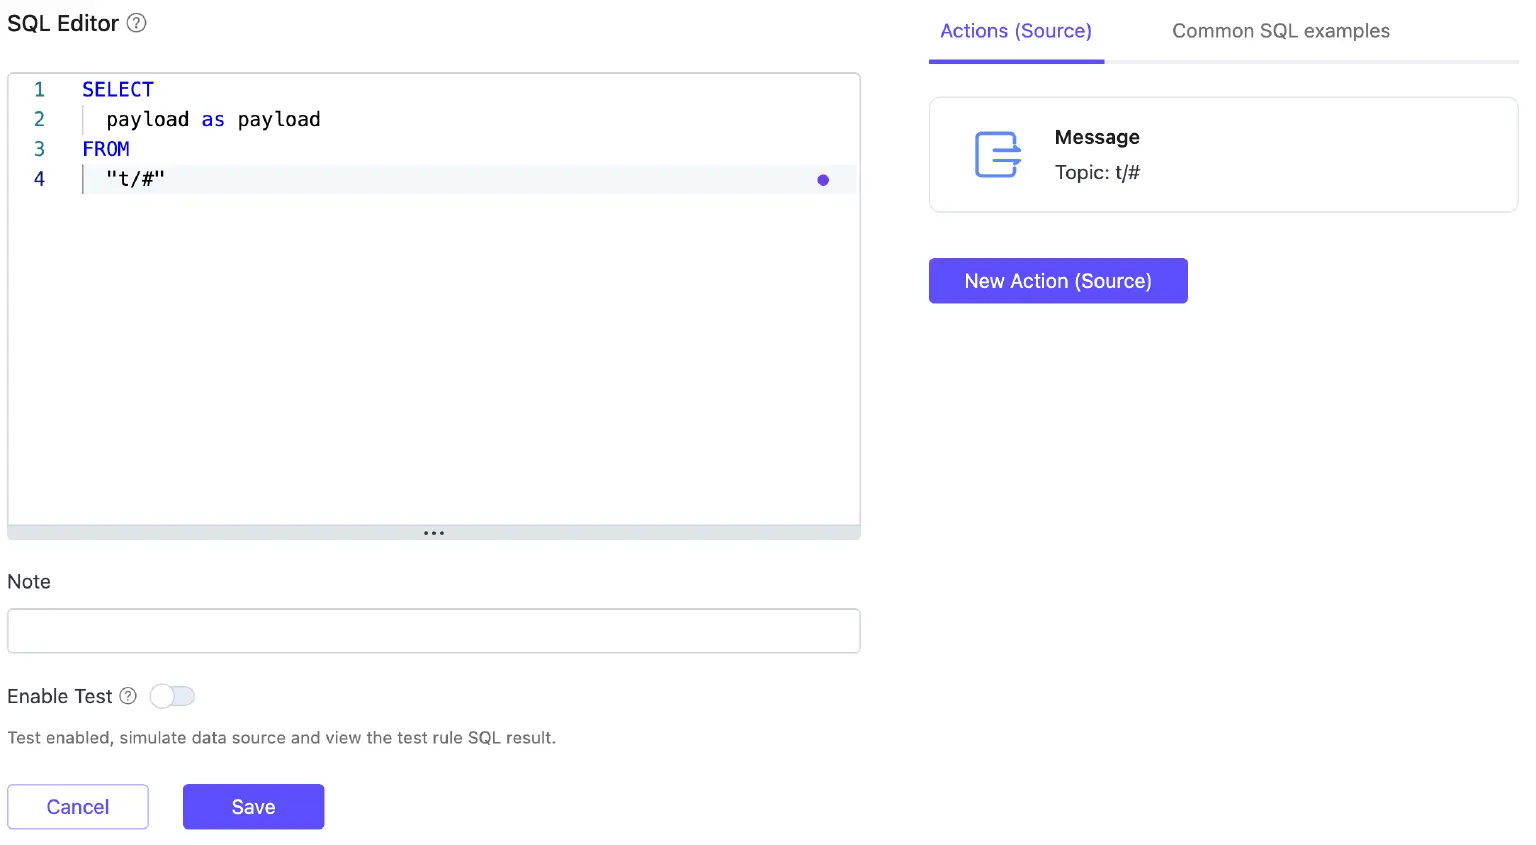
In the SQL Editor, create a new rule to process messages from the topic. Initially, write a rule to receive messages without a schema. This rule will handle messages from the topic t/#.
SELECT
  payload as payload
FROM
  "t/#"
2. Republish Setting
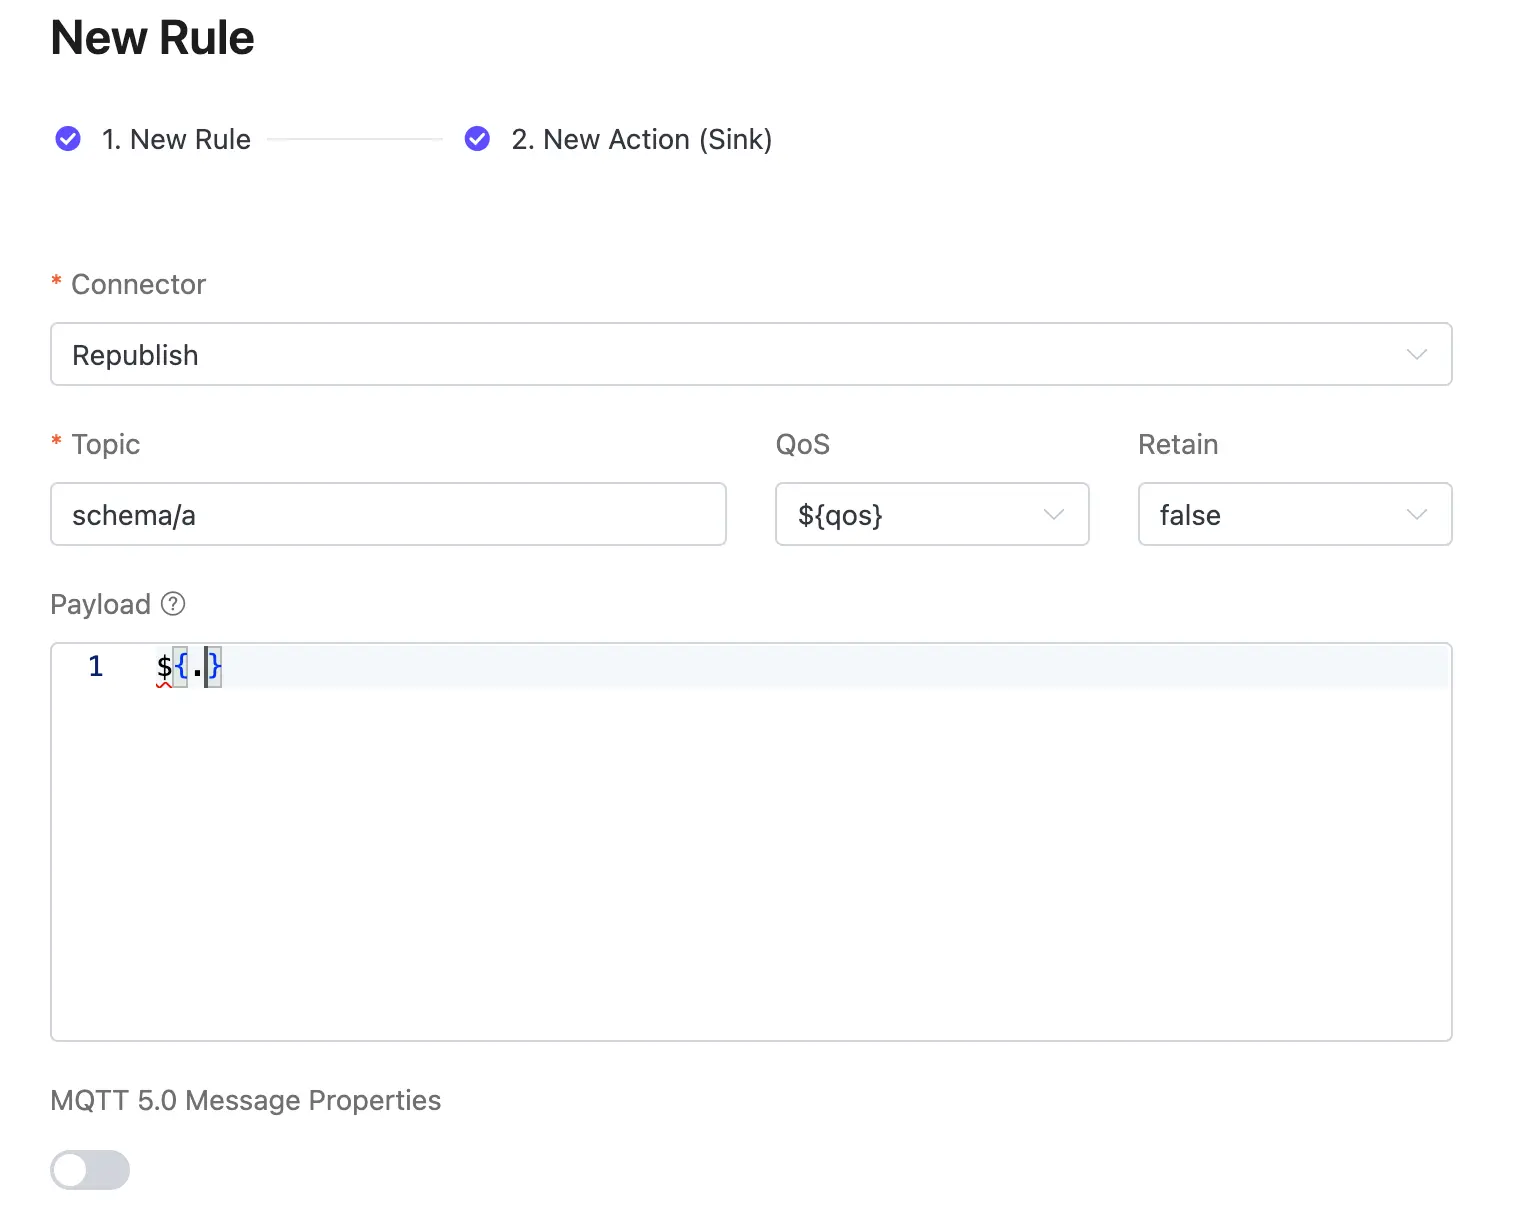
Click “Next” to add an action to output the messages by republishing the messages to a new MQTT topic.
- Topic: The MQTT topic to forward to. In this tutorial, enter
schema/a, all the messages will be sent to this topic. - QoS: Message QoS, choose from
0,1,2, or${qos}, or enter placeholders to set QoS from other fields. Here, choose${qos}to follow the QoS of the original message. - Retain: Choose
true,false, or${flags.retain}, to confirm whether to publish messages as retain messages. You can also enter placeholders to set retain message flags from other fields. - Message Template: Template for generating the forwarded message payload. Leave blank by default to forward the rule output results. Here, enter
${.}to forward all fields from the rule.
3. Subscribe to the Messages in MQTTX
In MQTTX, set the subscription to the topic ‘schema/a’, then send a message encoded with Protobuf to the topic 't/a'. In the dialogue, you will receive a message with an unreadable payload.
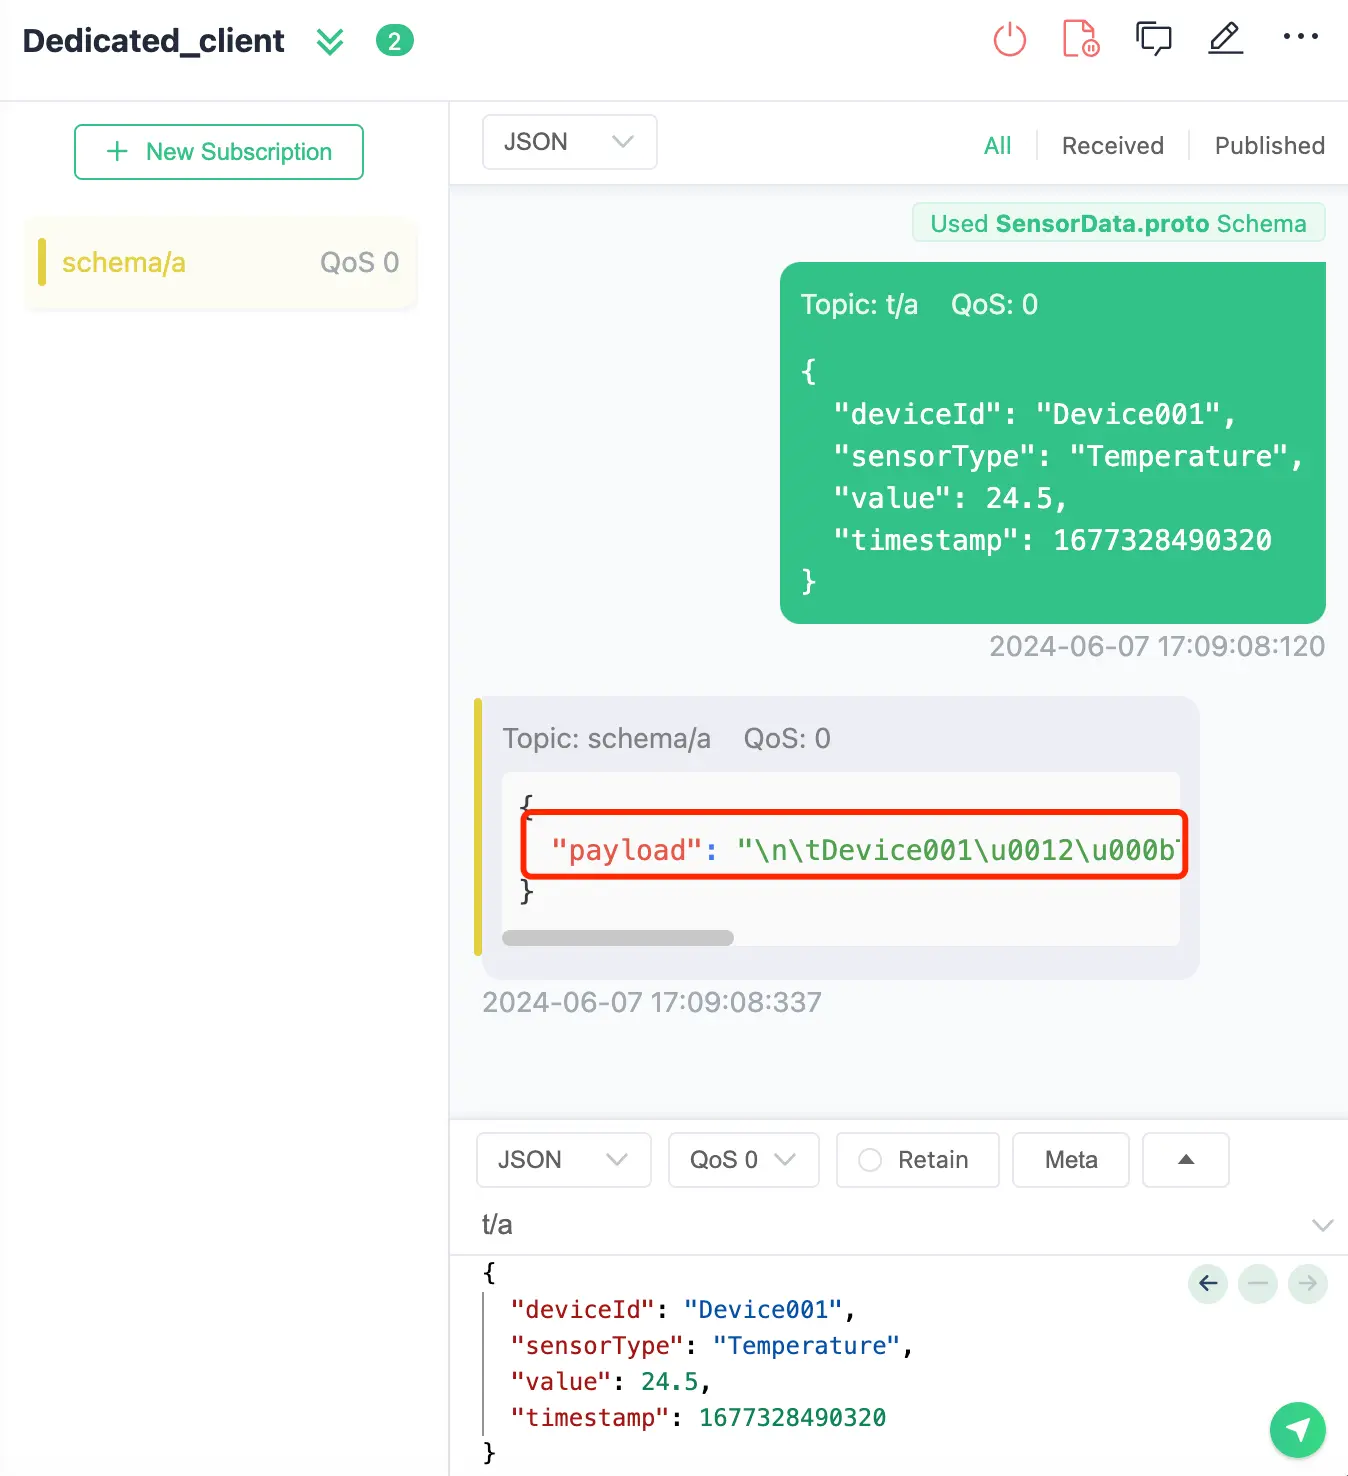
In the next step, we will configure the Schema Registry in Data Integration to verify if we can receive the decoded message.
Step 4: Schema Registry Configuration in Data Integration
1. Create a Protobuf Schema
On the Data Integration page, you will find the ‘Schema Registry' tab, then click 'New Schema Registry’.
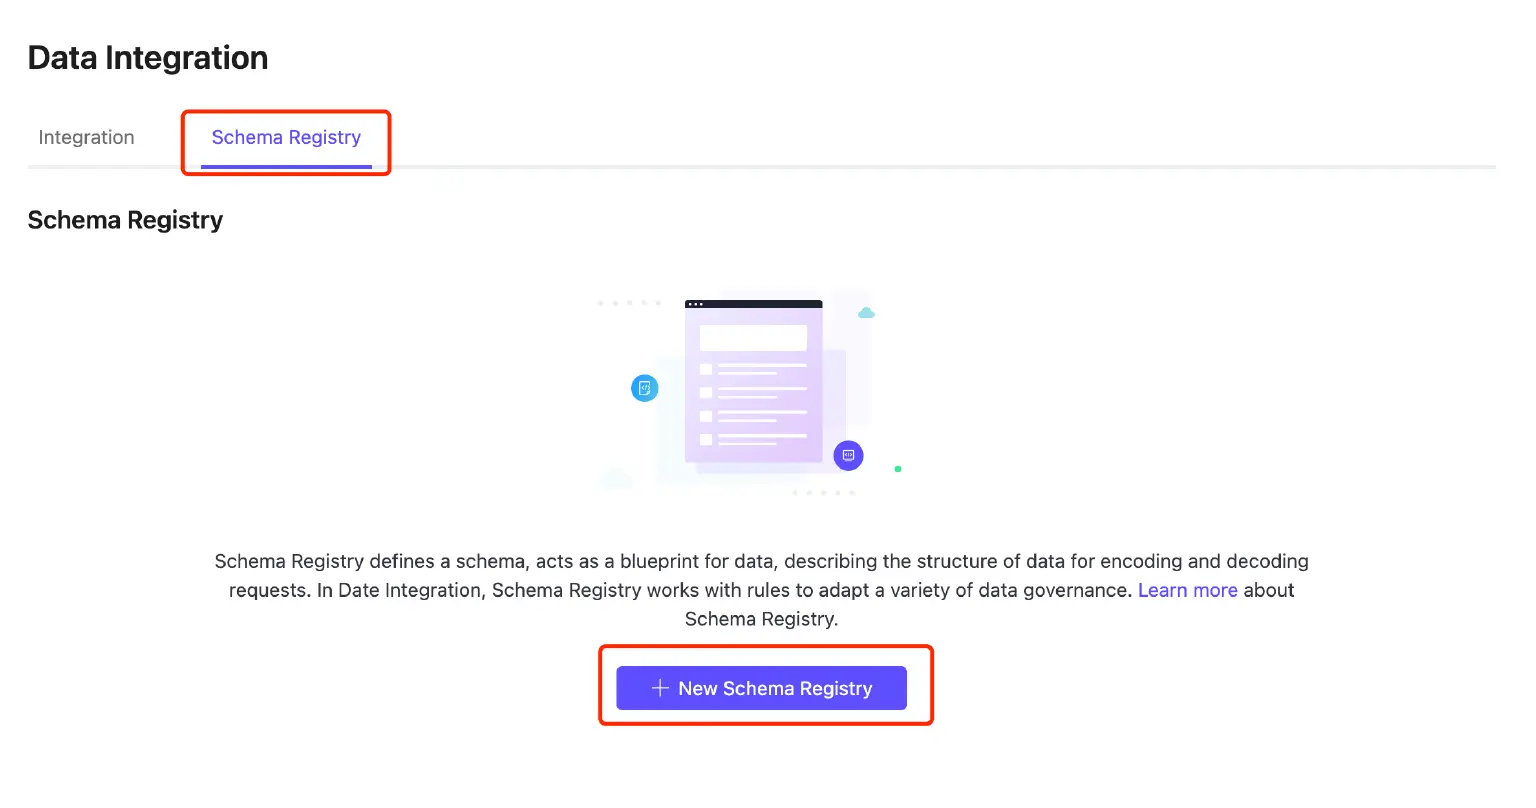
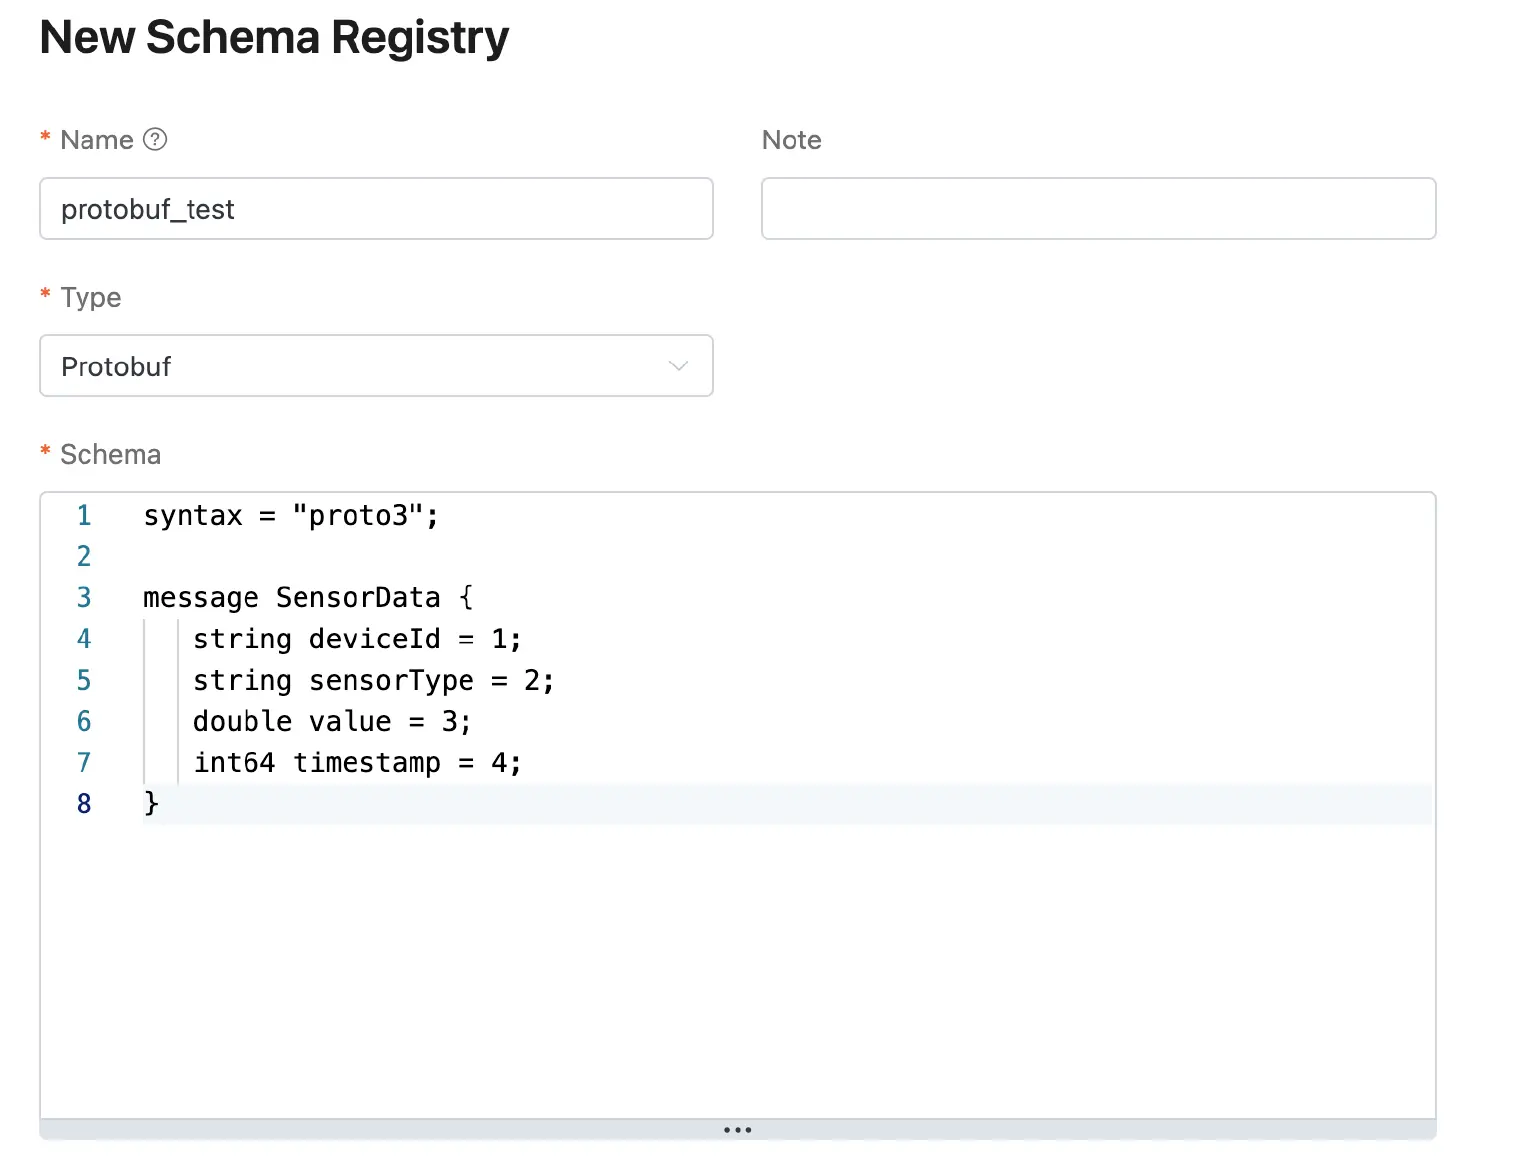
- Give the Schema a name: set the name 'protobuf_test'
- Choose a type: Choose 'Protobuf' from the dropdown menu.
- Schema:
syntax = "proto3";

message SensorData {
   string deviceId = 1;
   string sensorType = 2;
   double value = 3;
   int64 timestamp = 4;
}
2. Include the Schema in the Rule
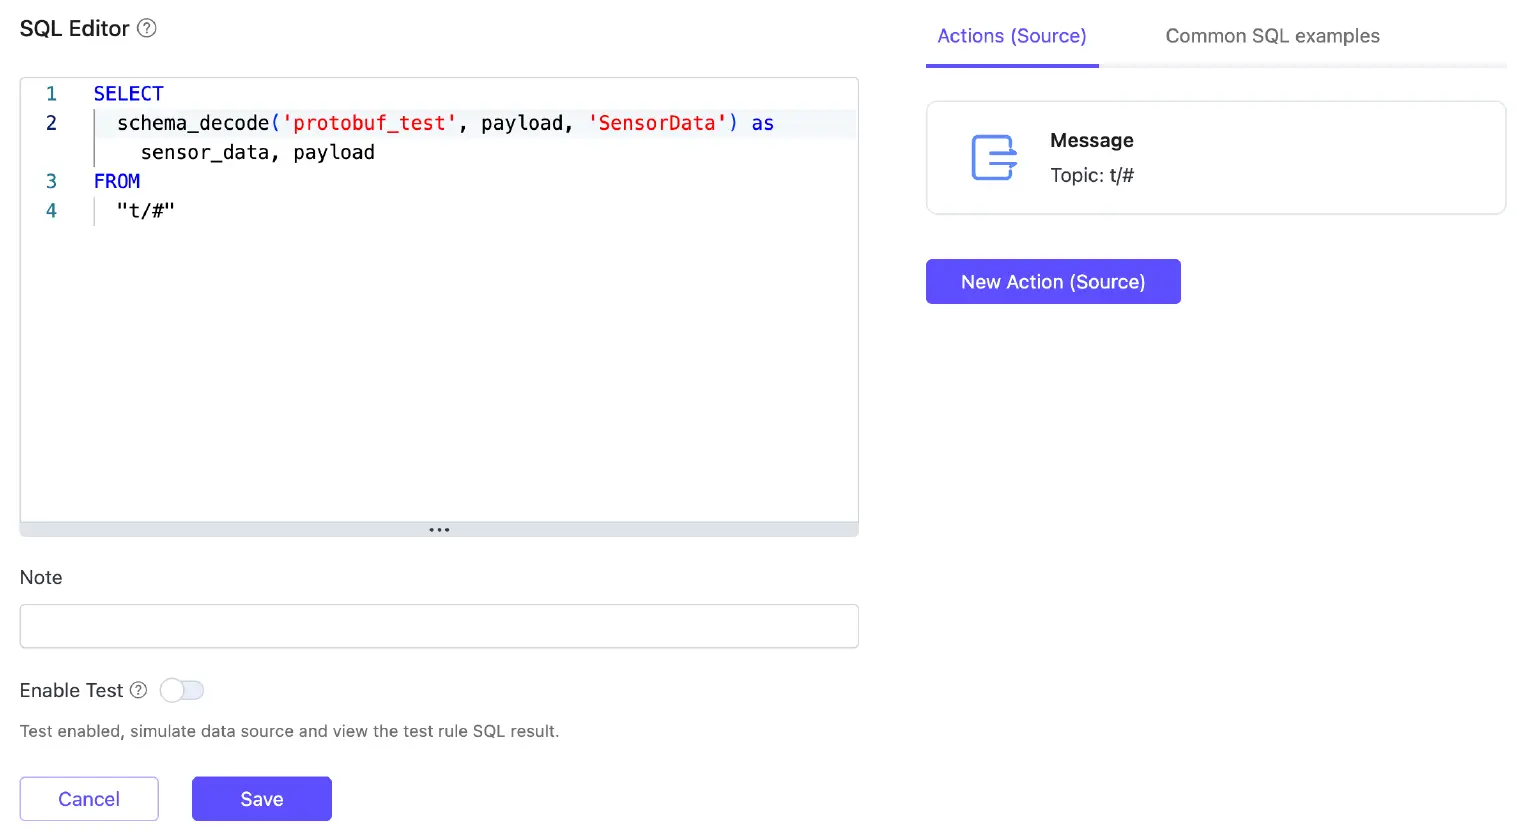
- On the Data Integration page, click and edit the rule we created in Step 3.
- Enter the following in the SQL editor:
SELECT schema_decode('protobuf_sensor', payload, 'SensorData') as sensor_data, payload FROM "t/#" - Save the rule.
3. Check the Decoded Messages in MQTTX
In MQTTX, set the subscription to the topic ‘schema/a’, then send a message to the topic ‘t/a' again. In the dialogue, you will receive a message with the decoded field 'sensor_data’, which is readable compared to the original payload.
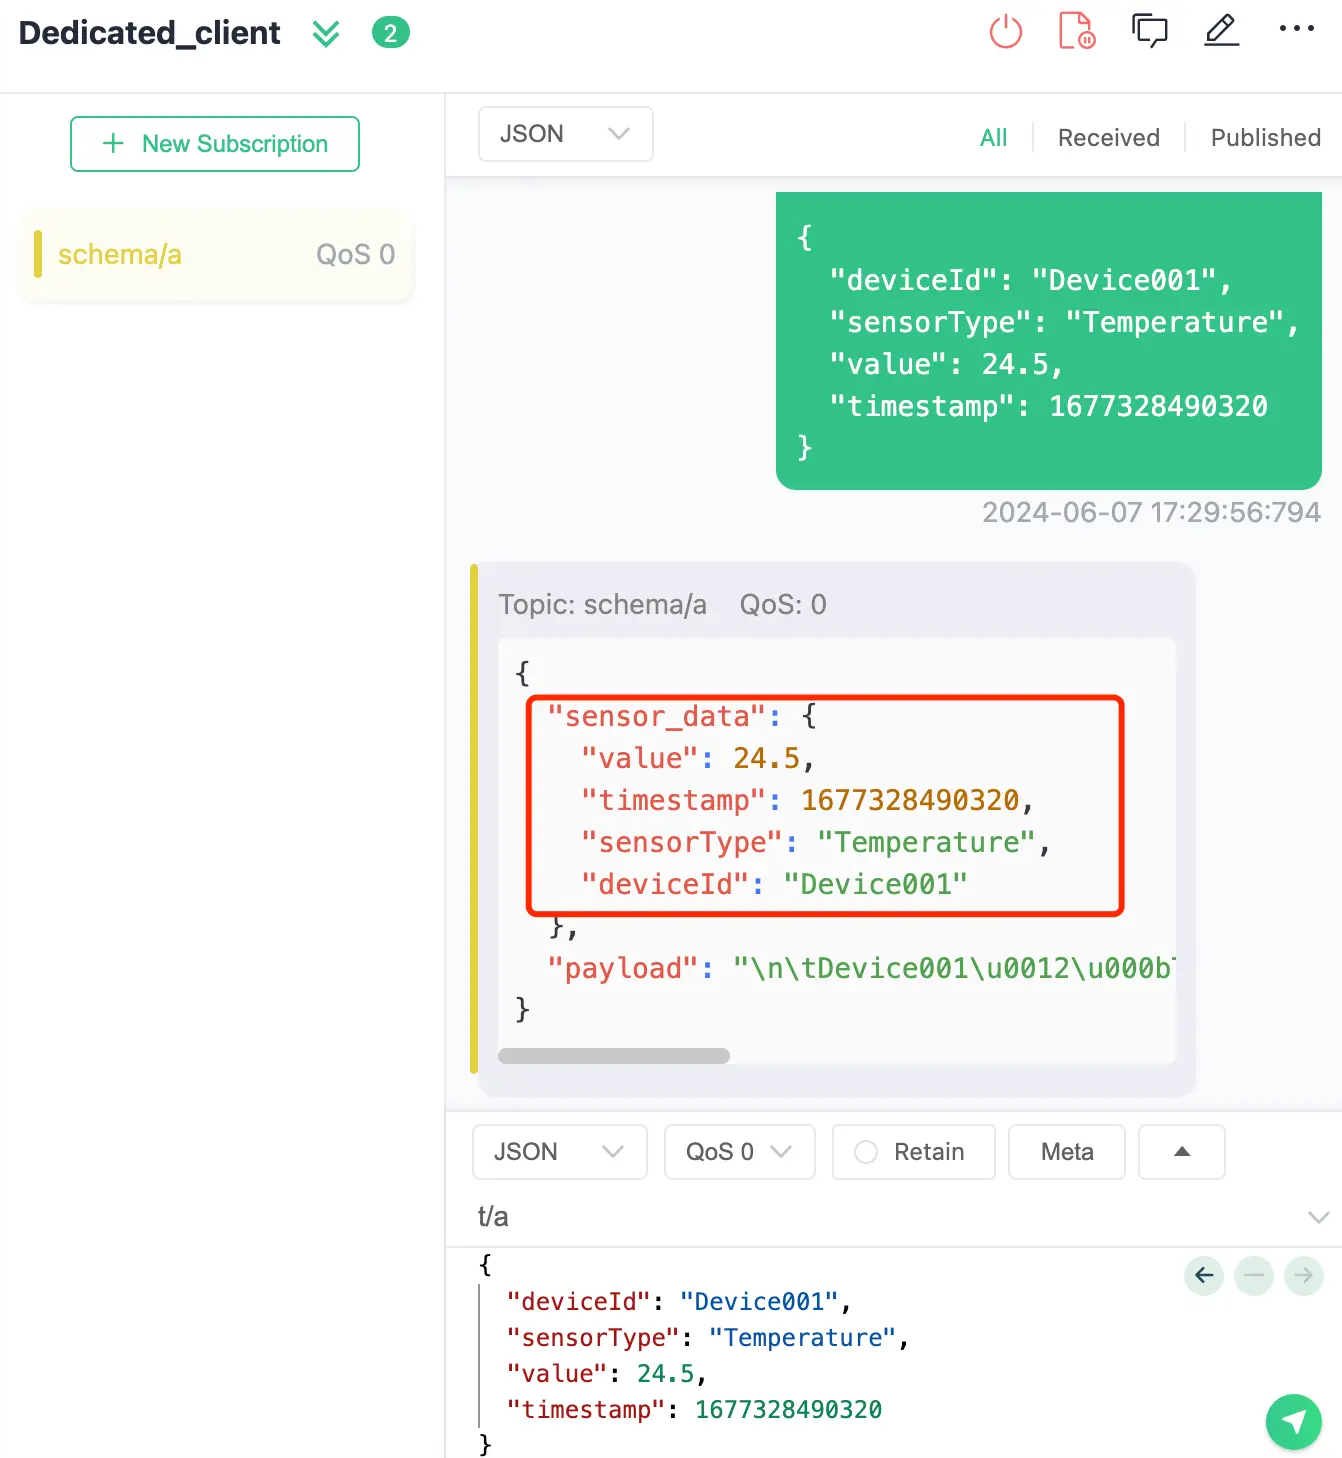
The result verified the Protobuf Schema is successfully set in Data Integration.
Schema Registry Wrap-Up
Schema Registry allows you to define and register schemas for your MQTT data formats. Once registered, these schemas can be shared and reused across various systems and applications. When a client sends data to a message broker, the schema for the data is included in the message header. The Schema Registry then ensures that the schema is valid and compatible with the expected schema for the topic. Using the Schema Registry in Data Integration, you can effortlessly build business-critical applications with secure data formats in EMQX Dedicated.