MQTT with Node.js: A Beginner's Guide with Examples & FAQs
Introduction
MQTT is a lightweight IoT messaging protocol based on the publish/subscribe model. It can provide real-time and reliable messaging services for networked devices with very little code and bandwidth. It is widely used in the industries such as the IoT, mobile Internet, smart hardware, Internet of Vehicles, and power energy.
Node.js is widely used in IoT due to its event-driven architecture and real-time data handling. It can easily connect devices, servers, and APIs. By combining Node.js with MQTT, developers can build scalable and secure IoT applications to communicate with devices in real-time, exchange information, and perform complex data analytics.
This article provides a comprehensive guide on using MQTT in a Node.js project for seamless communication between the client and an MQTT broker. You will learn how to establish a connection, subscribe and unsubscribe to topics, publish messages, and receive messages in real-time. This guide will equip you with the skills to leverage MQTT to build scalable and efficient IoT applications.
Why Use Node.js with MQTT?
- Lightweight Protocol: MQTT minimizes bandwidth usage, perfect for IoT devices.
- Event-Driven Architecture: Node.js handles asynchronous operations, ideal for real-time MQTT communication.
- Scalability: Build robust IoT systems with Node.js MQTT for industries like smart homes, automotive, and energy.
- MQTT.js Library: A widely-used, asynchronous JavaScript library for Node.js MQTT integration.
Node.js MQTT Project Preparation
Confirm Node.js Version
This project utilizes Node.js v22.12.0 for development and testing. To confirm that the correct version of Node.js is installed, readers can use the following command:
node --version

v22.12.0
Install the MQTT.js
MQTT.js is the go-to library for Node.js MQTT applications, supporting both Node.js and browser environments. Install it via npm or Yarn:
- NPM
# create a new project npm init -y # Install dependencies npm install mqtt --save - Yarn
yarn add mqtt
Once installed, we can create a new index.js file in the current directory, which will serve as the entry file for the project. This is where we can implement the complete logic of the MQTT connection test.
Prepare an MQTT Broker
Before proceeding, please ensure you have an MQTT broker to communicate and test with. There are several options for obtaining an MQTT broker:
- Private deployment
EMQX is the most scalable open-source MQTT broker for IoT, IIoT, and connected vehicles. You can run the following Docker command to install EMQX.docker run -d --name emqx -p 1883:1883 -p 8083:8083 -p 8084:8084 -p 8883:8883 -p 18083:18083 emqx/emqx - Fully managed cloud service
The fully managed cloud service is the easiest way to start an MQTT service. EMQX Serverless is a free, cloud-based MQTT service with 1M session minutes/month. Ideal for quick Node.js MQTT testing. - Free public MQTT broker
The Free public MQTT broker is exclusively available for those who wish to learn and test the MQTT protocol. It is important to avoid using it in production environments as it may pose security risks and downtime concerns.
For this blog post, we will use the free public MQTT broker at broker.emqx.io.
MQTT Broker Info
Server:
broker.emqx.ioTCP Port:
1883WebSocket Port:
8083SSL/TLS Port:
8883Secure WebSocket Port:
8084
For more information, please check out: Free Public MQTT Broker.

Node.js MQTT Usage
Create an MQTT Connection
TCP Connection
Import the MQTT.js client library
Note: In the Node.js environment, please use the commonjs specification to import dependency modules
const mqtt = require('mqtt')
To establish the MQTT connection, it is necessary to set the connection address, port, and client ID. In this example, we utilize the built-in function that generates random numbers in JavaScript to generate the client ID.
const protocol = 'mqtt'
const host = 'broker.emqx.io'
const port = '1883'
const clientId = `mqtt_${Math.random().toString(16).slice(3)}`

const connectUrl = `${protocol}://${host}:${port}`
Next, we establish the connection using the URL constructed by splicing the host and port. To achieve this, we call the built-in connect function of the MQTT module, and once the connection is established, it returns a Client instance.
const client = mqtt.connect(connectUrl, {
  clientId,
  clean: true,
  connectTimeout: 4000,
  username: 'emqx',
  password: 'public',
  reconnectPeriod: 1000,
})

client.on('connect', () => {
  console.log('Connected')
})
To learn more, please check out the blog How to Set Parameters When Establishing an MQTT Connection.
WebSocket
When connecting to the broker using MQTT over WebSocket, there are a few things we need to pay attention to:
- The WebSocket connection URL should begin with the
wsprotocol. - Update the port to the correct WebSocket port (e.g., 8083 for
broker.emqx.io). - Ensure to append the path parameter to the end of the connection URL (e.g.,
/mqttforbroker.emqx.io).
const protocol = 'ws'
const host = 'broker.emqx.io'
const port = '8083'
const path = '/mqtt'
const clientId = `mqtt_${Math.random().toString(16).slice(3)}`

const connectUrl = `${protocol}://${host}:${port}${path}`
TLS/SSL
Using TLS in MQTT can ensure the confidentiality and integrity of information, preventing information leakage and tampering. TLS authentication can be classified into one-way authentication and two-way authentication.
One-way authentication
const fs = require('fs')

const protocol = 'mqtts'
const host = 'broker.emqx.io'
const port = '8883'
const clientId = `mqtt_${Math.random().toString(16).slice(3)}`

const connectUrl = `${protocol}://${host}:${port}`

const client = mqtt.connect(connectUrl, {
  clientId,
  clean: true,
  connectTimeout: 4000,
  username: 'emqx',
  password: 'public',
  reconnectPeriod: 1000,

  // If the server is using a self-signed certificate, you need to pass the CA.
  ca: fs.readFileSync('./broker.emqx.io-ca.crt'),
})
Two-way authentication
const fs = require('fs')

const protocol = 'mqtts'
const host = 'broker.emqx.io'
const port = '8883'
const clientId = `mqtt_${Math.random().toString(16).slice(3)}`

const connectUrl = `${protocol}://${host}:${port}`

const client = mqtt.connect(connectUrl, {
  clientId,
  clean: true,
  connectTimeout: 4000,
  username: 'emqx',
  password: 'public',
  reconnectPeriod: 1000,

  // Enable the SSL/TLS, whether a client verifies the server's certificate chain and host name
  rejectUnauthorized: true,
  // If you are using Two-way authentication, you need to pass the CA, client certificate, and client private key.
  ca: fs.readFileSync('./broker.emqx.io-ca.crt'),
  key: fs.readFileSync('./client.key'),
  cert: fs.readFileSync('./client.crt'),
})
Subscribe to an MQTT Topic
We use the on function of the returned Client instance to monitor the connection status and subscribe to the topic /nodejs/mqtt in the callback function after the successful connection.
const topic = '/nodejs/mqtt'

client.on('connect', () => {
  console.log('Connected')
  client.subscribe([topic], () => {
    console.log(`Subscribe to topic '${topic}'`)
  })
})
With a successful subscription to the topic, we can monitor incoming messages using the on function. When a new message arrives, we can obtain the related topic and message within the callback function of this function. This allows us to handle the received message and respond accordingly effectively.
Note: The message received within the callback function is of type Buffer and needs to be converted into a string by the toString function.
client.on('message', (topic, payload) => {
  console.log('Received Message:', topic, payload.toString())
})
Publish MQTT Messages
After completing the above topic subscription and message monitoring, we will write a function for publishing messages.
Note: The message needs to be published after the MQTT connection is successful, so we write it in the callback function after the connection is successful.
client.on('connect', () => {
  client.publish(topic, 'nodejs mqtt test', { qos: 0, retain: false }, (error) => {
    if (error) {
      console.error(error)
    }
  })
})
Disconnect MQTT Connection
In MQTT.js, we need to use the end() method on the mqtt.Client object to disconnect from the broker. This method releases resources and closes the connection. Passing a parameter of true to the method will force the disconnection, which will not send a DISCONNECT message but will instead close the connection directly. We can also pass in a callback function that will be called once the disconnection is completed.
// Disconnect
client.end()

// Force disconnect
client.end(true)

// Callback for disconnection
client.end(false, {}, () => {
  console.log('client disconnected')
})
Please refer to the official documentation for more information about the end() method.
Error Handling
- Connection error handling
client.on('error', (error) => { console.error('connection failed', error) }) - Reconnection error handling
client.on('reconnect', (error) => { console.error('reconnect failed', error) }) - Subscription error handling
client.on('connect', () => { client.subscribe('topic', subOpts, (error) => { if (error) { console.error('subscription failed', error) } }) }) - Publishing error handling
client.on('connect', () => {
  client.publish('topic', 'hello mqtt', (error) => {
    if (error) {
      console.error('publish failed', error)
    }
  })
})
Complete code
The code for server connection, topic subscription, message publishing, and receiving is as follows.
const mqtt = require('mqtt')

const host = 'broker.emqx.io'
const port = '1883'
const clientId = `mqtt_${Math.random().toString(16).slice(3)}`

const connectUrl = `mqtt://${host}:${port}`

const client = mqtt.connect(connectUrl, {
  clientId,
  clean: true,
  connectTimeout: 4000,
  username: 'emqx',
  password: 'public',
  reconnectPeriod: 1000,
})

const topic = '/nodejs/mqtt'

client.on('connect', () => {
  console.log('Connected')

  client.subscribe([topic], () => {
    console.log(`Subscribe to topic '${topic}'`)
    client.publish(topic, 'nodejs mqtt test', { qos: 0, retain: false }, (error) => {
      if (error) {
        console.error(error)
      }
    })
  })
})

client.on('message', (topic, payload) => {
  console.log('Received Message:', topic, payload.toString())
})
For the complete code of this project, please check it on GitHub.
Testing Your Node.js MQTT Application
Add a startup script to package.json:
"scripts": {
  "start": "node index.js"
}
Use npm start to run the project.
npm start
Then, we can see the output information of the console as follows:
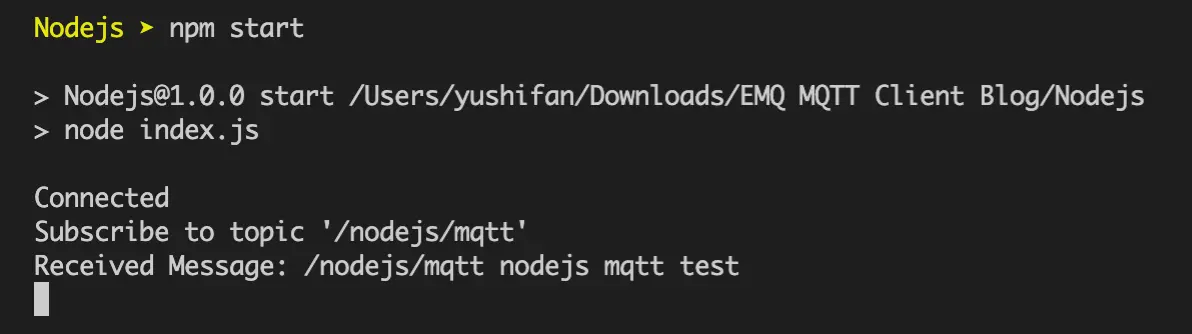
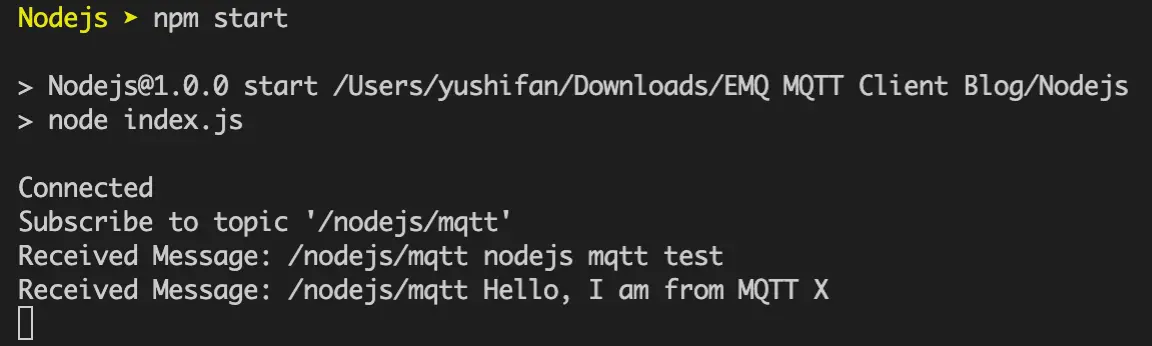
We see that the client has successfully connected to the MQTT broker and subscribed to the topic, received and published messages successfully. At this point, we will use MQTT Client Tool - MQTTX as another client for the message publishing and receiving test.
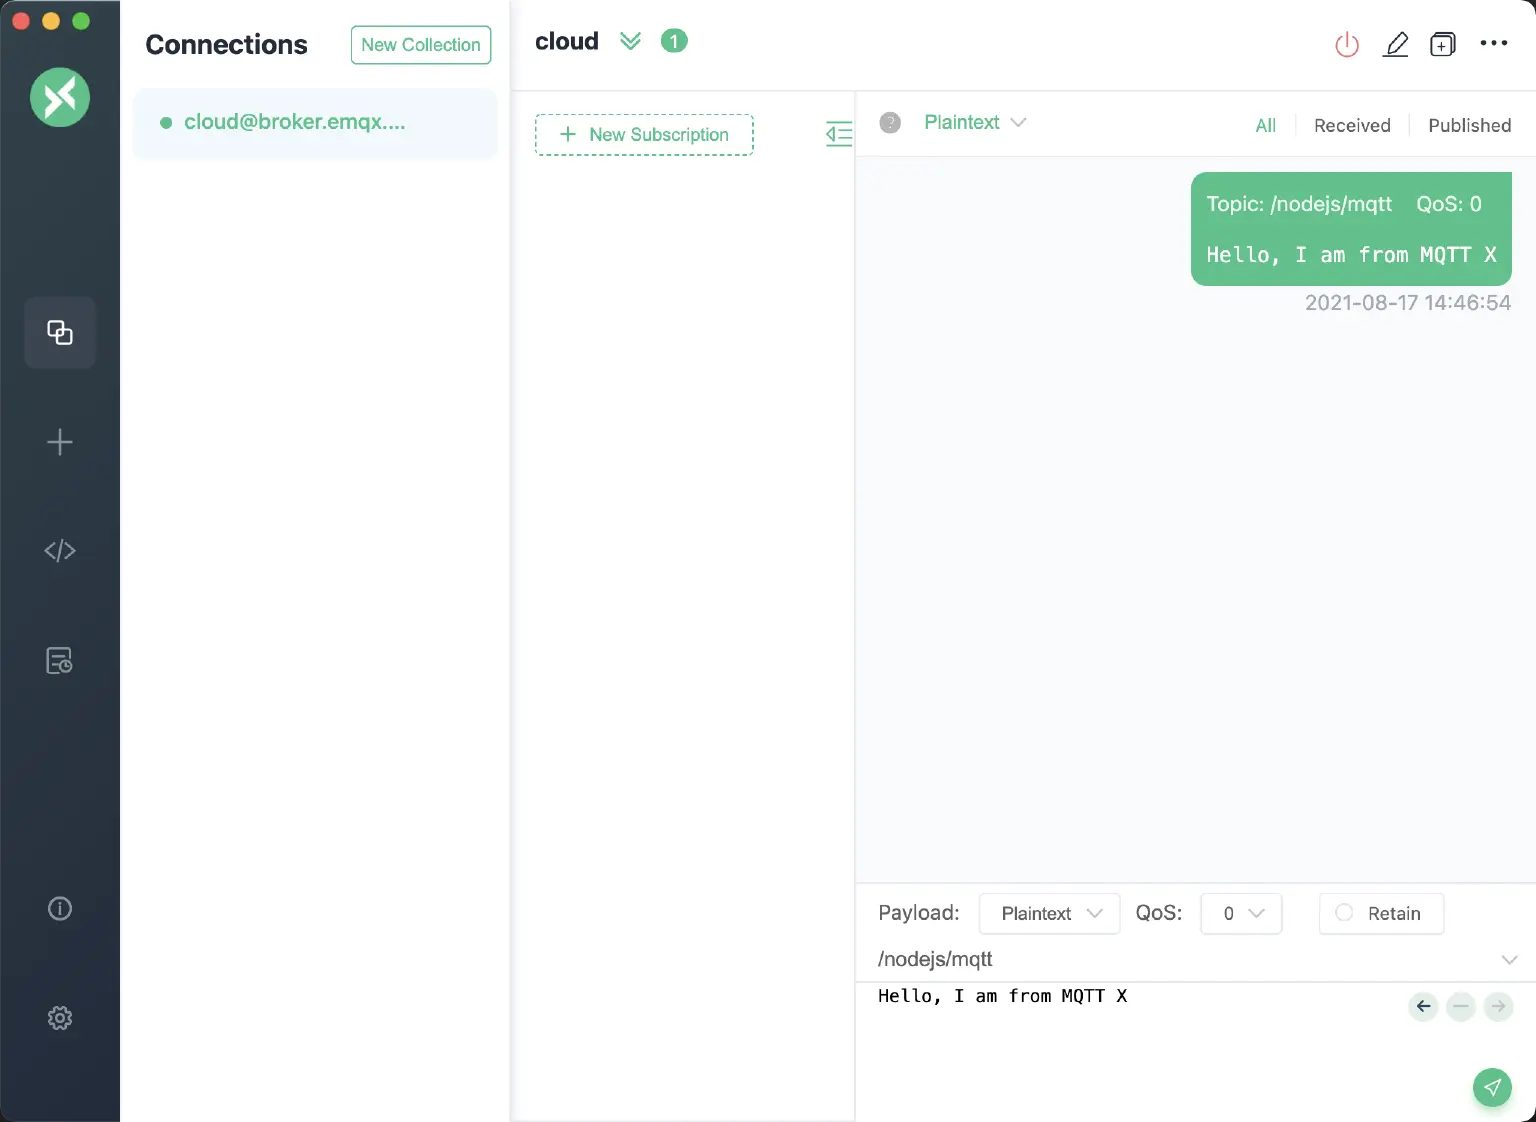
We can see that the message sent by MQTTX is printed in the console.
FAQs for Node.js MQTT
What format do MQTT messages come in?
MQTT messages come as a Buffer when using MQTT with Node.js. This is because they are designed to handle raw binary data, which could include any form of data, not just text.
How can I handle an MQTT message received as a Buffer in Node.js?
To handle a Buffer in Node.js, you can convert it to a string using the toString() method. If the original message was a JSON object, you might need to parse the string back into an object with JSON.parse(). Here's an example:
client.on('message', (topic, message) => {
  // message is a Buffer
  let strMessage = message.toString();
  let objMessage = JSON.parse(strMessage);
  console.log(objMessage);
})
What if the MQTT message sent is not in JSON format?
If the MQTT message is not JSON, you can still convert it to a string using the toString() method. However, if the content was not originally a string (for example, if it's binary data), you might need to handle it differently depending on the nature of the data.
What to do when Node.js MQTT clients don't receive messages?
- Make sure you're subscribed to the correct topic. MQTT topics are case-sensitive and must be an exact match.
- Ensure the broker is running and you can connect to it.
- If you're using MQTT QoS level 1 or 2, ensure the message is published with the same QoS level.
- Listen for
errorevents on your client to see if an error is thrown, which could explain why you're not receiving messages.
How can I debug issues in my Node.js MQTT application?
- Listen for 'error' events on your MQTT client. This often provides helpful information about any problems.
- Use console.log statements in your code to check the flow and see the content of variables.
- If you have problems with MQTT messages, try subscribing to the '#' topic. This is a wildcard topic that matches all messages, so you can see everything that's being published.
- If you're having connectivity issues, please check your broker's logs to see if there are any clues there.
- Consider using a tool like MQTTX to manually connect to your broker and publish/subscribe to topics. This can help determine whether the problem is with your Node.js code or the broker.
Advanced Node.js MQTT Use Cases
Using MQTT in Web frameworks such as Express.js
Express.js is an open-source web application framework that uses Node.js to build web applications and APIs. It is currently one of the most popular Node.js web frameworks and is highly flexible and scalable when creating web applications.
To integrate MQTT into Express.js, you can handle MQTT connection, publishing, and subscribing operations in its middleware. The following is a simple example code:
import express from 'express'
import * as mqtt from 'mqtt'

const app = express()
const mqttClient = mqtt.connect('mqtt://localhost:1883')

// Connect to the MQTT broker
mqttClient.on('connect', function () {
  console.log('Connected to MQTT broker')
})

// MQTT middleware for publishing and subscribing
app.use(function (req, res, next) {
  // Publish messages
  req.mqttPublish = function (topic, message) {
    mqttClient.publish(topic, message)
  }

  // Subscribe to topic
  req.mqttSubscribe = function (topic, callback) {
    mqttClient.subscribe(topic)
    mqttClient.on('message', function (t, m) {
      if (t === topic) {
        callback(m.toString())
      }
    })
  }
  next()
})

app.get('/', function (req, res) {
  // Publish
  req.mqttPublish('test', 'Hello MQTT!')

  // Subscribe
  req.mqttSubscribe('test', function (message) {
    console.log('Received message: ' + message)
  })

  res.send('MQTT is working!')
})

app.listen(3000, function () {
  console.log('Server is running on port 3000')
})
The above code creates an Express.js application and defines the req.mqttPublish() and req.mqttSubscribe() functions to handle MQTT publish and subscribe. These functions can be used in route handling to publish messages and subscribe to MQTT topics. In this example, when accessing the root path, a "Hello MQTT!" message will be published to the "test" topic, then subscribed to receive and process any incoming messages.
This is just a simple example implementation, and real-world applications might require more complex processing, such as handling multiple topics and validating request parameters.
Building Command-line tools in Node.js
Node.js boasts a robust open-source ecosystem, enabling developers to quickly create MQTT client tools that meet specific business requirements by leveraging various open-source libraries. Moreover, Node.js offers effortless packaging of projects into executable files using the pkg tool, enabling cross-platform deployment. For instance, one can build a customized command-line tool and integrate it into the business environment, by utilizing the Commander.js command-line tool library in Node.js.
Next, we demonstrate how to build a straightforward MQTT command-line tool using Commander.js. This tool features two commands: pub and sub.
- The
pubcommand enables users to publish messages to a specified topic. - The
subcommand permits users to subscribe to the specified topic and display received messages.
// mqtt-cli.js

import { program } from 'commander'
import mqtt from 'mqtt'

// MQTT Broker URL
const brokerUrl = 'mqtt://localhost:1883'

// Define CLI commands
program
  .command('pub')
  .description('Publish message to the given topic')
  .option('-t, --topic <TOPIC>', 'the message topic')
  .option('-m, --message <BODY>', 'the message body')
  .action((options) => {
    const { topic, message } = options

    const client = mqtt.connect(brokerUrl)

    client.on('connect', () => {
      client.publish(topic, message, () => {
        console.log(`Published message "${message}" to topic "${topic}"`)
        client.end()
      })
    })
  })

program
  .command('sub')
  .description('Subscribe to the given topic and log incoming messages')
  .option('-t, --topic <TOPIC>', 'the message topic')
  .action((options) => {
    const { topic } = options

    const client = mqtt.connect(brokerUrl)

    client.on('connect', () => {
      console.log(`Subscribed to topic "${topic}"`)

      client.subscribe(topic, () => {
        client.on('message', (topic, message) => {
          console.log(`Received message "${message.toString()}" on topic "${topic}"`)
        })
      })
    })
  })

program.parse(process.argv)
# Subscribe to test topic
node mqtt-cli.js sub -t test

# Publish an MQTT message
node mqtt-cli.js pub -t test -m 'Hello MQTT!'
Summary
This guide demonstrated how to use Node.js MQTT to build scalable IoT applications. By leveraging MQTT.js and brokers like EMQX, you can create robust systems for real-time device communication.
Explore advanced topics in the MQTT Guide: Beginner to Advanced to deepen your understanding.
Resources
- How to Use MQTT in Vue
- How to Use MQTT in React
- How to Use MQTT in Angular
- How to Use MQTT in Electron
- A Quickstart Guide to Using MQTT over WebSocket