How to Use MQTT over WebSocket: A Beginner's Guide

MQTT over WebSocket has become an indispensable technology for connecting web browsers to the world of the Internet of Things (IoT). By combining the lightweight efficiency of MQTT with the real-time, bi-directional capabilities of WebSockets, it enables web applications to seamlessly communicate with IoT devices.
In this guide, you will learn how to use MQTT over WebSocket in a browser using MQTT.js, connect to an MQTT broker via WebSocket, and implement publishing and subscribing in real time. We will also cover secure WebSocket connections (WSS) and common configuration mistakes.
What is the Difference Between MQTT and WebSocket?
Before diving into the practical steps, let's quickly review the two protocols at play:
- MQTT (Message Queuing Telemetry Transport): A lightweight messaging protocol designed for low-bandwidth, high-latency networks. It uses a publish/subscribe model, making it highly efficient for communication between resource-constrained devices.
- WebSocket: A communication protocol that provides a full-duplex, persistent connection over a single TCP connection. Unlike HTTP, it allows for real-time, two-way communication between a client and a server.
The synergy of these two protocols is powerful. MQTT over WebSocket allows you to leverage the efficiency of MQTT's publish/subscribe model directly within any web browser, which natively supports WebSockets. This simplifies development and democratizes access to IoT data, as you can now build web dashboards and applications that interact with IoT devices in real time without a complex backend.
Key Benefits of MQTT over WebSocket
Choosing to implement MQTT over WebSocket offers several compelling advantages:
- Simplified Interaction: Interact directly with IoT devices via any web browser. No need to worry about different protocols – MQTT over WebSocket makes it straightforward.
- Universal Accessibility: With a web browser, anyone can connect to and interact with IoT devices. This opens up the world of IoT to everyone, not just those with technical expertise.
- Real-Time Updates: Get data from IoT devices in real-time, providing the most current insights directly to your browser.
- Efficiency and Broad Support: MQTT is a lightweight protocol and, combined with the widespread support of WebSocket in JavaScript, it allows for efficient real-time data transmission on almost any web application.
- Enhanced Data Visualization: Web pages can better, faster, and more richly display various MQTT data. This advantage is particularly significant as web browsers become the de facto interface for visualizing MQTT data.
MQTT over WebSocket democratizes access to IoT devices, enabling anyone with a web browser to interact with these devices in real-time and easily.
Prerequisites: MQTT Broker Setup
Before proceeding, please ensure you have an MQTT broker to communicate and test with. There are several options available for obtaining an MQTT broker:
- Self-Hosted
You can deploy an open-source broker like EMQX using a simple Docker command. EMQX is the most scalable open-source MQTT broker for IoT, IIoT, and connected vehicles.docker run -d --name emqx -p 1883:1883 -p 8083:8083 -p 8084:8084 -p 8883:8883 -p 18083:18083 emqx/emqx - Fully managed cloud service
For a hassle-free experience, a managed cloud service like EMQX Cloud Serverless offers a forever free tier, allowing you to get a deployment up and running in minutes and run your MQTT service in 20+ regions across AWS, Google Cloud, and Microsoft Azure. - Free public MQTT broker
The Free public MQTT broker is exclusively available for those who wish to learn and test the MQTT protocol. It is important to avoid using it in production environments as it may pose security risks and downtime concerns.
For this blog post, we will use the free public MQTT broker at broker.emqx.io.
MQTT Broker Info:
Server:
broker.emqx.ioTCP Port:
1883WebSocket Port:
8083SSL/TLS Port:
8883Secure WebSocket Port:
8084
For more information, please visit Free Public MQTT Broker.
EMQX uses port 8083 for normal connections and port 8084 for WebSocket over TLS by default.

Get Started with MQTT over WebSocket
In this section, we will use MQTT.js to establish an MQTT over WebSocket connection to an MQTT broker using a WebSocket-enabled endpoint.
Install MQTT WebSocket Client
MQTT.js is a fully open-source client-side library for the MQTT protocol, written in JavaScript and available for Node.js and browsers. It supports MQTT/TCP, MQTT/TLS, and MQTT/WebSocket connections.
This article will use the MQTT.js library to explain WebSocket connections.
To install MQTT.js, use the npm command if you have the Node.js runtime environment on your machine. You can install it globally and connect via the command line on the Node.js.
Installation for Node.js Project
# npm
npm install mqtt --save

# yarn
yarn add mqtt
CDN References
If you're working directly in the browser and prefer not to install the library, you can also use a CDN:
<script src="https://unpkg.com/mqtt/dist/mqtt.min.js"></script>

<script>
   // Globally initializes an mqtt variable
   console.log(mqtt)
</script>
Connect to Broker over WebSocket in Browser
For simplicity, we will implement this directly in the browser by creating a basic HTML file. In this file, we'll set up both a publisher and a subscriber.
<!DOCTYPE html>
<html lang="en">
<head>
  <meta charset="UTF-8">
  <meta name="viewport" content="width=device-width, initial-scale=1.0">
  <title>WebSocket MQTT</title>
  <script src="https://unpkg.com/mqtt/dist/mqtt.min.js"></script>
</head>
<body>
  Use WebSocket client to connect to MQTT server
</body>
<script>
    const clientId = 'mqttjs_' + Math.random().toString(16).substring(2, 10)
    const host = 'ws://broker.emqx.io:8083/mqtt'
    const options = {
      keepalive: 60,
      clientId: clientId,
      protocolId: 'MQTT',
      protocolVersion: 5,
      clean: true,
      reconnectPeriod: 1000,
      connectTimeout: 30 * 1000,
      will: {
        topic: 'WillMsg',
        payload: 'Connection Closed abnormally..!',
        qos: 0,
        retain: false
      },
    }
    console.log('Connecting mqtt client')
    const client = mqtt.connect(host, options)
    client.on('error', (err) => {
      console.log('Connection error: ', err)
      client.end()
    })
    client.on('reconnect', () => {
      console.log('Reconnecting...')
    })
</script>
Connection Address
The example connection address, ws://broker.emqx.io:8083/mqtt, includes protocol // hostname . domain : port / path.
Common mistakes by beginners include:
- When connecting to the MQTT.js client, it is important to specify the protocol type in the connection address. This is because the client supports multiple protocols. Additionally, MQTT does not specify a port for WebSocket. EMQX defaults to 8083 for non-encrypted connections, while for encrypted connections, it defaults to
8084. - Excluding path from the connection address: MQTT over WebSocket uniformly uses
/mqttas the connection path, which should be specified when connecting. - The protocol and port are mismatched. Please use
mqtt://for MQTT,ws://orwss://for WebSocket connections, and make sure to use encrypted WebSocket connections when under HTTPS. - The certificate does not match the connection address.
Connection Options
In the previous code snippet, options refer to the client connection options. These options include parameters such as keepalive, clientId, username, password, clean, reconnectPeriod, connectTimeout, and will. For more detailed descriptions of each option, please refer to the MQTT.js documentation.
Subscribe/Unsubscribe Topics
Subscriptions can only be made after a successful connection, and the subscribed topics must comply with MQTT subscription topic rules. JavaScript's asynchronous feature means a successful connection is only ensured after the 'connect' event or by using client.connected.
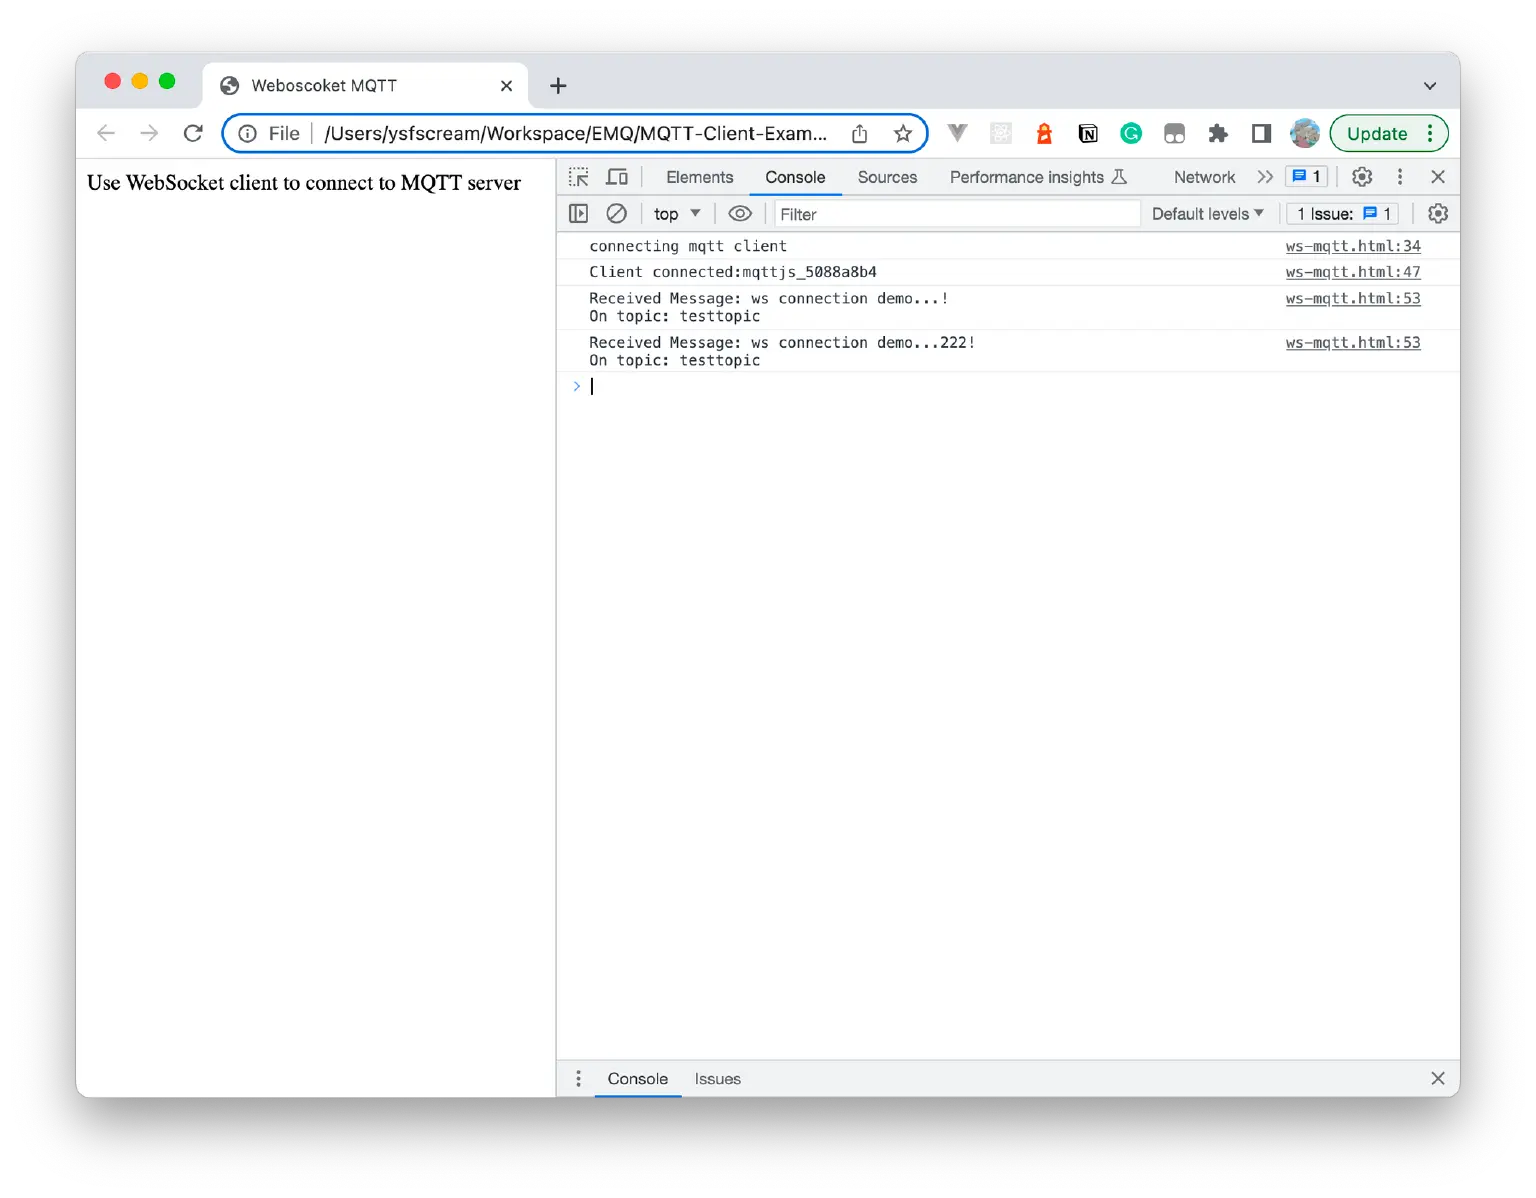
client.on('connect', () => {
  console.log(`Client connected: ${clientId}`)
  // Subscribe
  client.subscribe('testtopic', { qos: 0 })
})
// Unsubscribe
client.unsubscribe('testtopic', () => {
  console.log('Unsubscribed');
})
Publish/Receive Messages
You can publish messages to specific topics, which must comply with the MQTT publish topic rules. You do not need to subscribe to the topic before publishing; the client must be connected.
// Publish
client.publish('testtopic', 'ws connection demo...!', { qos: 0, retain: false })
// Receive
client.on('message', (topic, message, packet) => {
  console.log(`Received Message: ${message.toString()} On topic: ${topic}`)
})
For more detailed information and examples, please refer to JavaScript MQTT Client: A Beginner's Guide to MQTT.js.
Use WebSocket over SSL/TLS
Secure WebSocket connections can be established using the WSS protocol (WebSocket Secure), essentially a WebSocket over a TLS (previously SSL) connection. TLS is used to encrypt the data that is sent over the connection, ensuring data privacy and integrity, as well as authentication.
To use WebSocket over TLS with MQTT.js, you need to change the protocol in the broker address from ws to wss. However, you must also ensure that the broker you are connecting to supports WSS connections and that the port number is correct for WSS. For example, EMQX uses port 8084 for WSS connections by default.
Here's an example of how you might establish a secure connection:
const host = 'wss://broker.emqx.io:8084/mqtt'
const options = {
  // other options as before
}

const client = mqtt.connect(host, options)

// rest of your code...
Remember, if you're connecting to a broker over WSS from a web page served over HTTPS, you must ensure the broker's certificate is trusted by the client's browser. This usually means the certificate must be issued by a well-known certificate authority and not be expired, revoked, or used for a different domain. If you're using a self-signed certificate for the broker, you must manually add it to the browser's trust store.
For more details and potential issues related to using WebSocket over TLS, please refer to the MQTT.js documentation or the appropriate tutorial for your MQTT broker.
Note: When using WebSocket connections in a browser, it is not possible to establish two-way authenticated connections. However, this feature is supported in most other programming language environments. For example, in Node.js:
const mqtt = require('mqtt')
const fs = require('fs')
const path = require('path')

const KEY = fs.readFileSync(path.join(__dirname, '/tls-key.pem'))
const CERT = fs.readFileSync(path.join(__dirname, '/tls-cert.pem'))
const TRUSTED_CA_LIST = fs.readFileSync(path.join(__dirname, '/crt.ca.cg.pem'))

const host = 'wss://broker.emqx.io:8084/mqtt'
const options = {
    ...
  key: KEY,
  cert: CERT,
  rejectUnauthorized: true,
  ca: TRUSTED_CA_LIST,
}

const client = mqtt.connect(host, options)
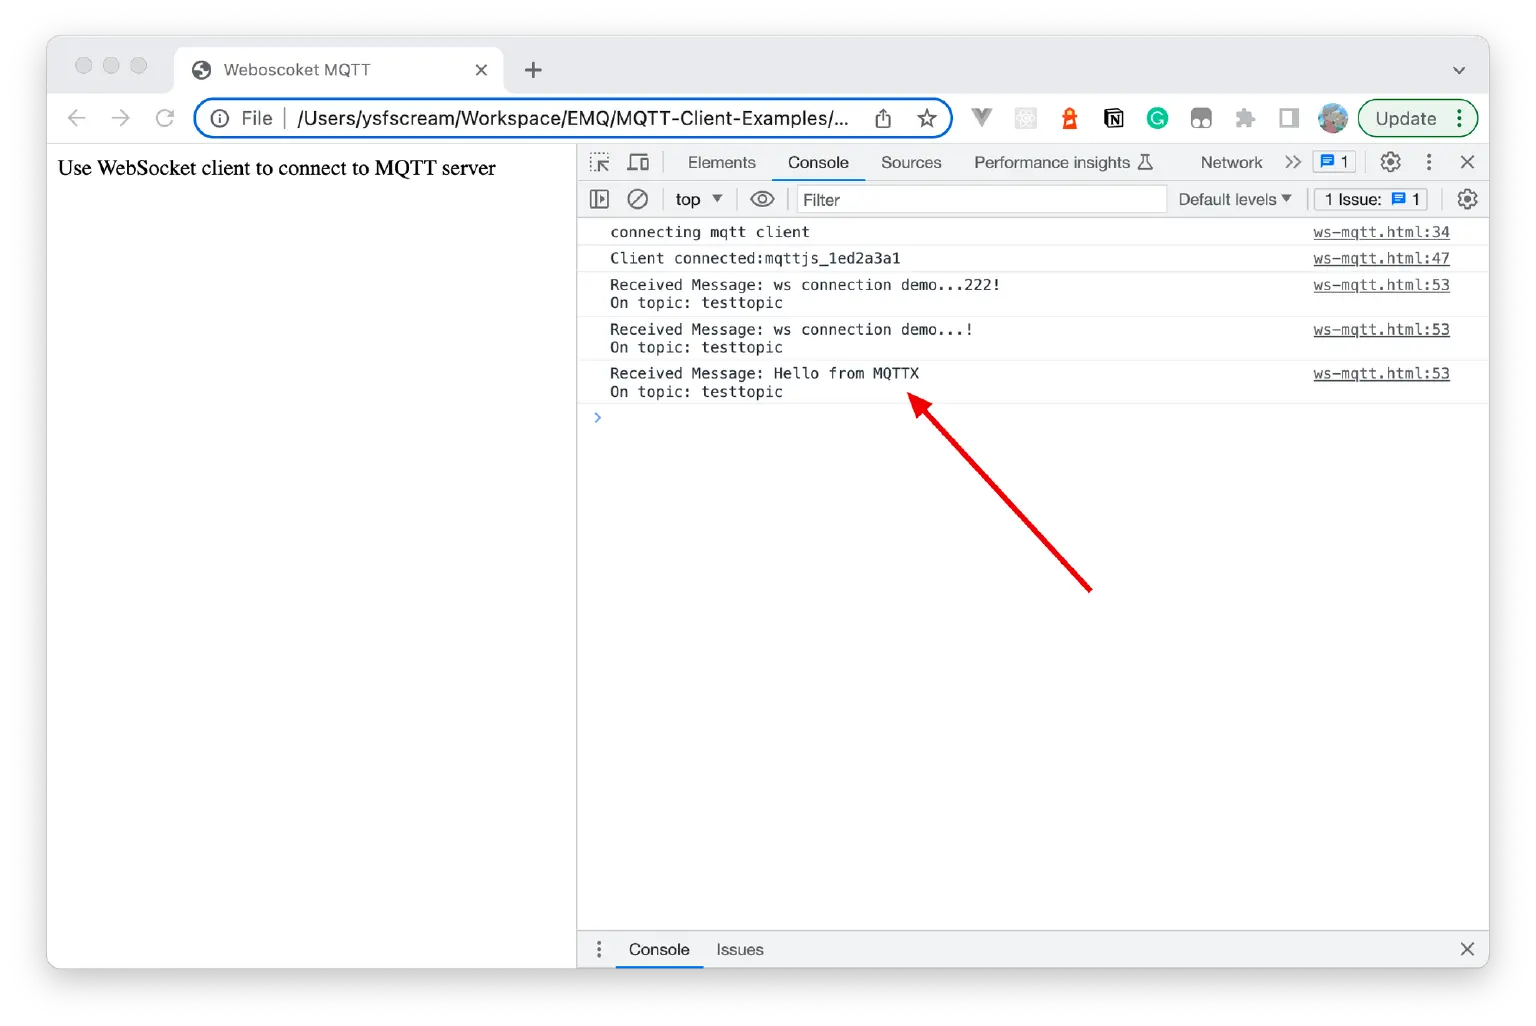
Test
Let's test our setup by opening the HTML file we created in a web browser. We can use a tool like MQTTX, which provides a GUI for MQTT interactions. Here's how you can test it:
- After opening the browser console, we can see some successful connection messages and receive the message on the subscribed topic.
- Connect to the same address in the demo using MQTTX and send a message "Hello from MQTTX" to the subscribed topic.

- We can now see this message being received in the browser console.
Q&A
What is MQTT over WebSocket and how does MQTT.js use it?
MQTT over WebSocket is a method of using the MQTT protocol over WebSocket connections. It allows MQTT.js running in browsers to connect to an MQTT broker WebSocket connection and enable real-time publish/subscribe messaging for IoT applications.
Can MQTT run in browser?
Yes. MQTT can run in browsers using MQTT.js with WebSocket connections.
What is the difference between MQTT and WebSocket?
MQTT (Message Queuing Telemetry Transport) is a message transfer protocol based on the publish/subscribe pattern. It is typically used for communication between IoT devices. It is a lightweight protocol with low overhead and low bandwidth consumption, making it suitable for resource-constrained devices.
WebSocket is a bidirectional communication protocol that provides a persistent, full-duplex communication channel over a single TCP connection. WebSocket is typically used for real-time communication between web applications and servers, enabling the server to push data to the client without the client sending requests.
The main difference lies in the protocol design and use case: MQTT is a message transfer protocol used for publish/subscribe communication, while WebSocket is a communication protocol used for real-time bidirectional communication.
Can WSS support two-way authentication connections in the browser?
No, it is impossible to specify a client certificate using JavaScript code when establishing a connection in a browser, even if client certificates are set up in your OS certificate store or potentially some smart card. This means that MQTT.js cannot do so. Additionally, you cannot specify a Certificate Authority (CA) either, as it is controlled by the browser.
Reference: How to use TLS/SSL two-way authentication connections in browser? · Issue #1515 · mqttjs/MQTT.js
Can it be used outside of a browser environment?
Yes, you can use MQTT over WebSocket in non-browser environments. Different programming languages have corresponding MQTT client libraries, such as Python, Node.js, Golang, etc., allowing you to connect to MQTT brokers and communicate using MQTT over WebSocket in your chosen environment. When TLS/SSL connections are supported, you can also use mutual certificate authentication.
Why do I need to fill in a path when connecting to EMQX?
A path must be filled in when using WebSocket to connect to EMQX. This is because EMQX follows the unified path specification of MQTT-WebSocket. This specification requires a specific path to be specified in WebSocket connections to identify and distinguish MQTT over WebSocket traffic. This path routes MQTT over WebSocket traffic to the MQTT Broker for processing.
In EMQX, the default path for MQTT over WebSocket is /mqtt. This is set according to the specification. Therefore, when connecting to EMQX, this path must be included in the WebSocket address to ensure the connection is correctly routed to the MQTT broker.
Why does my MQTT connection drop when the browser tab goes to the background?
Modern web browsers (like Chrome and Safari) severely throttle JavaScript execution and timers in background tabs to save battery and CPU. This throttling can delay the keepalive ping packets sent by MQTT.js, causing the MQTT broker to assume the client is offline and close the connection.
To mitigate this background disconnection issue, you can:
- Increase the
keepaliveinterval in your connection options (e.g., setting it to 120 seconds or higher). - Implement an automatic reconnection strategy using
reconnectPeriod. - Run your MQTT.js client logic inside a Web Worker, which runs in a separate thread and is less aggressively throttled by the browser.
What ports should I open on my firewall for MQTT over WebSocket?
Unlike standard MQTT which uses TCP ports, MQTT over WebSocket operates over standard web protocols. You need to open the following ports based on your setup:
8083: The default port for unencrypted WebSocket (ws://) connections.8084: The default port for secure, encrypted WebSocket (wss://) connections.
Note: These are completely separate from the standard MQTT TCP port (1883) and MQTT over TLS port (8883). Ensure your corporate firewall allows traffic through 8083/8084 if you are hosting your own broker.
Does MQTT over WebSocket support MQTT 5.0 features?
Yes, absolutely. MQTT over WebSocket is not a new version of the protocol; it simply wraps standard MQTT packets inside WebSocket frames.
As long as your client library (such as MQTT.js, where you specify protocolVersion: 5) and your MQTT broker (like EMQX) both support MQTT 5.0, you can fully utilize advanced features like User Properties, Shared Subscriptions, Session Expiry, and Will Delay Interval directly in the browser.
When developing MQTT web applications, whether using Vue.js or React, can I only use WebSocket connections?
If you are developing applications in a browser, you can only use WebSocket connections to establish MQTT over WebSocket connections.
Summary
This guide introduced how to use MQTT over WebSocket with MQTT.js to establish a MQTT broker WebSocket connection in the browser. By combining MQTT and WebSocket, developers can enable real-time publish/subscribe communication for IoT applications without requiring a backend bridge.
You can find the complete code for the project at this GitHub link: MQTT-Client-Examples/mqtt-client-WebSocket at master · emqx/MQTT-Client-Examples.
If you want to learn more about the features of the MQTT protocol, explore advanced applications of MQTT, or get started with MQTT application and service development, check out the series of articles on MQTT Guide: Beginner to Advanced provided by EMQ.
Resources
To learn more about MQTT over WebSocket, here are some useful resources:
- MQTT vs WebSocket: Key Differences & Applications
This guide provides a clear and concise comparison to help you understand their core differences, applications, and how they can even be used together to optimize your communication architecture. - Online MQTT Client - MQTTX Web
MQTTX Web is a user-friendly, browser-based tool for online debugging, developing, and testing MQTT applications. It connects to an MQTT broker via a WebSocket client and offers an intuitive interface. - Top 3 MQTT WebSocket Clients in 2026
This blog will explore the top 3 MQTT WebSocket client tools highly recommended in 2026. - JavaScript MQTT Client: A Beginner's Guide to MQTT.js
This blog introduces the use of some common APIs of MQTT.js and some experience in the use process to help users quickly use MQTT.js in JavaScript projects. - How to Use MQTT in Vue
This blog mainly introduces how to use MQTT in the Vue project, and implements the connection, subscription, messaging, unsubscribing and other functions between the client and MQTT broker. - How to Use MQTT in React
This article mainly introduces how to use MQTT in the React project for implementing connect, subscribe, messaging and unsubscribe, etc., between the client and MQTT broker.