How to Integrate MQTT in Your Electron Project
Introduction
Electron is an open-source software framework developed and maintained by GitHub. It enables developers to create desktop GUI applications using web technologies by combining the Chromium rendering engine and the Node.js runtime. Electron is the main GUI framework behind several notable projects including open-source applications like Visual Studio Code and GitHub Desktop, as well as commercial applications such as Slack, Discord, and Microsoft Teams.
A basic Electron includes three files: package.json (metadata), main.js (code), and index.html (graphical user interface). The frame is provided by the Electron executable file (electron.exe on Windows, electron.app on macOS, electron on Linux). Developers are free to add flags, customize icons, rename or edit Electron executable files.
MQTT (Message Queuing Telemetry Transport) is a lightweight messaging protocol designed for fast, efficient, and reliable communication between devices, particularly in IoT ecosystems. By integrating MQTT into Electron, developers can take advantage of its low overhead, high performance, and ease of use to manage communication between the desktop client and various connected devices or services in a seamless and responsive manner.
This article explains how to use MQTT in Electron projects, creating a simple MQTT desktop client that implements connection, subscription, unsubscription, messaging, and other functions between the client and the MQTT broker.
Project Initialization
New Project
There are many ways to build a new project, but here is a brief list of a few:
Create Manually
Do the following in the self-built project directory
cd your-project

npm init

npm i -D electron@lates
Alternatively, you can follow the official Electron documentation to build your project: https://www.electronjs.org/docs/tutorial/first-app
Rapid Development with the Official Template Projects
electron-qucik-start: https://github.com/electron/electron-quick-start
  # Clone this repository
  git clone https://github.com/electron/electron-quick-start
  # Go into the repository
  cd electron-quick-start
  # Install dependencies
  npm install
  # Run the app
  npm start
electron-react-bolierplate: https://github.com/electron-react-boilerplate/electron-react-boilerplate
git clone --depth 1 --single-branch https://github.com/electron-react-boilerplate/electron-react-boilerplate.git your-project-name
cd your-project-name
yarn
electron-vue: https://github.com/SimulatedGREG/electron-vue
# Install vue-cli and scaffold boilerplate
npm install -g vue-cli
vue init simulatedgreg/electron-vue my-project

# Install dependencies and run your app
cd my-project
yarn # or npm install
yarn run dev # or npm run dev
For this article, we'll use the official Electron quick start project template to quickly initialize our example project.
Installing MQTT in Your Electron Project
To get started with MQTT integration in your Electron project, you need to install the MQTT.js library. This can be done easily via the command line using npm:
npm install mqtt --save
After the dependencies are installed, if you want to open the console for debugging, you need to modify the code in main.js and uncomment win.webContents.openDevTools().
// Open the DevTools.
mainWindow.webContents.openDevTools()
In this case, the locally installed MQTT.js module cannot be loaded directly into renderer.js without using the front-end builder to package the front-end page. In addition to using the build tool method, there are two other ways to solve this:
nodeIntegrationcan be set to true inwebPreferences. When this property is present,webviewwill have Node integration in it, and node APIs likerequireandprocesscan be used to access low-level system resources. Node integration is disabled by default.const mainWindow = new BrowserWindow({ width: 800, height: 600, webPreferences: { nodeIntegration: true, preload: path.join(__dirname, 'preload.js'), }, })- The MQTT.js module can be imported in preload.js. When there is no node integration, this script still can access all Node APIs. However, when this script execution completes, global objects injected via Node will be removed.
- The MQTT.js module can be imported in main process and connected. In Electron, processes communicate by passing messages through developer-defined "channels" with the
ipcMainandipcRenderermodules. These channels are arbitrary (you can name them anything you want) and bidirectional (you can use the same channel name for both modules). For usage examples, check out the IPC tutorial.
For example, in the main process, ipcMain listens for connection operations. When the user clicks the connection, the corresponding configuration information collected in the render process is transferred to the main process through ipcRenderer to connect:- Receive the connection data sent by the rendering process in the main process and make MQTT connection:
// main.js ipcMain.on('onConnect', (event, connectUrl, connectOpt) => { client = mqtt.connect(connectUrl, connectOpt) client.on('connect', () => { console.log('Client connected:' + options.clientId) }) client.on('message', (topic, message) => { console.log(`${message.toString()}\nOn topic: ${topic}`) }) }) - Click to connect in the rendering process, get the connection data from the page and send it to the main process:
// render.js function onConnect() { const { host, port, clientId, username, password } = connection const connectUrl = `mqtt://${host.value}:${port.value}` const options = { keepalive: 30, protocolId: 'MQTT', clean: true, reconnectPeriod: 1000, connectTimeout: 30 * 1000, rejectUnauthorized: false, clientId, username, password, } console.log('connecting mqtt client') window.electronAPI.onConnect(connectUrl, options) } - In preload.js, the API method for interprocess IPC communication is implemented, and the channel is established:
// preload.js
contextBridge.exposeInMainWorld('electronAPI', {
  onConnect: (data) => ipcRenderer.send('onConnect', data),
})
- Receive the connection data sent by the rendering process in the main process and make MQTT connection:
Using MQTT in the Electron Project
Connect to the MQTT broker
This article will use the free public MQTT broker provided by EMQX. This service was created based on the EMQX MQTT platform. The information about broker access is as follows:
- Broker: broker.emqx.io
- TCP Port: 1883
- Websocket Port: 8083
To illustrate more intuitive, the key connection code for the example will be written in the renderer.js file. With the consideration of security, the installed MQTT module will be loaded via the require method of the Node.js API, in the preload.js file (using method 2 above). Also, this method injecting it in the global window object.
Note: Context isolation (contextIsolation) has been enabled by default since Electron 12, Although preload scripts share a
windowglobal with the renderer they're attached to, you cannot directly attach any variables from the preload script towindowbecause of thecontextIsolationdefault.
Therefore, we need to set contextIsolation: false in webPreferences to close:
const mainWindow = new BrowserWindow({
    width: 800,
    height: 600,
    webPreferences: {
      preload: path.join(__dirname, 'preload.js'),
      contextIsolation: false; // Version 12.0.0 above are enabled by default
    }
  })
So that the loaded module can be accessed directly in renderer.js:
- Import MQTT module
// preload.js const mqtt = require('mqtt') window.mqtt = mqtt - Configure and test MQTT module
// renderer.js
const clientId = 'mqttjs_' + Math.random().toString(16).substr(2, 8)

const host = 'mqtt://broker.emqx.io:1883'

const options = {
  keepalive: 30,
  clientId: clientId,
  protocolId: 'MQTT',
  protocolVersion: 4,
  clean: true,
  reconnectPeriod: 1000,
  connectTimeout: 30 * 1000,
  will: {
    topic: 'WillMsg',
    payload: 'Connection Closed abnormally..!',
    qos: 0,
    retain: false,
  },
  rejectUnauthorized: false,
}

// Information about the mqtt module is available
console.log(mqtt)

console.log('connecting mqtt client')
const client = mqtt.connect(host, options)

client.on('error', (err) => {
  console.log('Connection error: ', err)
  client.end()
})

client.on('reconnect', () => {
  console.log('Reconnecting...')
})

client.on('connect', () => {
  console.log('Client connected:' + clientId)
  client.subscribe('testtopic/electron', {
    qos: 0,
  })
  client.publish('testtopic/electron', 'Electron connection demo...!', {
    qos: 0,
    retain: false,
  })
})

client.on('message', (topic, message, packet) => {
  console.log(
    'Received Message: ' + message.toString() + '\nOn topic: ' + topic
  )
})
We can see the following output on the console after writing the above code and running the project:

The MQTT module works fine. After setting up the module, we can write a simple UI interface to manually enter the configuration required for the MQTT connection, and click the connect button to connect to the MQTT server, as well as disconnect, subscribe to topics, send and receive messages, and so on.
Interface of application
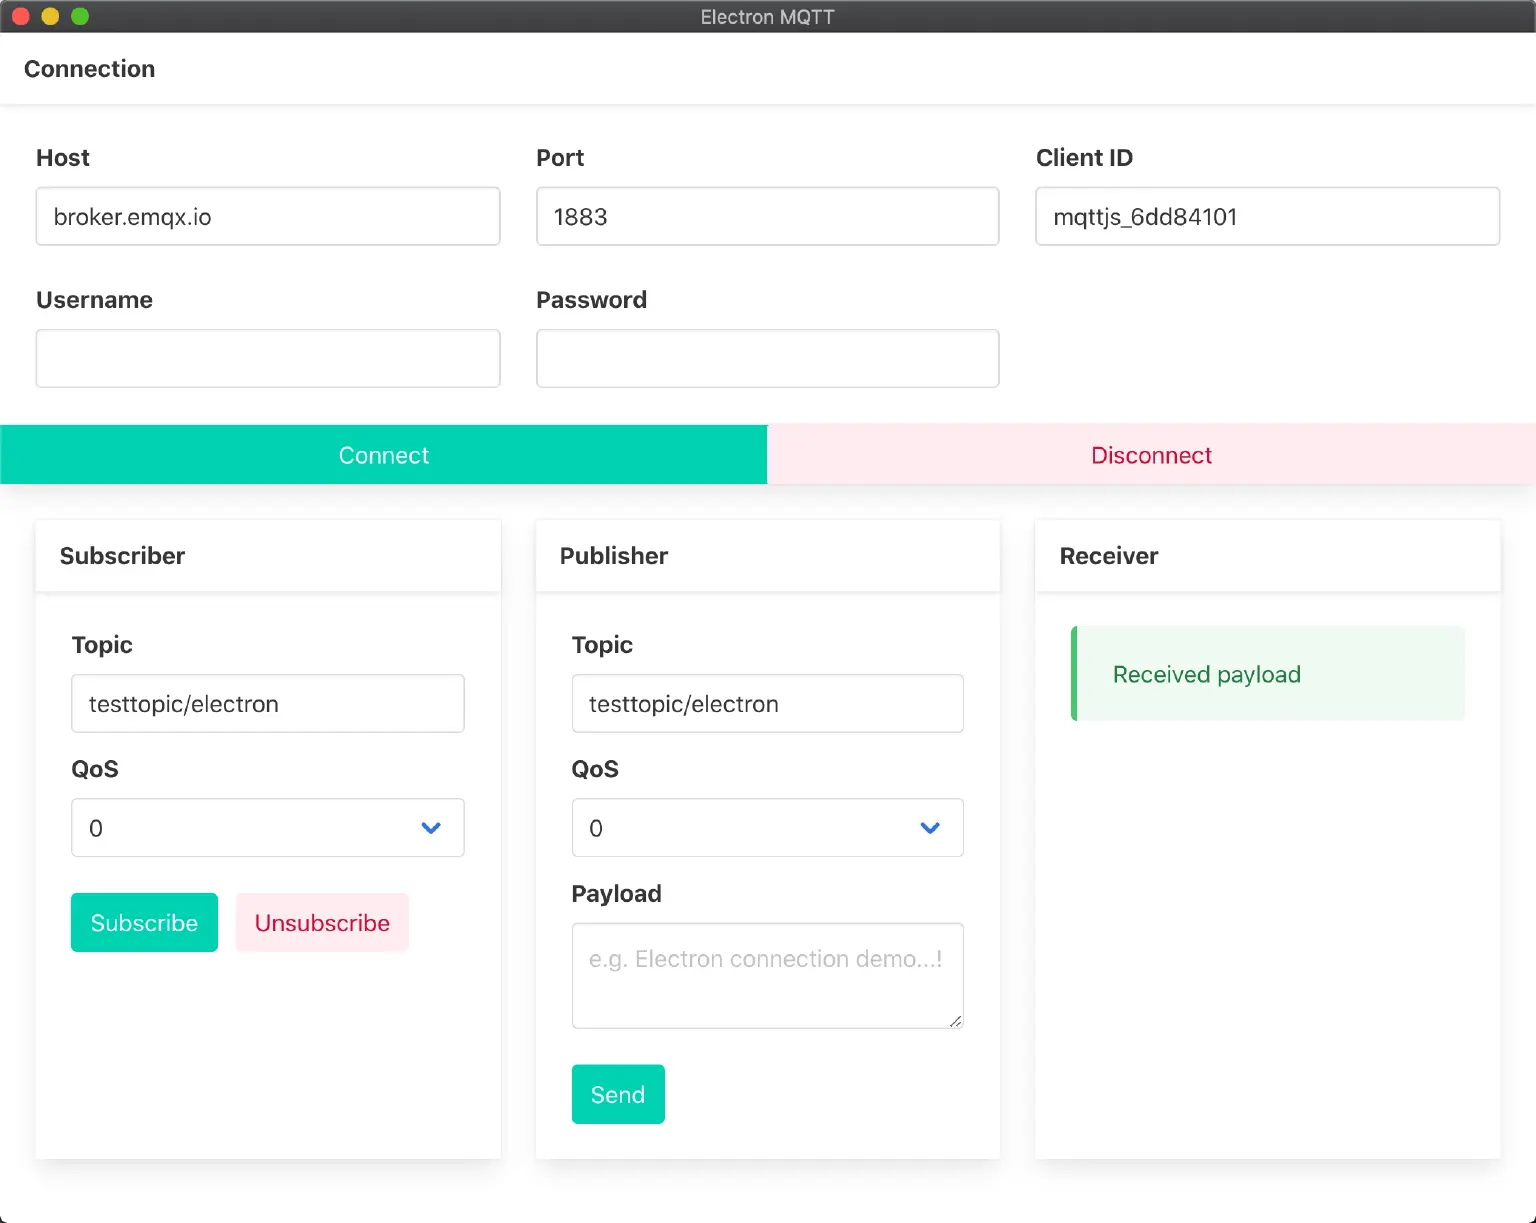
The complete code is available here: MQTT-Client-Examples/mqtt-client-Electron at master · emqx/MQTT-Client-Examples.
Key Code Snippets for MQTT Integration
Connect
let client = null

const options = {
  keepalive: 30,
  protocolId: 'MQTT',
  protocolVersion: 4,
  clean: true,
  reconnectPeriod: 1000,
  connectTimeout: 30 * 1000,
  will: {
    topic: 'WillMsg',
    payload: 'Connection Closed abnormally..!',
    qos: 0,
    retain: false,
  },
}

function onConnect() {
  const { host, port, clientId, username, password } = connection
  const connectUrl = `mqtt://${host.value}:${port.value}`
  options.clientId =
    clientId.value || `mqttjs_${Math.random().toString(16).substr(2, 8)}`
  options.username = username.value
  options.password = password.value
  console.log('connecting mqtt client')
  client = mqtt.connect(connectUrl, options)
  client.on('error', (err) => {
    console.error('Connection error: ', err)
    client.end()
  })
  client.on('reconnect', () => {
    console.log('Reconnecting...')
  })
  client.on('connect', () => {
    console.log('Client connected:' + options.clientId)
    connectBtn.innerText = 'Connected'
  })
}
Subscribe to the topic
function onSub() {
  if (client.connected) {
    const { topic, qos } = subscriber
    client.subscribe(
      topic.value,
      { qos: parseInt(qos.value, 10) },
      (error, res) => {
        if (error) {
          console.error('Subscribe error: ', error)
        } else {
          console.log('Subscribed: ', res)
        }
      }
    )
  }
}
Unsubscribe
function onUnsub() {
  if (client.connected) {
    const { topic } = subscriber
    client.unsubscribe(topic.value, (error) => {
      if (error) {
        console.error('Unsubscribe error: ', error)
      } else {
        console.log('Unsubscribed: ', topic.value)
      }
    })
  }
}
Publish messages
function onSend() {
  if (client.connected) {
    const { topic, qos, payload } = publisher
    client.publish(topic.value, payload.value, {
      qos: parseInt(qos.value, 10),
      retain: false,
    })
  }
}
Receive messages
// In the onConnect function
client.on('message', (topic, message) => {
  const msg = document.createElement('div')
  msg.setAttribute('class', 'message-body')
  msg.innerText = `${message.toString()}\nOn topic: ${topic}`
  document.getElementById('article').appendChild(msg)
})
Disconnect
function onDisconnect() {
  if (client.connected) {
    client.end()
    client.on('close', () => {
      connectBtn.innerText = 'Connect'
      console.log(options.clientId + ' disconnected')
    })
  }
}
Testing the MQTT Connection in Electron
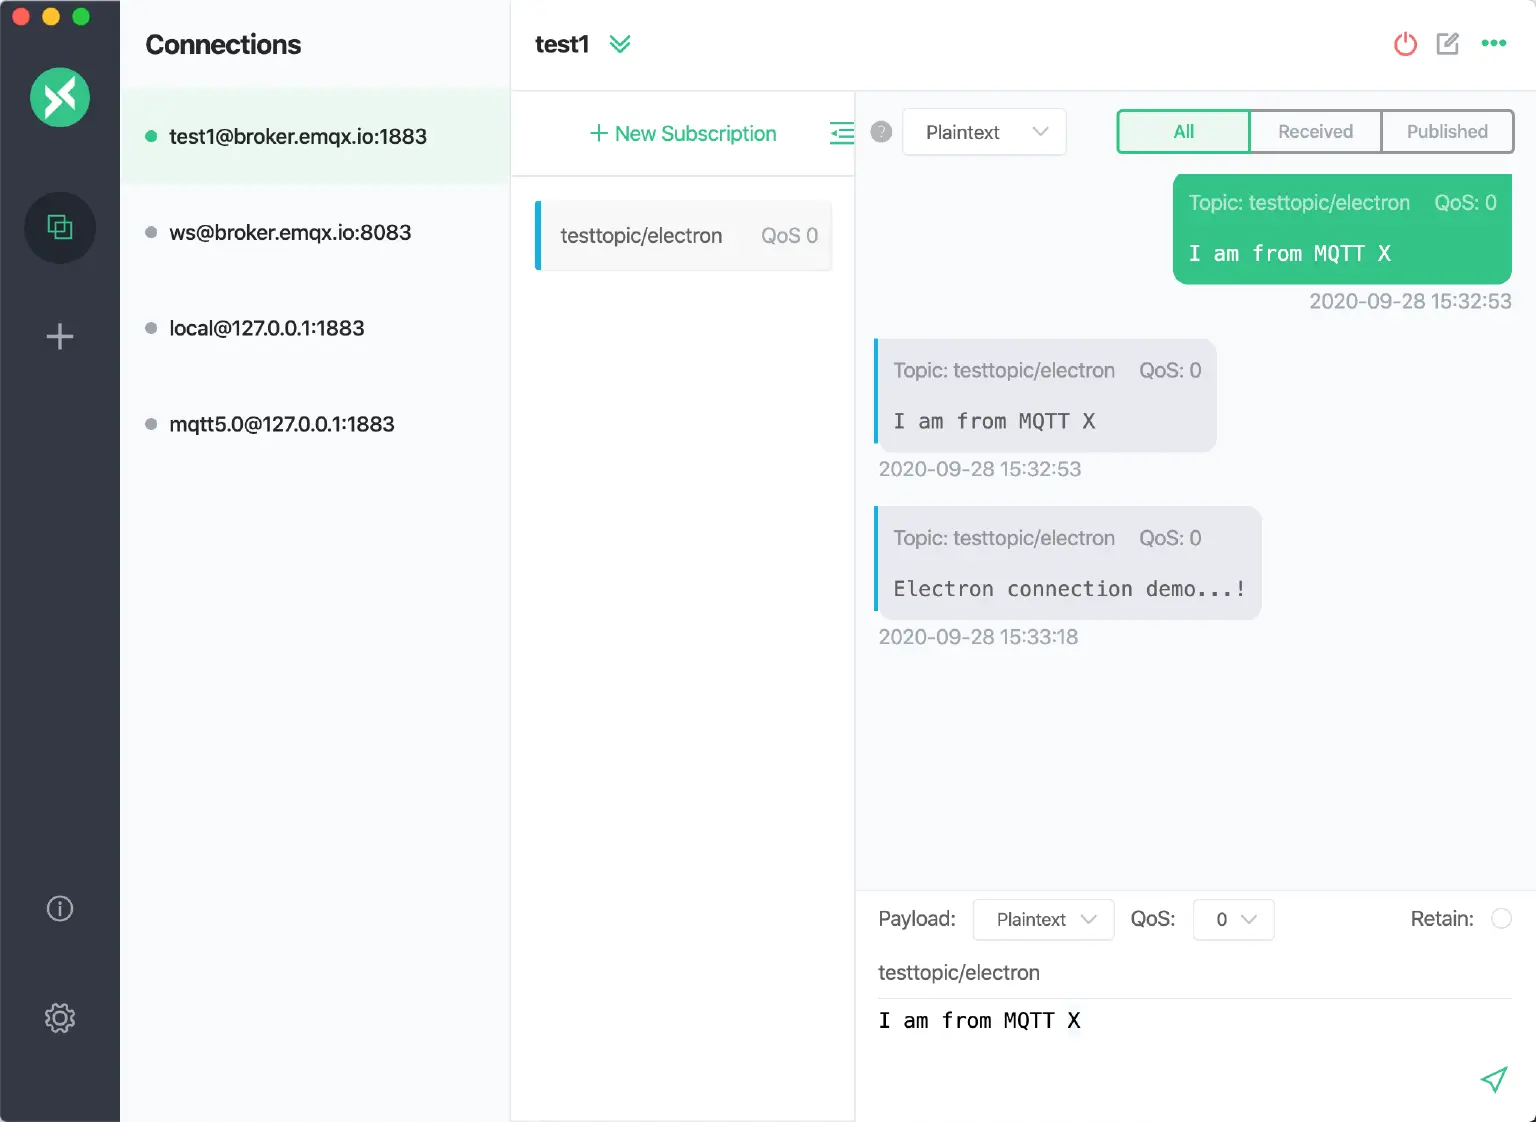
Once you have set up the MQTT client, you can test your connection using MQTTX, a popular all-in-one MQTT 5.0 client. In this test, you’ll send and receive messages between your Electron app and MQTT broker.
When using MQTTX to send a message to the client, you can see that the message is received properly:

Send a message to MQTTX using the client you wrote yourself, and now you can see that MQTTX is also receiving the message properly:
Summary
In this tutorial, we demonstrated how to create an MQTT desktop client using Electron, enabling seamless communication with MQTT brokers for IoT applications. By following these steps, you can integrate MQTT into your own Electron-based desktop apps, enabling real-time messaging and device communication.
It is also worth noting that since the Electron project includes both a browser environment and a Node.js environment, it is possible to use the browser's WebSocket API to implement an MQTT over WebSocket connection by modifying the connection protocol and port number in the above code.
Resources
- How to Use MQTT in Vue Projects
- How to Use MQTT in React Projects
- How to Use MQTT in Angular Projects
- How to Use MQTT in Node.js
- A Quickstart Guide to Using MQTT over WebSocket