MQTT to Webhook: Extending IoT Applications

Introduction
In the realm of IoT, ensuring the safety and efficiency of device operation relies heavily on real-time monitoring of diverse device data and events.
In this blog, we'll delve into the process of harnessing MQTT to gather various types of device data and seamlessly integrate it with Webhook. Through this integration, we'll achieve the seamless transmission and processing of real-time data.
Benefits of MQTT to Webhook Integration for IoT
MQTT is a lightweight publish/subscribe messaging protocol designed for efficient communication across networks, particularly beneficial in environments with limited bandwidth and unstable connections.
Webhook is a callback mechanism that utilizes HTTP as its transport protocol. Through Webhook, MQTT messages and client events can be swiftly pushed in real time to designated servers. This dynamic duo not only facilitates real-time monitoring of device data but also enables the automation of various business processes based on device statuses, such as triggering alarms in case of failures.
In IoT applications, Webhook presents distinctive advantages:
- Expansive Data Distribution: Webhook seamlessly integrates MQTT data into a plethora of external systems, including analytics platforms and cloud services, enabling multi-system data distribution effortlessly.
- Real-time Response and Business Triggering: Leveraging Webhook, external systems can promptly receive MQTT data, triggering real-time business processes. This rapid response capability proves invaluable, especially in scenarios like alarm data reception and business workflow initiation.
- Tailored Data Processing: External systems gain the ability to process received data according to their specific requirements, allowing for the implementation of intricate business logic without being bound by the limitations of MQTT broker’s functionality.
- Loosely Coupled Integration: Webhook adopts a loosely coupled system integration approach, utilizing a straightforward HTTP interface for seamless integration, enhancing overall system interoperability.
In essence, the amalgamation of MQTT and Webhook offers a robust, flexible, and real-time data processing and transmission solution for IoT applications. By adeptly selecting and configuring the data integration method, diverse IoT application needs can be met, thereby enhancing efficiency and usability across the IoT landscape.
Integrate MQTT to Webhook Using EMQX
EMQX MQTT Platform provides robust capabilities for Webhook data integration, seamlessly integrating MQTT device events and data into external systems such as analytics platforms and cloud services. This facilitates multi-system data distribution, catering to the demands of real-time monitoring and event response.
It supports flexible configuration of request methods and request data formats, offers secure communication through HTTPS, and provides authentication mechanisms. It can efficiently and flexibly transmit client messages and event data in real-time, enabling scenarios such as IoT device state notifications, alert notifications, and data integration.
With the webhook, users can write code in their preferred programming language and framework to implement custom, flexible, and complex data processing logic.
MQTT to Webhook Integration Demo Preparation
Prerequisites
- Git
- Docker Engine: v20.10+
- Docker Compose: v2.20+
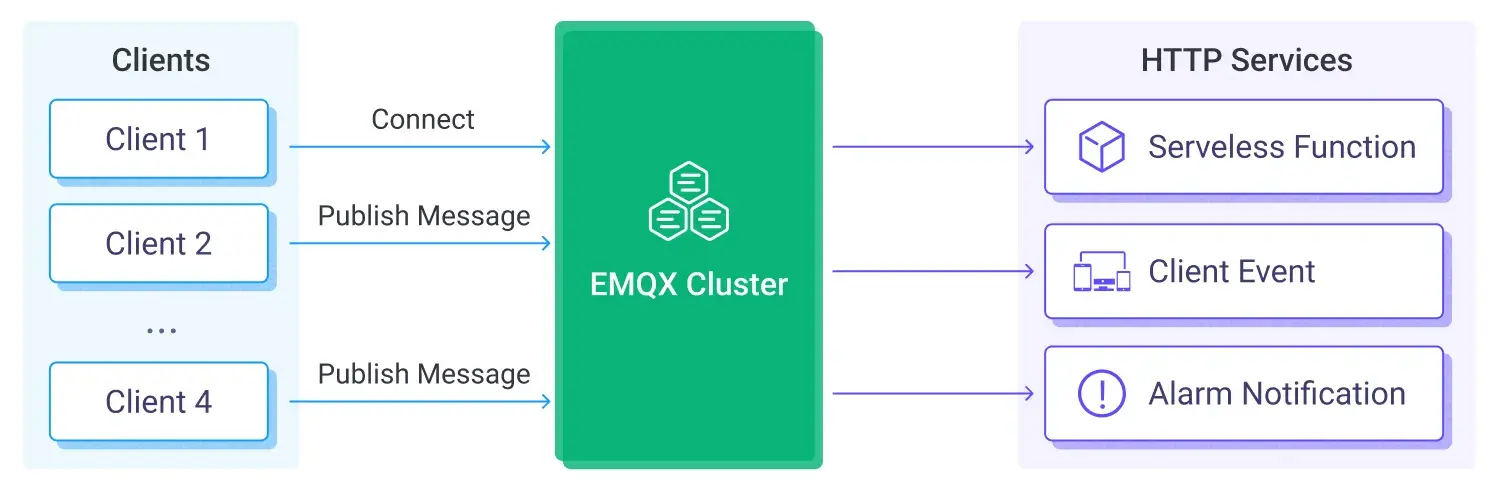
How it Works
This is a simple and effective architecture that utilizes the following key components:
| Component Name | Version | Description |
|---|---|---|
| EMQX Enterprise | 5.5.0+ | An MQTT Broker for connecting MQTT devices and sending device events and message data to Webhook services. |
| MQTTX CLI | 1.9.3+ | A command-line tool for simulating device connections to EMQX and publishing messages. |
| Node.js | 18.17 | The runtime environment for running Webhook services to handle data requests from EMQX. |
Clone the Project Locally
Clone the emqx/mqtt-to-webhook repository locally using Git:
git clone https://github.com/emqx/mqtt-to-webhook
cd mqtt-to-webhook
The codebase consists of three parts:
- The
emqxfolder contains EMQX-Webhook integration configurations to automatically create rules and data bridges when launching EMQX. - The
webserverfolder contains the Node.js code for the sample Webhook service. - The
docker-compose.ymlorchestrates all components to launch the project with one click.
Start MQTTX CLI, EMQX, and Webhook
Please make sure you have installed the Docker, and then run Docker Compose in the background to start the demo:
docker-compose up -d
This sample service contains several key components, which we will cover in more detail below.
Simulate Device Subscriptions and Message Publishing
The sample uses MQTTX CLI to simulate device subscriptions and message publishing for testing purposes.
- Simulate a device subscribing to two topics, t/1 and t/2. Here's the command you'd use:
mqttx sub -t t/1 t/2 - Use the simulate command to simulate a device connecting to EMQX and periodically publishing messages to the topic mqttx/simulate/tesla/{clientid} at 5-second intervals. The command looks like this:
mqttx simulate -sc tesla -c 1 -im 5000
Any MQTT client can subscribe to and receive these simulated messages using the following command:mqttx sub -t mqttx/simulate/tesla/+
By now, we've successfully replicated the behavior of devices. We will delve into how to process these messages and events on EMQX in the next sections.
Process Device Events and Messages
After simulating device subscriptions and message publications, it's time to process the messages and events sent by these devices on EMQX. This task is accomplished through the Webhook data integration feature on EMQX.
EMQX will set up two Webhooks to handle messages sent by devices, as well as connection/disconnection and subscription/unsubscription events. For more client events, you can refer to the Webhook documentation.
To view or modify these configurations, you can open the following URL in your browser: http://localhost:18083. Use the default username "admin" and password "public" to log in. Then navigate to Integration → Webhook page.
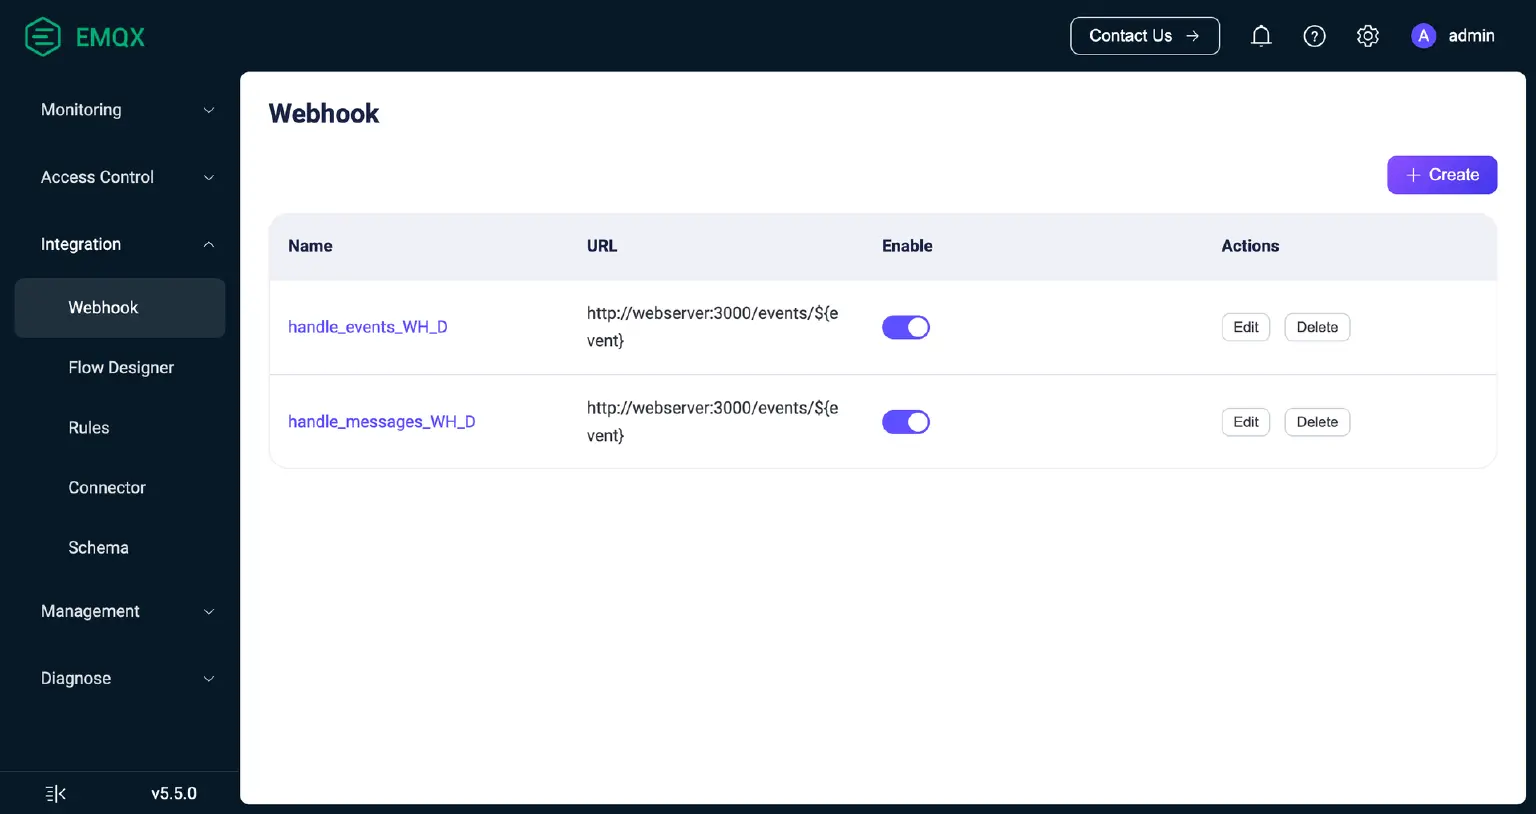
The main configurations are as follows:
- Triggers: These are the events that initiate the Webhook. For messages, you'll need to select "Message Publish" and add the topic mqttx/simulate/# to filter messages; for device events, check "Connection Established", "Connection Disconnected", "Subscription Completed", and "Unsubscription".
- Request Method: Choose the "POST" method.
- URL: This is the address of the Webhook service, which should be entered as
http://webserver:3000/events/${event}, where${event}is a placeholder that will be dynamically replaced based on the specific event triggered. - Request Headers: Add a request header with the key as
Authorizationand the value asBearer B53498D3-1752-4AA7-BACA-7013309B7468, which is used to authenticate the Webhook service in the request.
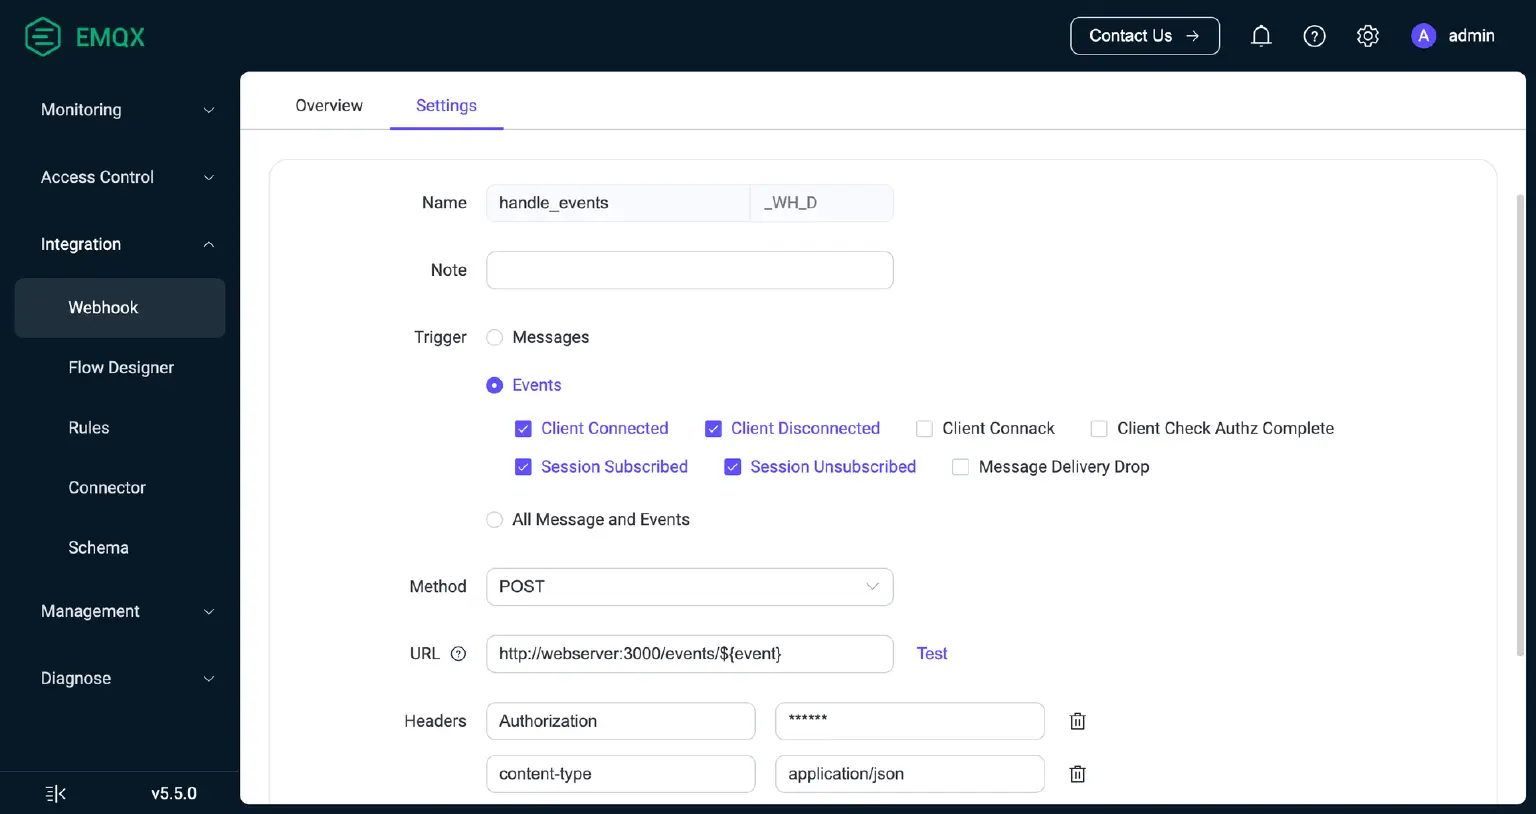
Once these parameters are configured, the Webhook will be able to correctly receive and process events and messages from MQTT clients.
EMQX, through its Webhook data integration feature, will send event and message data to the Webhook service in real-time. The Webhook data integration offers dynamic configuration capabilities for HTTP request parameters, including URL, authentication method, request headers, request method, and request body, thus enabling flexible interfacing with various Webhook services.
Process Data with Webhook Services
This blog post will walk you through setting up a Node.js-based Webhook service that receives requests from EMQX and processes data efficiently.
- Tracking Connected Devices. The service logs devices that have connected and updates their online status upon connection or disconnection.
- Recording Device Event History. It maintains a history of device events, including records of connections, disconnections, subscriptions, and unsubscriptions.
For the complete code, refer to here.
With that, we've wrapped up the configuration process for EMQX MQTT and Webhook. The Webhook service will store the processed data from MQTT device messages and events on EMQX into a local file. Next, we'll show you how to view and interpret this data.
Access Data Recorded by the Webhook Service
You can view the data through the interface provided by the Webhook service using the following command:
curl http://localhost:3000/events
The example data returned will be like:
{
  "devices": [
    {
      "clientId": "mqttx_1752c0ab",
      "username": "undefined",
      "connected": true,
      "ip": "192.168.228.4:43912",
      "connectedAt": "2024-02-19T09:42:12.952Z"
    },
    {
      "clientId": "mqttx_baf18c96_1",
      "username": "undefined",
      "connected": true,
      "ip": "192.168.228.5:58340",
      "connectedAt": "2024-02-19T09:42:13.020Z"
    }
  ],
  "eventsHistory": [
    {
      "event": "client.connected",
      "clientId": "mqttx_1752c0ab",
      "username": "undefined",
      "peername": "192.168.228.4:43912",
      "options": {
        "proto_ver": 5,
        "keepalive": 60,
        "clean_start": true,
        "node": "emqx@192.168.228.3"
      },
      "createdAt": "2024-02-19T09:42:12.952Z"
    },
    {
      "event": "session.subscribed",
      "clientId": "mqttx_1752c0ab",
      "username": "undefined",
      "options": {
        "topic": "t/2",
        "qos": 0,
        "node": "emqx@192.168.228.3"
      },
      "createdAt": "2024-02-19T09:42:12.963Z"
    },
    {
      "event": "client.connected",
      "clientId": "mqttx_baf18c96_1",
      "username": "undefined",
      "peername": "192.168.228.5:58340",
      "options": {
        "proto_ver": 5,
        "keepalive": 30,
        "clean_start": true,
        "node": "emqx@192.168.228.3"
      },
      "createdAt": "2024-02-19T09:42:13.020Z"
    }
  ],
  "messages": [
    {
      "topic": "mqttx/simulate/tesla/mqttx_baf18c96",
      "payload": "{\"car_id\":\"ZTGZJC1XPFN643051\",\"display_name\":\"Nova's Tesla\",\"model\":\"S\",\"trim_badging\":\"ad\",\"exterior_color\":\"lime\",\"wheel_type\":\"cumque\",\"spoiler_type\":\"aspernatur\",\"geofence\":\"West Ransom\",\"state\":\"online\",\"since\":\"2024-02-18T21:05:53.133Z\",\"healthy\":false,\"version\":\"9.6.6\",\"update_available\":true,\"update_version\":\"2.7.2\",\"latitude\":\"52.1216\",\"longitude\":\"78.0590\",\"shift_state\":\"R\",\"power\":-908,\"speed\":20,\"heading\":96,\"elevation\":1373,\"locked\":true,\"sentry_mode\":true,\"windows_open\":true,\"doors_open\":false,\"trunk_open\":true,\"frunk_open\":true,\"is_user_present\":false,\"is_climate_on\":true,\"inside_temp\":9.1,\"outside_temp\":29,\"is_preconditioning\":false,\"odometer\":744655,\"est_battery_range_km\":394.1,\"rated_battery_range_km\":281.3,\"ideal_battery_range_km\":138.5,\"battery_level\":47,\"usable_battery_level\":43,\"plugged_in\":true,\"charge_energy_added\":94.03,\"charge_limit_soc\":44,\"charge_port_door_open\":false,\"charger_actual_current\":72.98,\"charger_power\":43,\"charger_voltage\":234,\"charge_current_request\":36,\"charge_current_request_max\":25,\"scheduled_charging_start_time\":\"2028-04-25T11:27:22.090Z\",\"time_to_full_charge\":5.34,\"tpms_pressure_fl\":3,\"tpms_pressure_fr\":2.8,\"tpms_pressure_rl\":3.4,\"tpms_pressure_rr\":2.8,\"timestamp\":1708335738038}",
      "qos": 0,
      "clientId": "mqttx_baf18c96_1",
      "createdAt": "2024-02-19T09:42:18.046Z"
    }
  ]
}
- deviceCount: The total number of devices connected to your EMQX server.
- messageCount: The total number of messages received by the EMQX server.
- eventsHistoryCount: The number of event histories recorded by the EMQX server.
- devices: The array that contains comprehensive details about all the devices connected to the EMQX server.
- eventsHistory: The array that contains all device event histories received by the EMQX server.
- messages: The array that holds all messages received by the MQTT server.
With these data, you can get a full picture of your application's operational state, including device connectivity, message reception, and device behavior records. This information is instrumental in understanding and optimizing your EMQX setup, leveraging client data, managing devices, and conducting behavior audits.
Weighing Webhook Against Other EMQX Integrations
Webhook offers real-time data transmission and adaptable interfaces that streamline integration with a myriad of services. It empowers developers to handle real-time events or connect with third-party services like cloud storage, functions, and alert services, all without the need for intricate programming.
Yet, when it comes to managing events on a grand scale, Webhook might not always be the optimal choice. Its reliance on HTTP protocol means it could stumble upon network delays or bandwidth constraints when dealing with hefty data loads. And if the server's processing power isn't up to par, you might face delays in data handling or even data loss.
For those reasons, when you're looking at large-scale data transfer and message storage, other data integration methods within EMQX, such as directly saving data to a database, might be more up your alley. This method sidesteps the pitfalls of network delays and bandwidth issues, leveraging the database's processing prowess to ensure data is stored securely and handled efficiently. It's a win-win, boosting operational efficiency while safeguarding system stability and security.
Conclusion
In this blog, we explored how to integrate MQTT and Webhook to extend IoT applications. By harnessing EMQX as a real-time MQTT Broker and leveraging Webhook for data transfer to external systems, we achieved a comprehensive solution for collecting and processing device data.
In the real world, you can tweak EMQX and Webhook settings to fit your unique requirements. Whether it's setting distinct MQTT topics to categorize device data or configuring Webhook to dispatch data to various external systems for in-depth analysis and action, the possibilities are vast.
Overall, the combination of EMQX, MQTT, and Webhook offers a potent and adaptable solution, empowering users to scale their IoT applications effectively. We're eager to see how you'll harness these tools to unlock new potentials in your IoT endeavors.