Bridging BACnet Data to MQTT: A Solution to Better Implementing Intelligent Building
In our previous blog post, we provided a beginner's guide to the BACnet protocol. In this article, we will explain the reasons for bridging BACnet with MQTT and provide instructions on how to do it.
Why Bridge BACnet to MQTT?
As smart buildings become more popular, the equipment inside them has become networked. The trend toward cloud technology has led to the integration of single-building monitoring and remote unified monitoring, with a preference for cloud-side collaboration architecture. The primary challenge now is figuring out how to send BACnet network data to the cloud, both from a business and technical standpoint.
In the field of IoT, MQTT protocol is the de facto data transmission standard. It is a lightweight messaging protocol commonly used for remote monitoring and communication in IoT (Internet of Things) applications. It provides a simple and flexible way to transfer messages between devices while effectively handling a large number of concurrent connections.
MQTT has several advantages that make it popular in IoT applications:
- Lightweight: MQTT is designed to be lightweight, requiring minimal processing power and memory, making it suitable for resource-constrained devices.
- Low-bandwidth: MQTT is optimized for low-bandwidth networks, allowing efficient message transfer even over limited bandwidth connections.
- Asynchronous Communication: MQTT uses a publish-subscribe model, enabling asynchronous communication between clients. This allows for decoupled message exchange and better scalability.
- QoS Levels: MQTT supports various quality of service (QoS) levels for message delivery, allowing for different levels of reliability and message guarantees.
- Easy Integration: MQTT protocols are easy to integrate with various IoT platforms and applications, as it follows a simple and well-defined message format.
- Robust Community: MQTT has a robust and active community, providing extensive support and documentation, as well as open source tools and libraries for implementation and management.
- Efficient Handling of Large Scale Connections: MQTT is capable of handling a large number of concurrent connections efficiently, making it suitable for large-scale IoT deployments.
We can bridge BCAnet to MQTT to complement each other and solve the issues we have mentioned before.
The Architecture of BACnet to MQTT Bridging
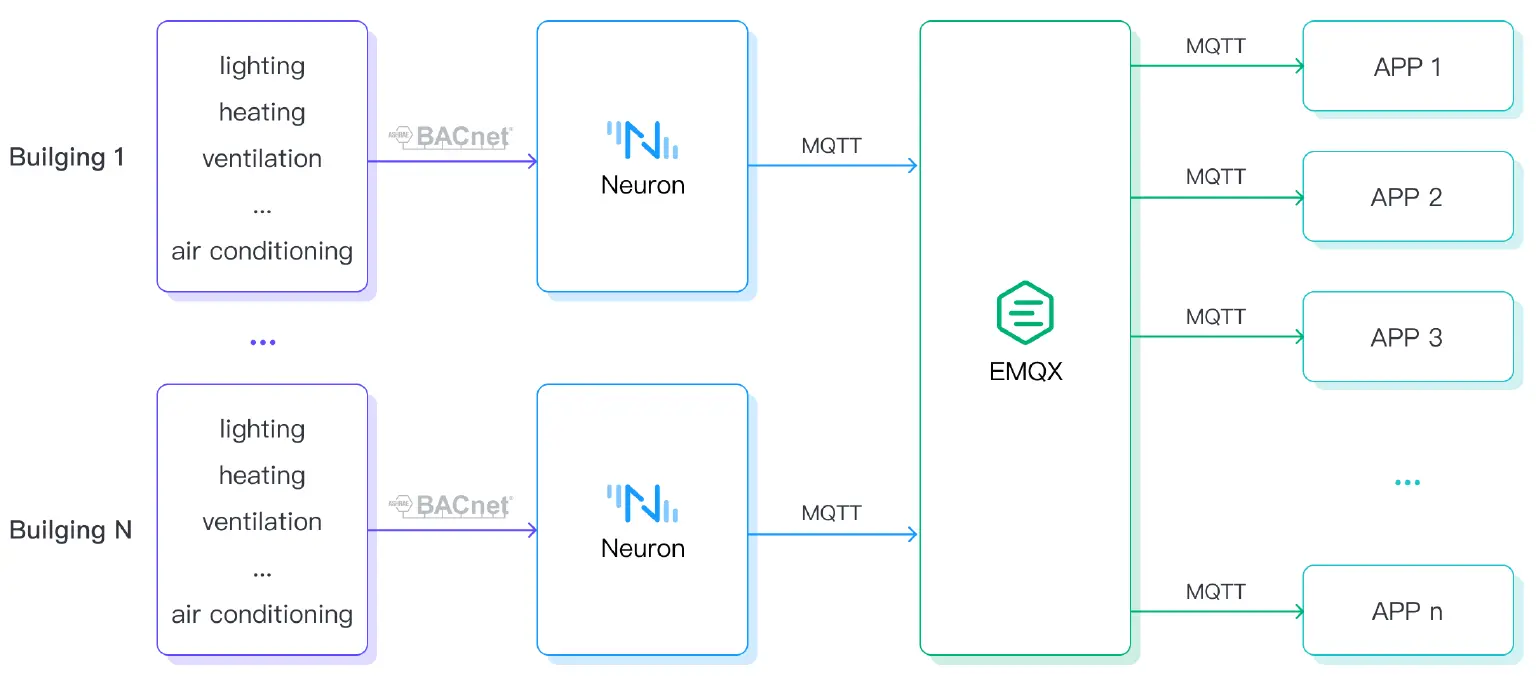
This blog uses Neuron and EMQX from EMQ to achieve BACnet to MQTT bridging. Neuron can convert the BACnet protocol to MQTT, while EMQX acts as an MQTT broker, handling massive connections and data.
Neuron is a modern industrial IoT connectivity server that can connect various industrial devices that use standard protocols or device-specific protocols, achieving interconnection between industrial IoT platforms and various devices. As a lightweight industrial software, Neuron can run on various IoT edge hardware devices with limited resources. It aims to solve the problem of unified access to data-centric automation devices and provide basic support for intelligent manufacturing.
EMQX is a large-scale and elastic cloud-native distributed IoT MQTT message server. As the most scalable MQTT message server worldwide, EMQX provides efficient and reliable mass connection of IoT devices, capable of high-performance real-time processing of message and event flow data, helping users quickly build critical IoT platforms and applications.
The following diagram shows how Neuron collects data from the edge and converts it into MQTT for uploading to EMQX.
Bridging BACnet to MQTT via Neuron
This section will introduce how to use Neuron to collect data from BACnet/IP devices, upload the collected data to EMQX, and view it using MQTTX.
EMQX Quick Start
EMQX provides multiple installation methods; users can check the detailed installation methods in the documentation. This example uses container deployment to quickly experience EMQX.
Run the following command to obtain the Docker image:
docker pull emqx/emqx-enterprise:5.1.0
Run the following command to start the Docker container:
docker run -d --name emqx-enterprise -p 1883:1883 -p 8083:8083 -p 8084:8084 -p 8883:8883 -p 18083:18083 emqx/emqx-enterprise:5.1.0
Access the EMQX Dashboard by visiting http://localhost:18083 (replace “localhost” with your actual IP address) through a web browser. This allows you to manage device connections and monitor related metrics. Keep the Docker container running for this tutorial. You can refer to the documentation to experience more features in the Dashboard.
Initial username: admin, initial password: public
Neuron Quick Start
Neuron provides various installation methods; users can view detailed installation methods in the documentation. This example uses containerized deployment.
Obtaining Docker images:
$ docker pull emqx/neuron:latest
Starting the Docker container:
$ docker run -d --name neuron -p 7000:7000 --privileged=true --restart=always emqx/neuron:latest
Open a web browser and enter the gateway address and port number to run Neuron. This will take you to the management console page, with the default port number being 7000. You can access it through your browser at http://localhost:7000/ (replace "localhost" with your actual IP address).
Step 1: Log in
Log in with the initial username and password:
- Username:
admin - Password:
0000
Step 2: Add a Southbound Device
In the configuration menu, select South Devices to enter the South Devices interface. Click Add Device to add a new device.
- Name: fill in the name of the device, such as bacnet-1;
- Mode: plugin
- Plugin: select the plugin BACnet/IP from the drop-down box.
Step 3: Set Parameters for Southbound Devices
After adding a southbound device, it automatically enters the device configuration interface, where you can fill in the parameters and submit them.
- Device IP Address: input device IP;
- Device Port: default 47808.
Step 4: Create a Group in the Device Card
Click on any blank space on the device node card to enter the group list management interface, and click Create to bring up the dialog box for creating a group. Fill in the parameters and submit:
- Group Name: Fill in the group name, such as group-1;
- Interval: 1000.
Step 5: Add Tags to the Group
Click on any blank space of the group card, enter the point list management interface, and click Create to enter the page for adding data points.
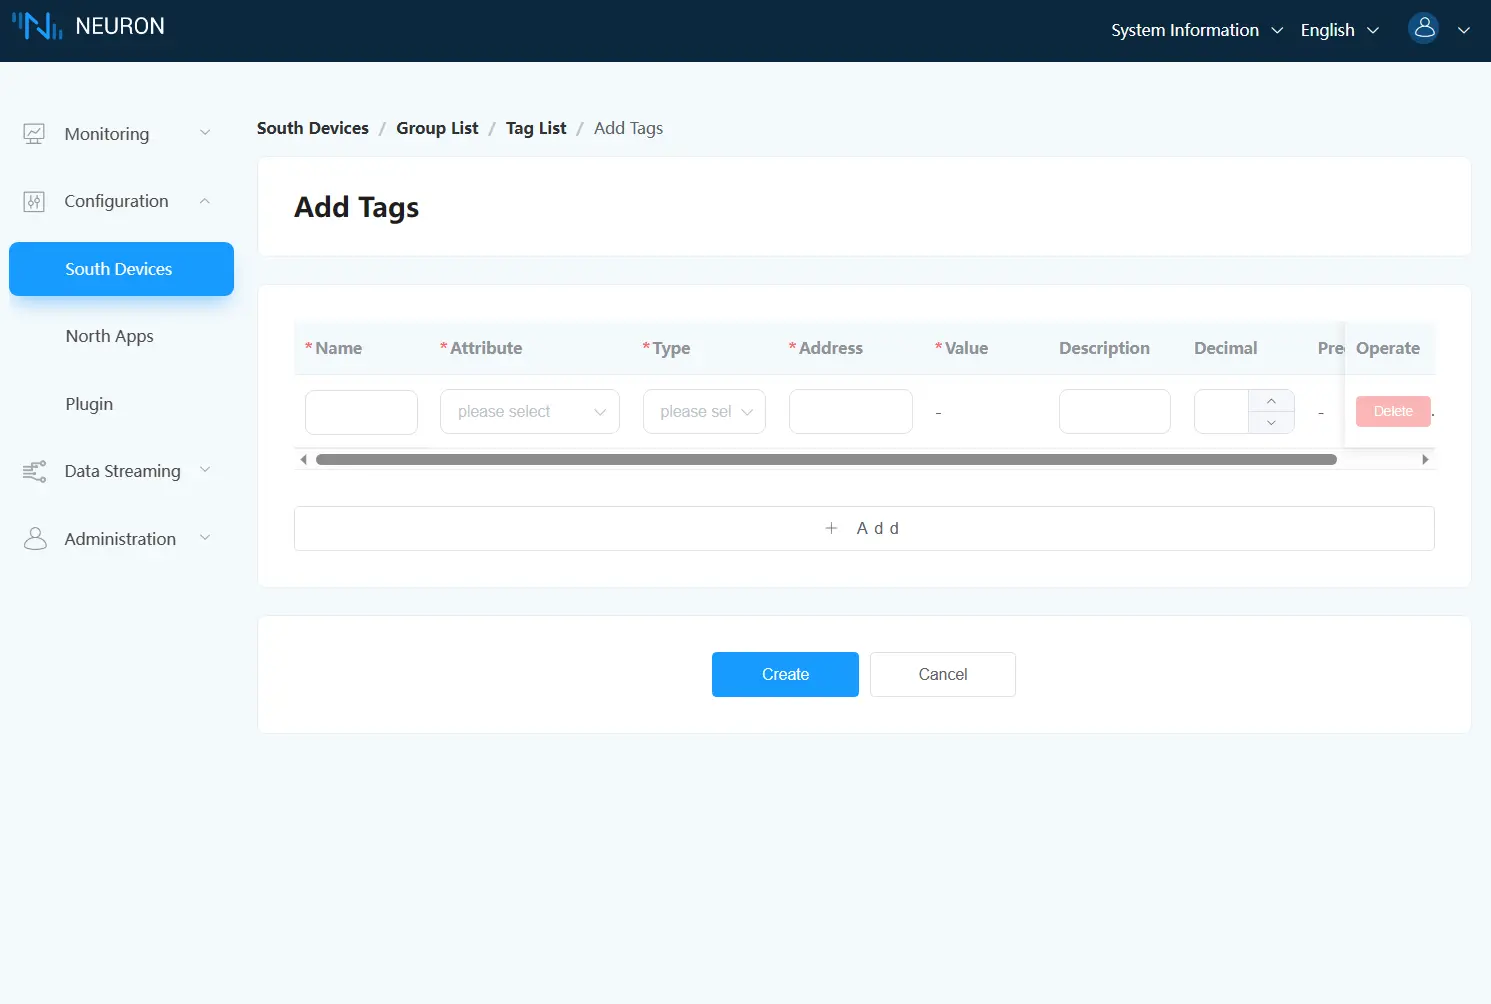
Fill in the parameters of the data point and submit it:
- Name: Fill in the location name, such as tag-1;
- Attribute: Select the location attribute from the dropdown menu, such as Read, Subscribe;
- Type: Select the data type from the dropdown menu, such as FLOAT;
- Address: Fill in the driver address, for example, AI3333. AI represents the analog input object type of the device and 3333 represents the object identifier of the analog input object;
- Description, Decimal, Precision: not filled.
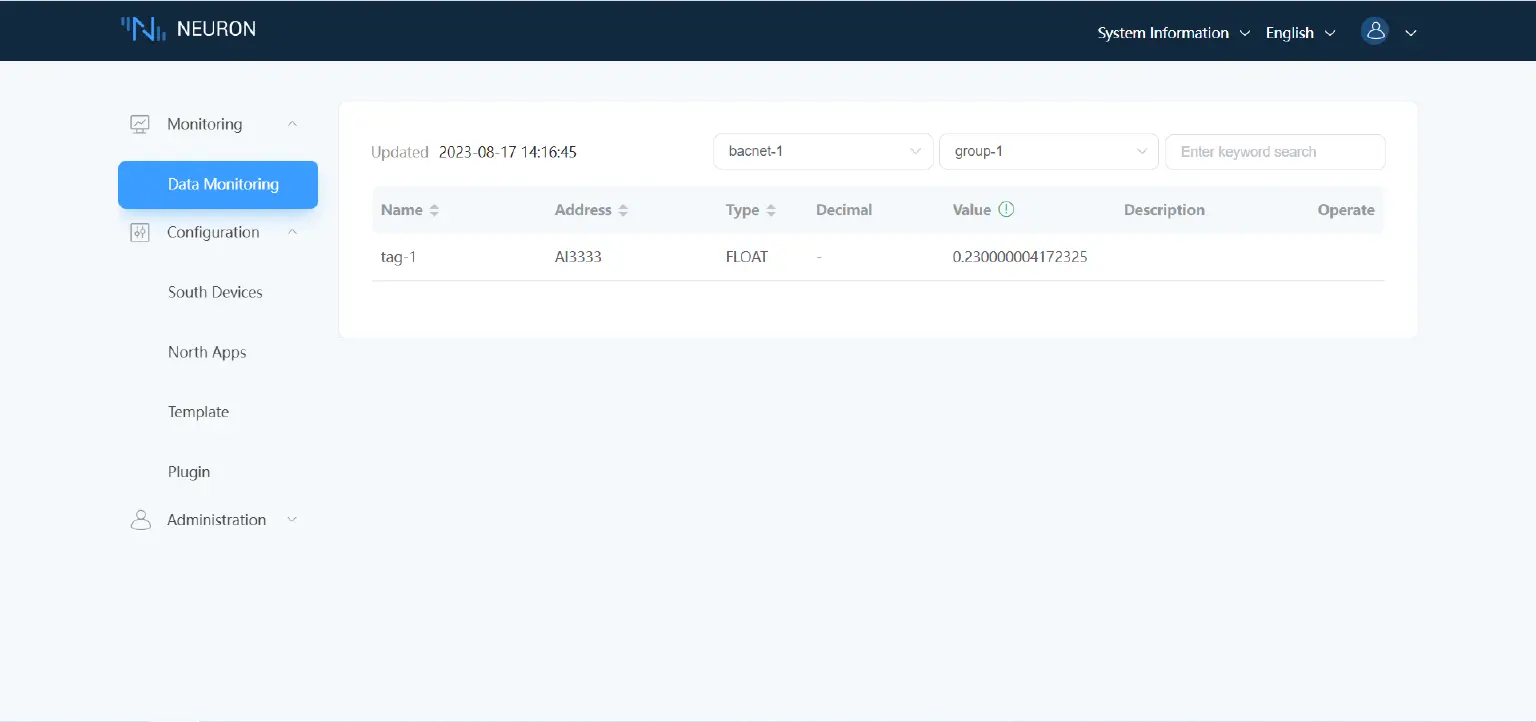
Step 6: View Collected Data in Data Monitoring
Select Monitoring → Data Monitoring from the left navigation menu. View the values read by the created data points, as shown in the following figure.
The data monitoring displays values in groups:
- South Device: Select the southbound device you want to view from the drop-down menu, for example, the created bacnet-1;
- Group Name: Select the group you want to view under the selected southbound device from the drop-down menu, for example, the created group-1;
- After selecting, the page will display all values of points read in the selected group.
Step 7: Add Northbound Plugin Modules to the Application.
By creating a northbound application, Neuron establishes a connection with the northbound application and uploads collected device data to EMQX.
Select the North Apps in the Configuration menu, click Add Application, as shown in the figure below.
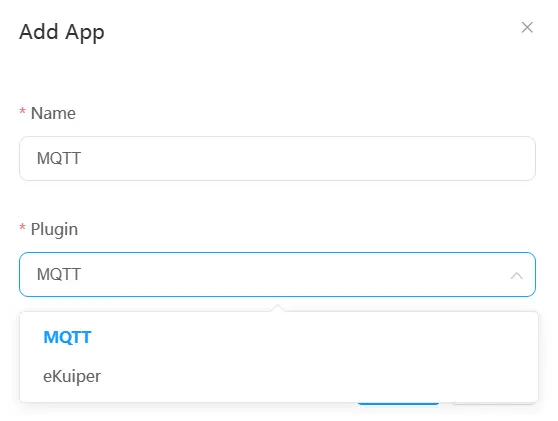
Add an MQTT cloud connection module:
- Name: Fill in the application name, for example, MQTT;
- Plugin: Select the MQTT plugin from the drop-down.
Step 8: Configure Northbound Application Parameters
After adding the northbound application, it will automatically enter the application configuration interface to fill in the parameters and submit.
Set up MQTT connection:
- Client ID: Note that these IDs should be independent of each other(Duplicate IDs will cause the client to be kicked). For example, set to MQTT-12123;
- QoS Level: Default to 0;
- Upload Format: Default to Values-format;
- Write Request Topic: Default to /neuron/MQTT/write/req;
- Write Response Topic: Default to /neuron/MQTT/write/resp;
- Offline Data Caching: Default to off;
- Broker Host: Fill in the address of the created emqx broker, which is usually localhost, i.e. your actual IP address;
- Broker Port: Default to 1883;
- Username, Password: Not required;
- SSL: Default to off.
Step 9: Subscribe to the Southbound Point Group
Click on any blank space of the newly created MQTT application node card to enter the subscription group interface, and click "Add Subscription".
Subscribe to the data group of southbound devices:
- South device: Select the created southbound device from the dropdown list, for example, bacnet-1;
- Group: Select the group to be subscribed to from the dropdown list, for example, group-1;
- Topic: The MQTT topic, which is default set as
/neuron/mqtt/bacnet-1/group-1in this example. Next, subscribe to this topic and receive messages in MQTTX.
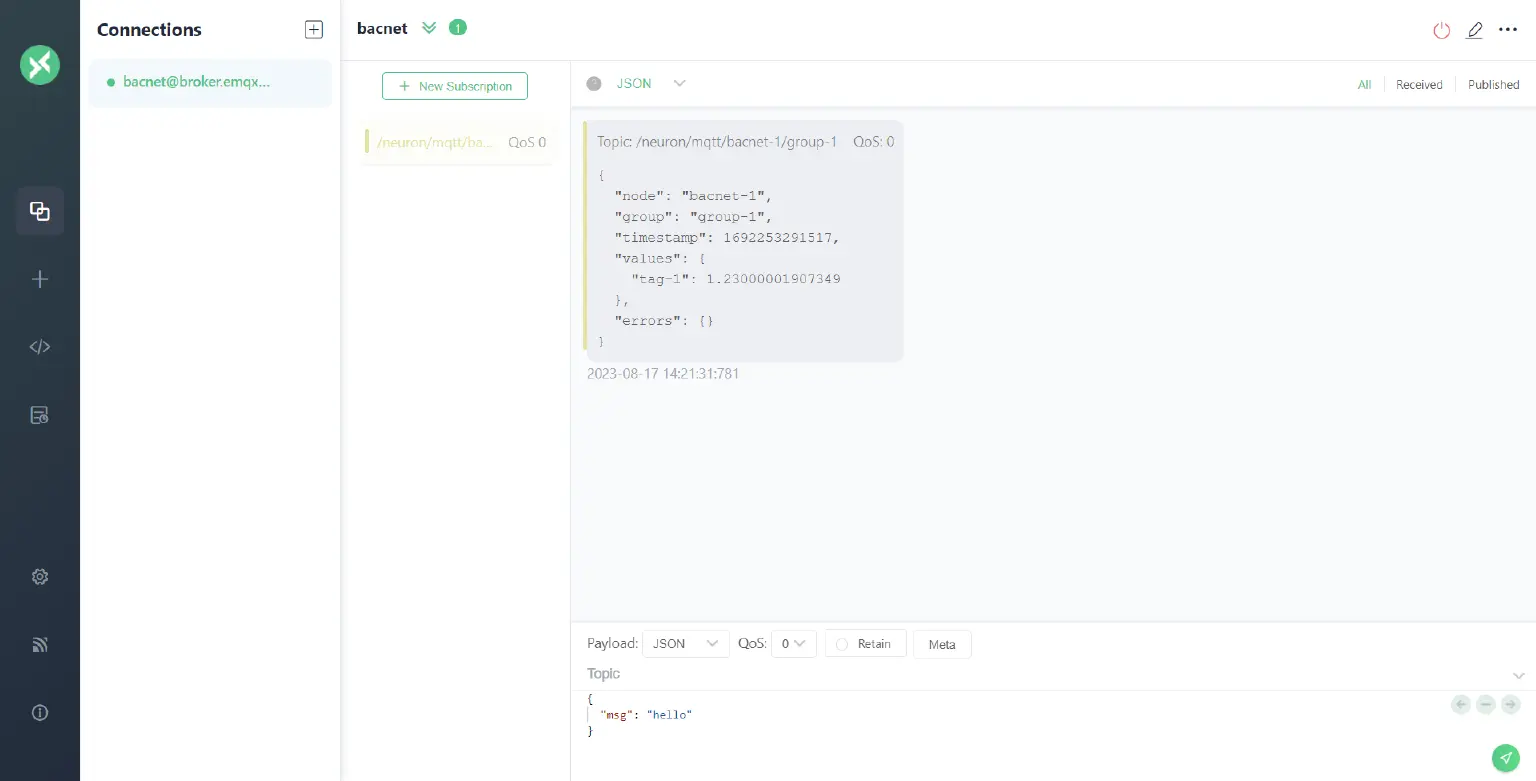
Step 10: View data in the MQTT Client.
After subscribing, you can use an MQTT client to connect to EMQX and view the reported data. Here we use MQTTX, a powerful cross-platform MQTT client tool, which can be downloaded from the official website.
Once MQTTX is launched, click + New Connection on the main page, fill in the configuration parameters, and click Connect in the upper right corner.
- Name: Naming messages facilitate viewing. For example, naming them bacnet;
- Client ID: Using the default value is ok; ensure that the ID is independent;
- Host: Select mqtt:// and fill in
localhost(replace "localhost" with your actual IP address); - Port: 1883.
Optional parameters can be filled in, and then click the Connect button on the upper right corner after completion. After a successful connection, subscribe to the topic.
Click Add Subscription, and the topic should be the same as the one in step 9. For example, fill in /neuron/mqtt/bacnet-1/group-1;
After a successful subscription, you can see that MQTTX continues to receive data collected and reported by Neuron. As shown in the following figure.
Conclusion
As the need for smarter, safer, and more comfortable building functions grows, there will be an increased demand for data from building equipment. The integration of cloud computing and AI technology requires BACnet to adapt to changes in technology architecture. An increasingly popular option to bridge these changes is to switch to MQTT. This blog provides solutions for users to safely and conveniently implement IoT platforms for smart buildings on-demand, improving connectivity and enabling people to live and work smarter, safer, and more comfortably.