Getting Data from EMQX Cloud with InfluxDB Native Collector
Introduction
InfluxData recently announced the availability of Native Collectors, bringing native data collection to the InfluxDB Cloud. This will provide developers with the fastest way to get data from third-party MQTT brokers such as EMQX Cloud into the InfluxDB Cloud without the need for additional software or new code.
While integrating with a private MQTT broker is always possible, this is an easier way to do cloud-to-cloud integration.
In this tutorial, I'll show you step-by-step how to integrate InfluxDB Cloud with EMQX Cloud, a leading MQTT service provider, using this new native collector.
Four steps integration
The integration only needs 4 steps:
- Create an MQTT broker on EMQX Cloud – 3 mins
- Create a bucket on InfluxDB Cloud – 3 mins
- Config the native collector – 2 mins
- Verification – 1 min
Yes! You will get data from EMQX Cloud to InfluxDB Cloud in less than 10 minutes!
Now, let’s check it out.
Step 1: Create an MQTT broker on EMQX Cloud.
Creating a dedicated MQTT broker on EMQX Cloud is as easy as a few clicks.
Get an account
Go to EMQX Cloud and click start free to register an account if you are new to EMQX Cloud.
Create an MQTT cluster
Once logged in, click "Cloud Console" under the account menu and you will be able to see the green button to create a new deployment.
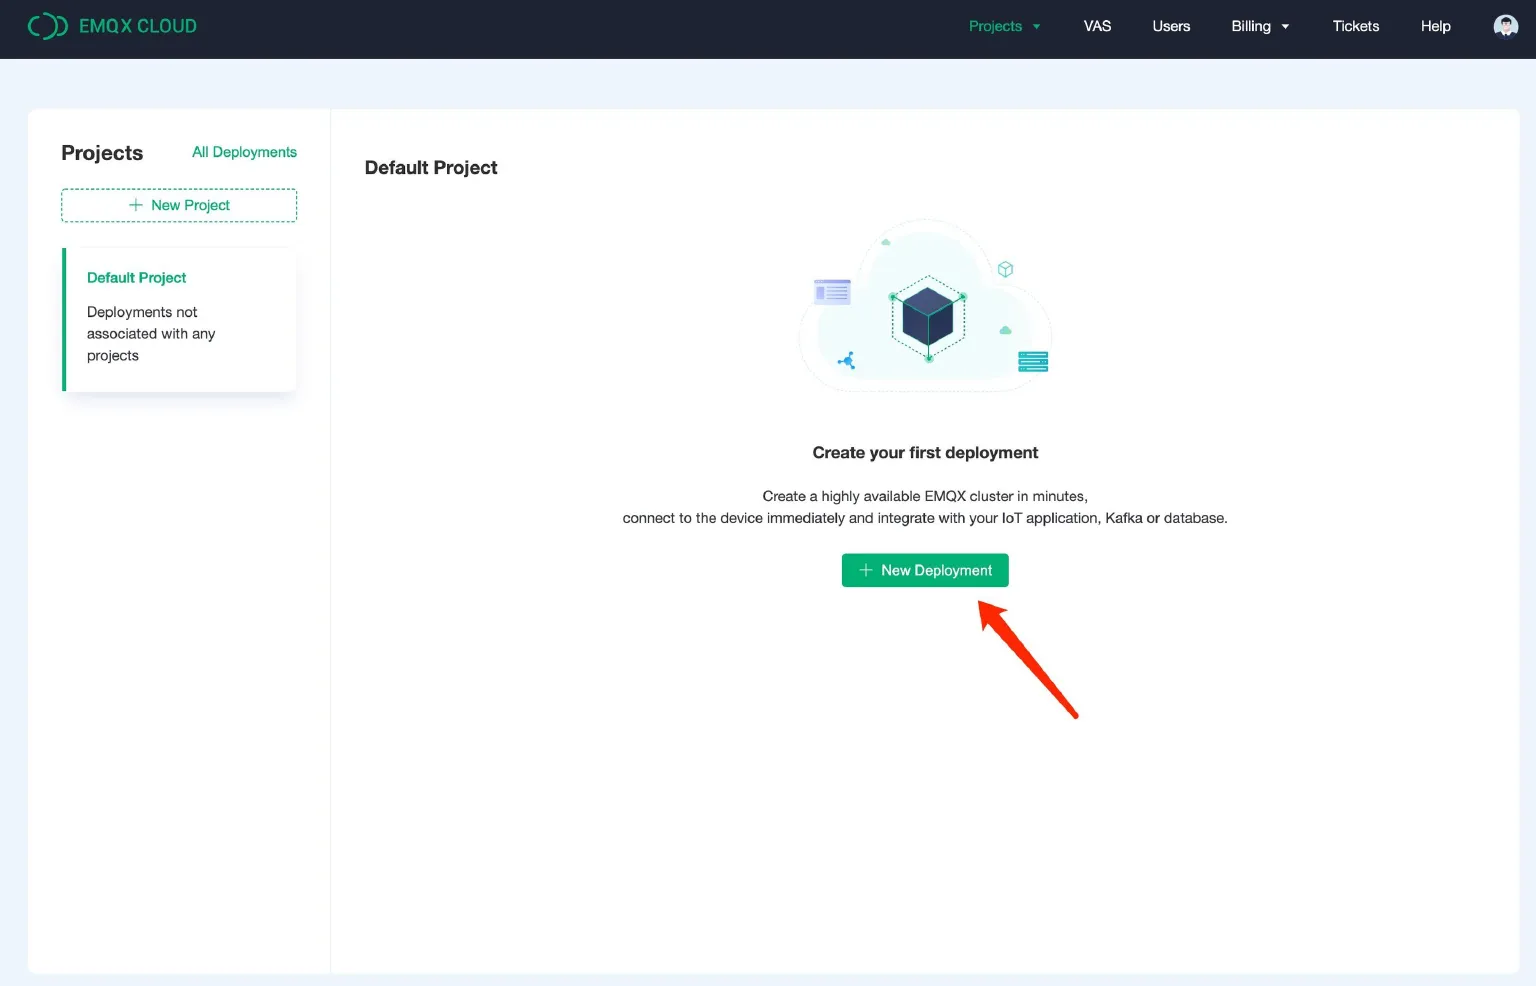
EMQX Cloud offers a 14-day free trial of Standard and Professional plans. While the Pro plan offers more features, the Standard plan is more than enough for this tutorial.
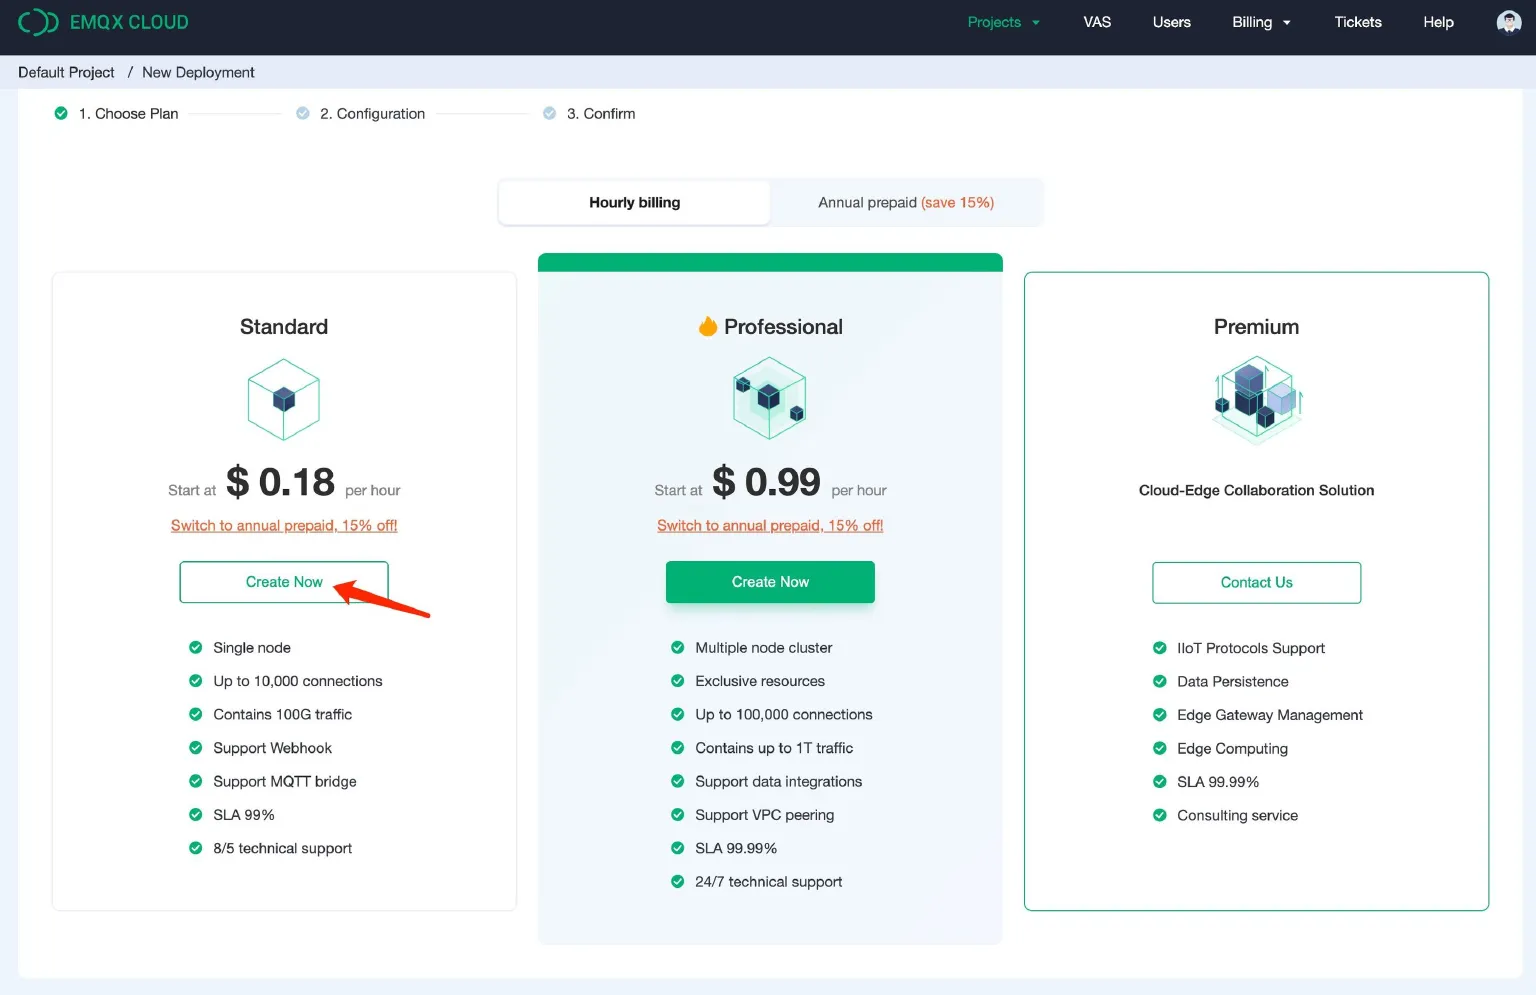
Click "Create Now" and follow a step-by-step walkthrough to complete the deployment. After clicking the final "Deploy" button, you will see the instance created as follows:

It will take a few minutes to get a running instance.
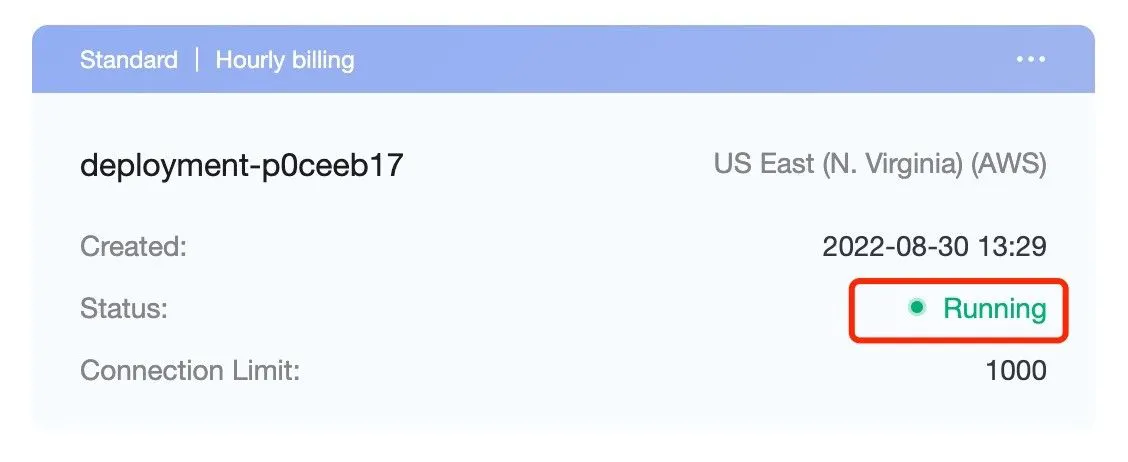
Once the status changes to Running, click the card to go to the cluster overview.
Get Connection Adress and Port
On the overview page, you will see the instance details. Note the connection address and connection port here, which is required when we configure the integration on InfluxDB Cloud.
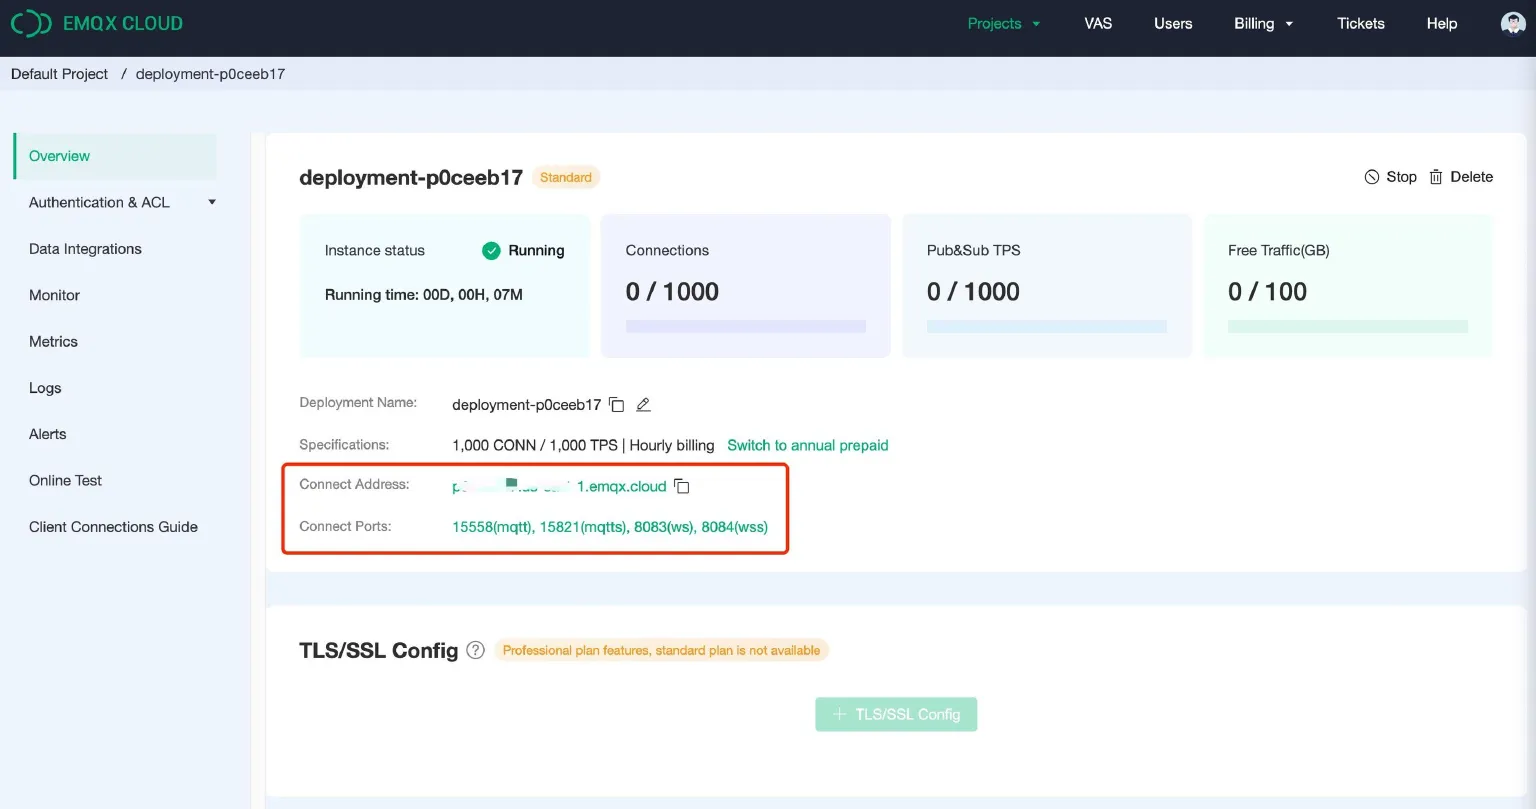
Each EMQX Cloud instance creates four listeners for MQTT connections (MQTT, MQTT with TLS, MQTT over WebSocket, and MQTT over WebSocket with TLS). However, InfluxDB Cloud currently only supports the MQTT protocol, so you only need to note the first port.
Add Credentials for MQTT connection
The last thing on EMQX Cloud is to create credentials for the MQTT connection. Click Authentication and ACLs on the left menu, then click Authentication in the submenu.

Click the "Add" button on the right and provide the username and password for the mqtt connection later. Here I will use "test" and "influxdb" as username and password.
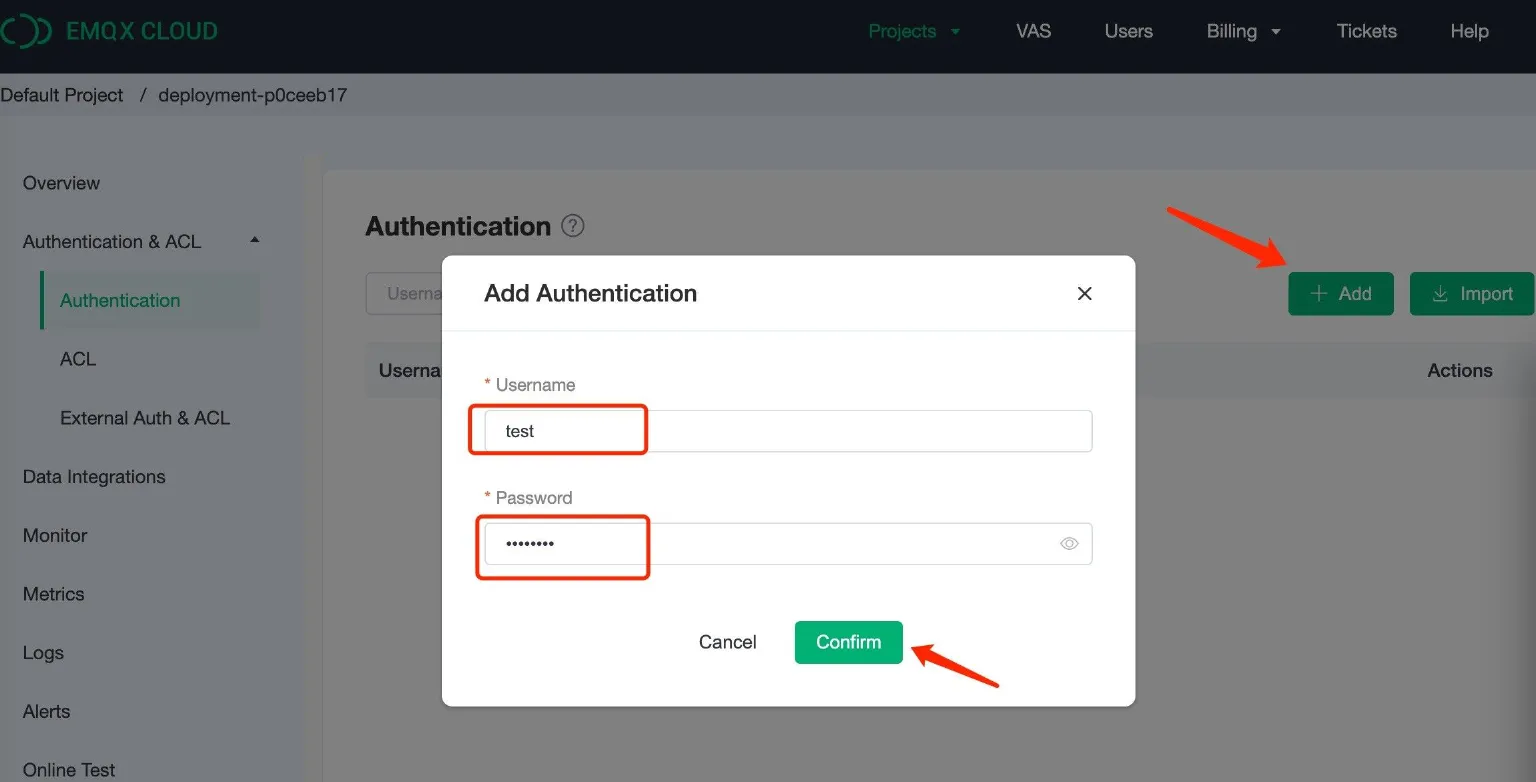
Click ‘Confirm’ and everything is settled down on EMQX Cloud side.
Now you have a running MQTT broker provided by EMQX Cloud. Let’s move on to Step 2.
Step 2: Create a bucket on InfluxDB Cloud
Create an InfluxDB Cloud account
If you are using InfluxDB Cloud for the first time, you will also need to create an account.`
Create a Bucket for data persistence
Once logged in, go to the console page and click the "Buckets" button in the menu.

Click ‘Create Bucket’ on the right side and fill out the form.
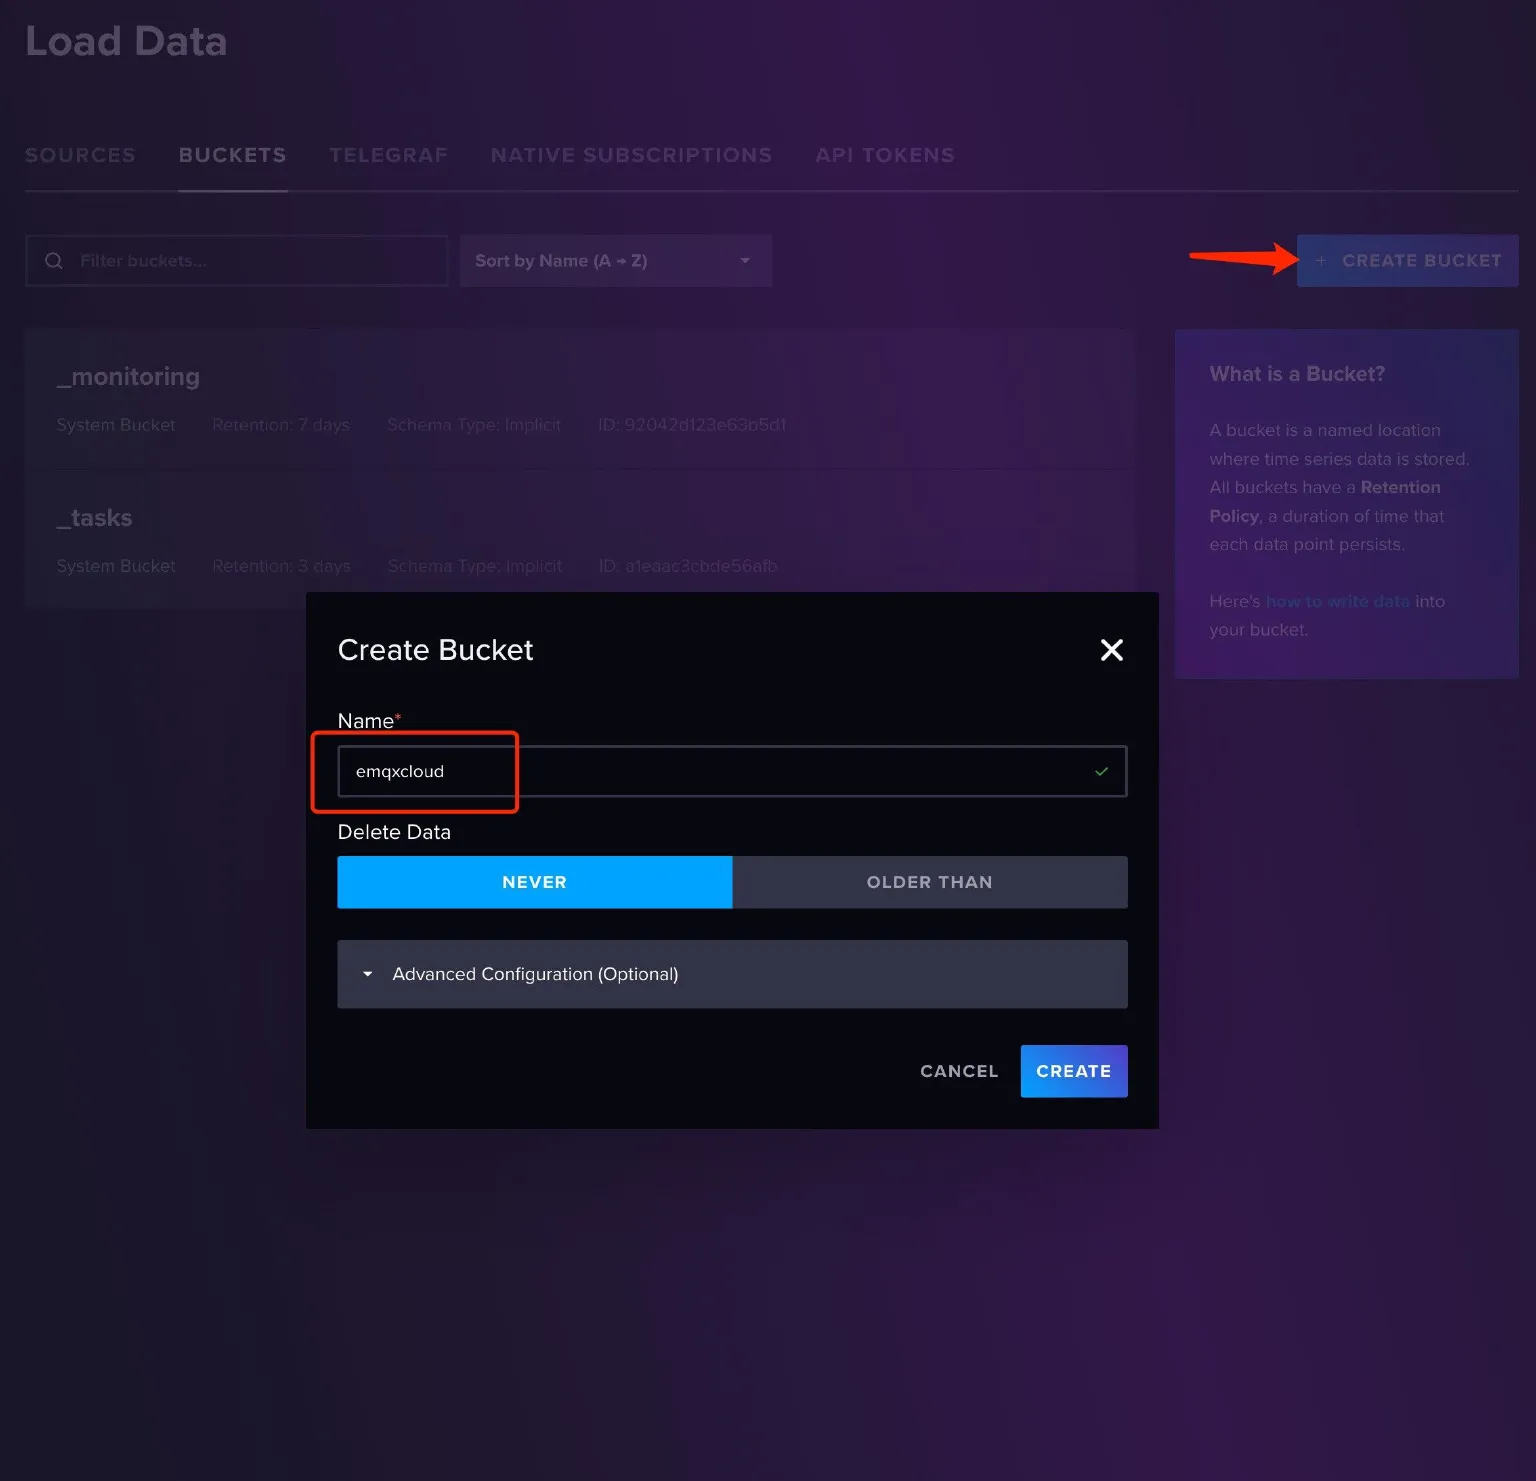
I will use "emqxcloud" as the bucket name here. Click "Create".
OK, now you have your bucket ready. Let's try out the new Native Collector.
Step 3: Config the native collector
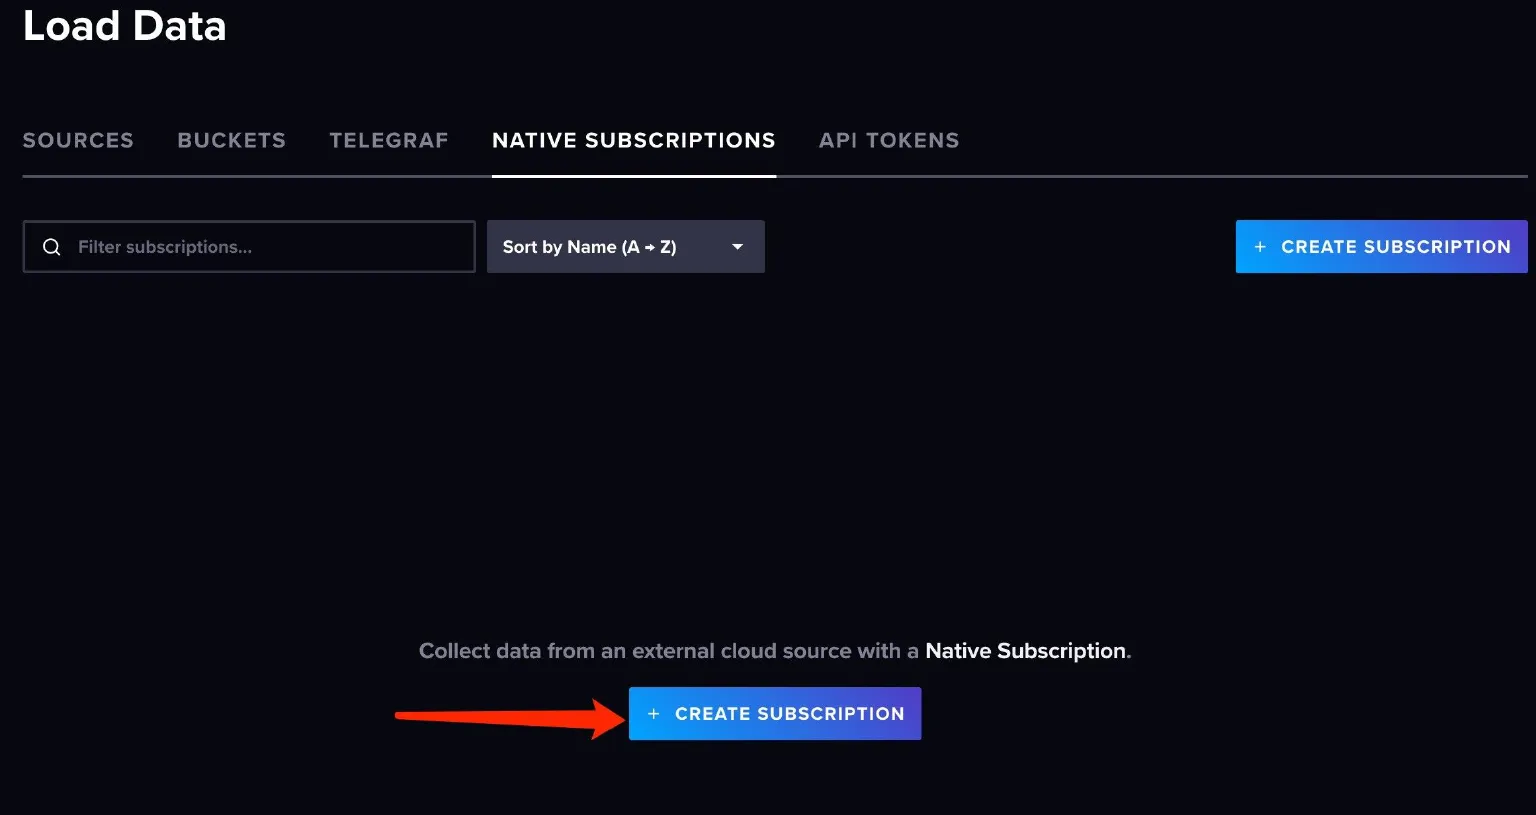
Go to the Native Subscriptions page
Click the ‘NATIVE SUBSCRIPTIONS’ tab on the bucket page.

Please note that this feature is available with usage-based plans only. So you need to upgrade your account by linking a credit card. Luckily, InfluxDB Cloud offers $250 credits for new users.
Create a Subscription
Go ahead and click Create Subscription.
On the integration configuration page, there are 5 sections:
- Config Broker Details
- Config Security Details
- Subscribe to a Topic
- Set write destination
- Define data parsing rules.
Don't worry, let's go through them one by one.
Config Broker Connection
To create a subscription, InfluxDB first needs to connect to the target MQTT broker on EMQX Cloud.
Here we will use the connection details we created on EMQX Cloud.
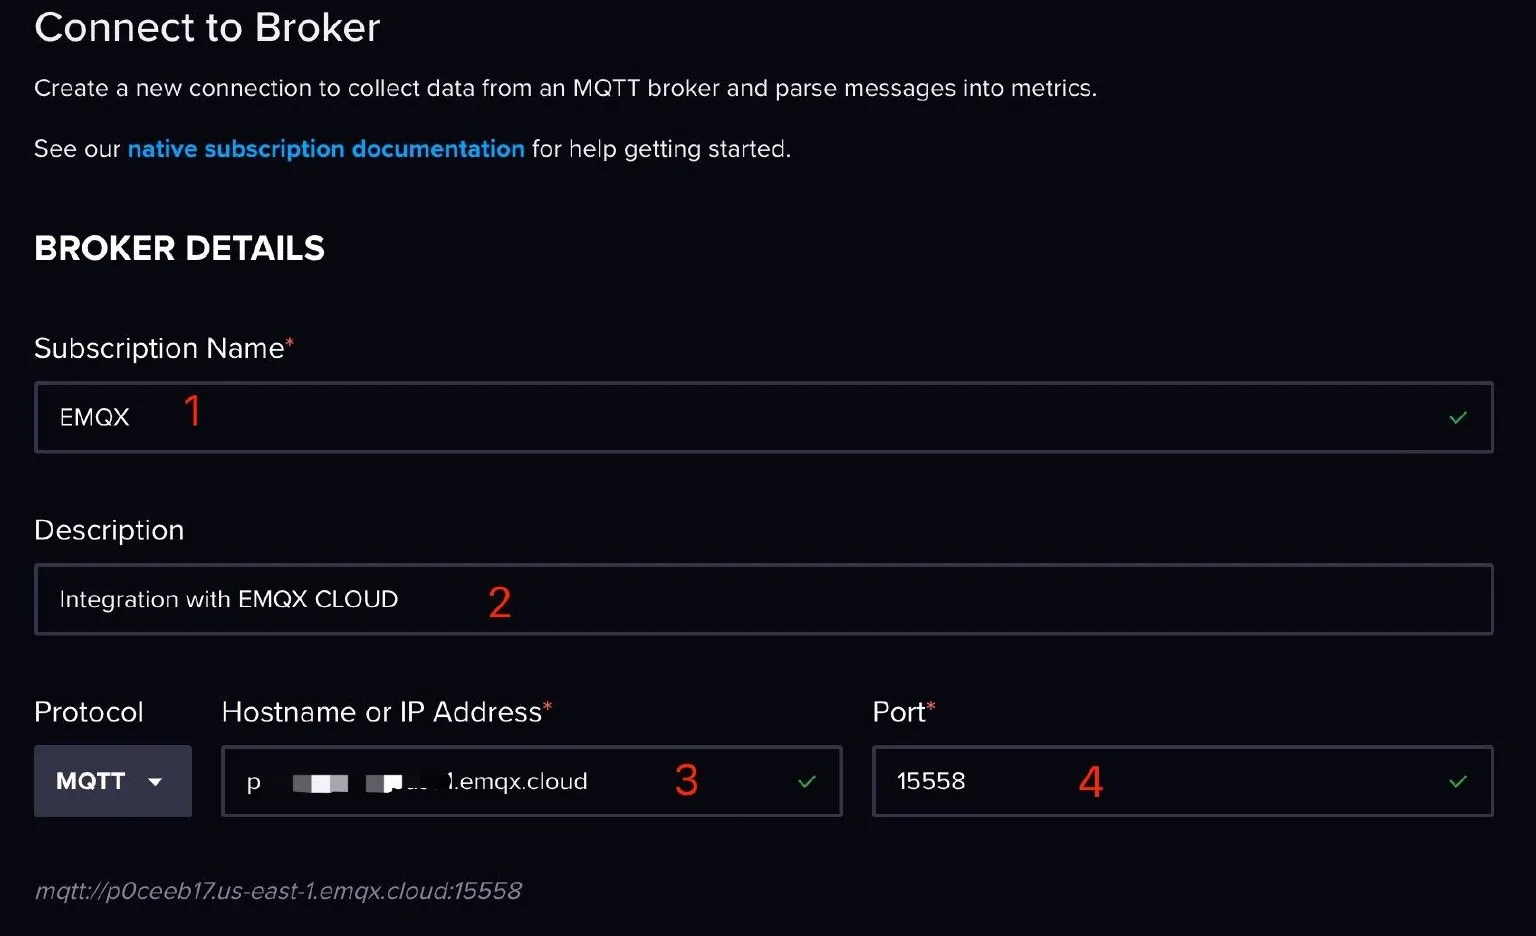
This part has 4 inputs:
- Subscription Name: Name your subscription as desired. I use ‘EMQX’ in this example.
- Description: (Optional) Give this subscription a short description.
- Hostname or IP Address: The connect address you got from EMQX Cloud in Step 1.
- Port: The connect port you got from EMQX Cloud in Step 1.
Config Security Details
Choose BASIC in ‘SECURITY DETAILS’ and set the username and password you created in EMQX Cloud.
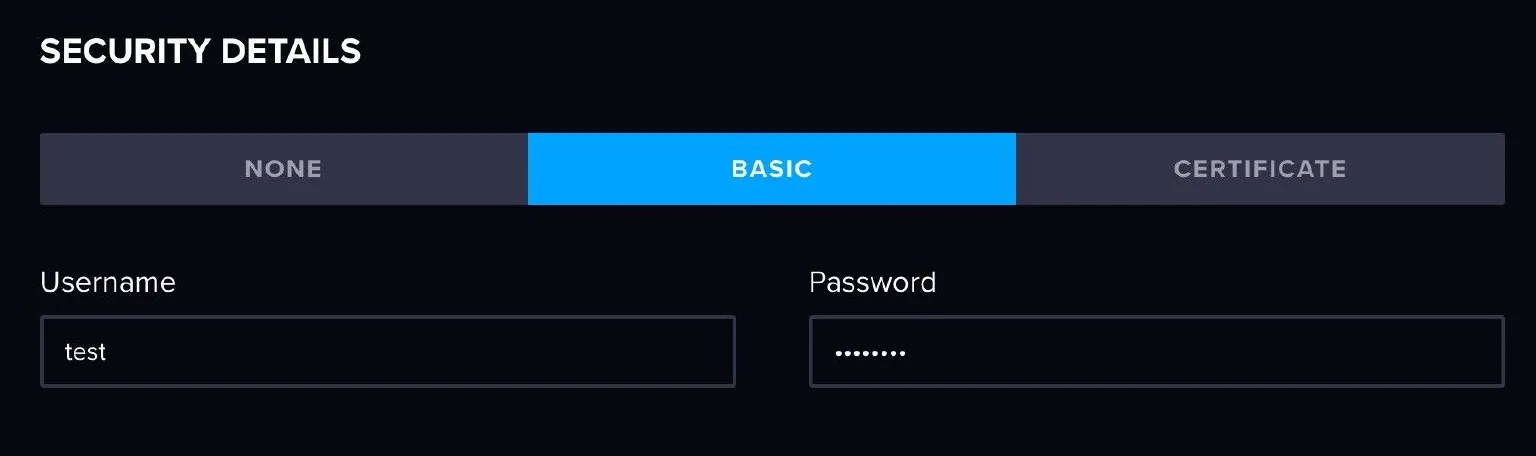
Double check the address, port, and username/password. They are essential for establishing a successful MQTT connection to EMQX cloud.
Subscribe to a Topic
Once the connection is configured, we need to tell InfluxDB Cloud which topics it should listen to.

Just give the topic name here. I used "influxdb" for this demo. It's easy to understand. All data sent to this topic will be forwarded to InfluxDB Cloud.
While we've used an explicit topic name here, InfluxDB Cloud Native Collector do support wildcards like "+" and "#". Using wildcards is more practical in real use cases. Check InfluxDB Cloud’s doc for more information.
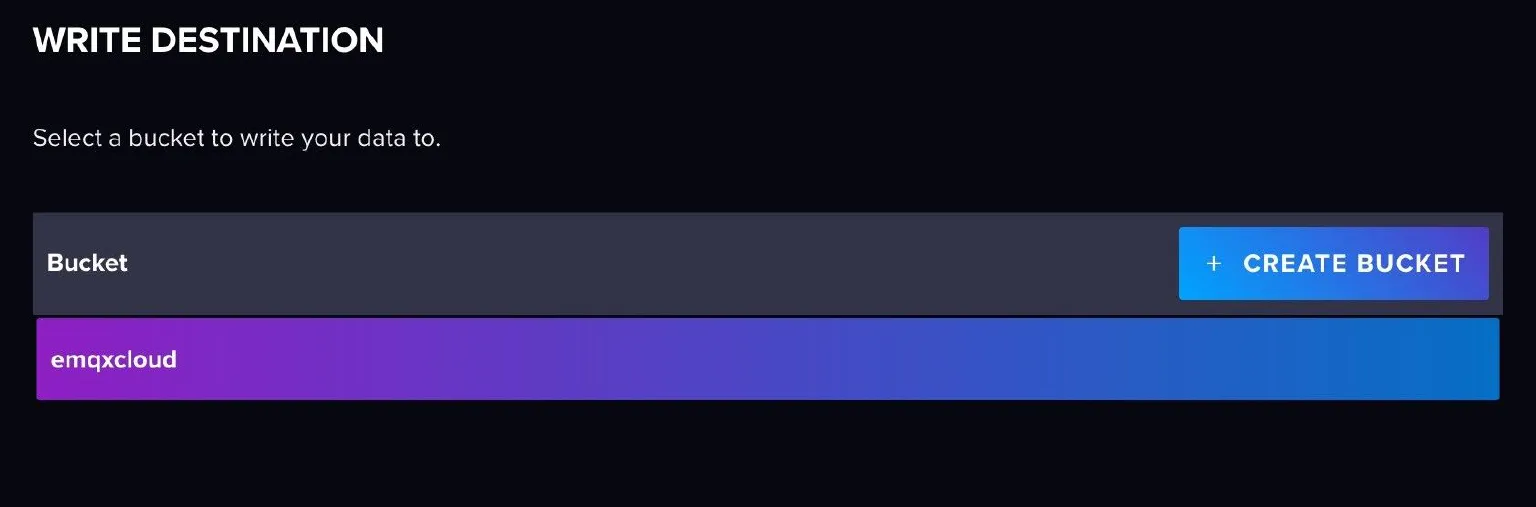
Set Write Destination
In the "WRITE DESTINATION" section, leave it as default as there is only one Bucket. However, if you have multiple buckets, make sure to select the right one.
Define Data Parsing Rules
Now, the last part: Define Data Parsing Rules.
InfluxDB Cloud Native Collector supports three data formats. In this demo, we will use the JSON format. It's easier to read in a demo.
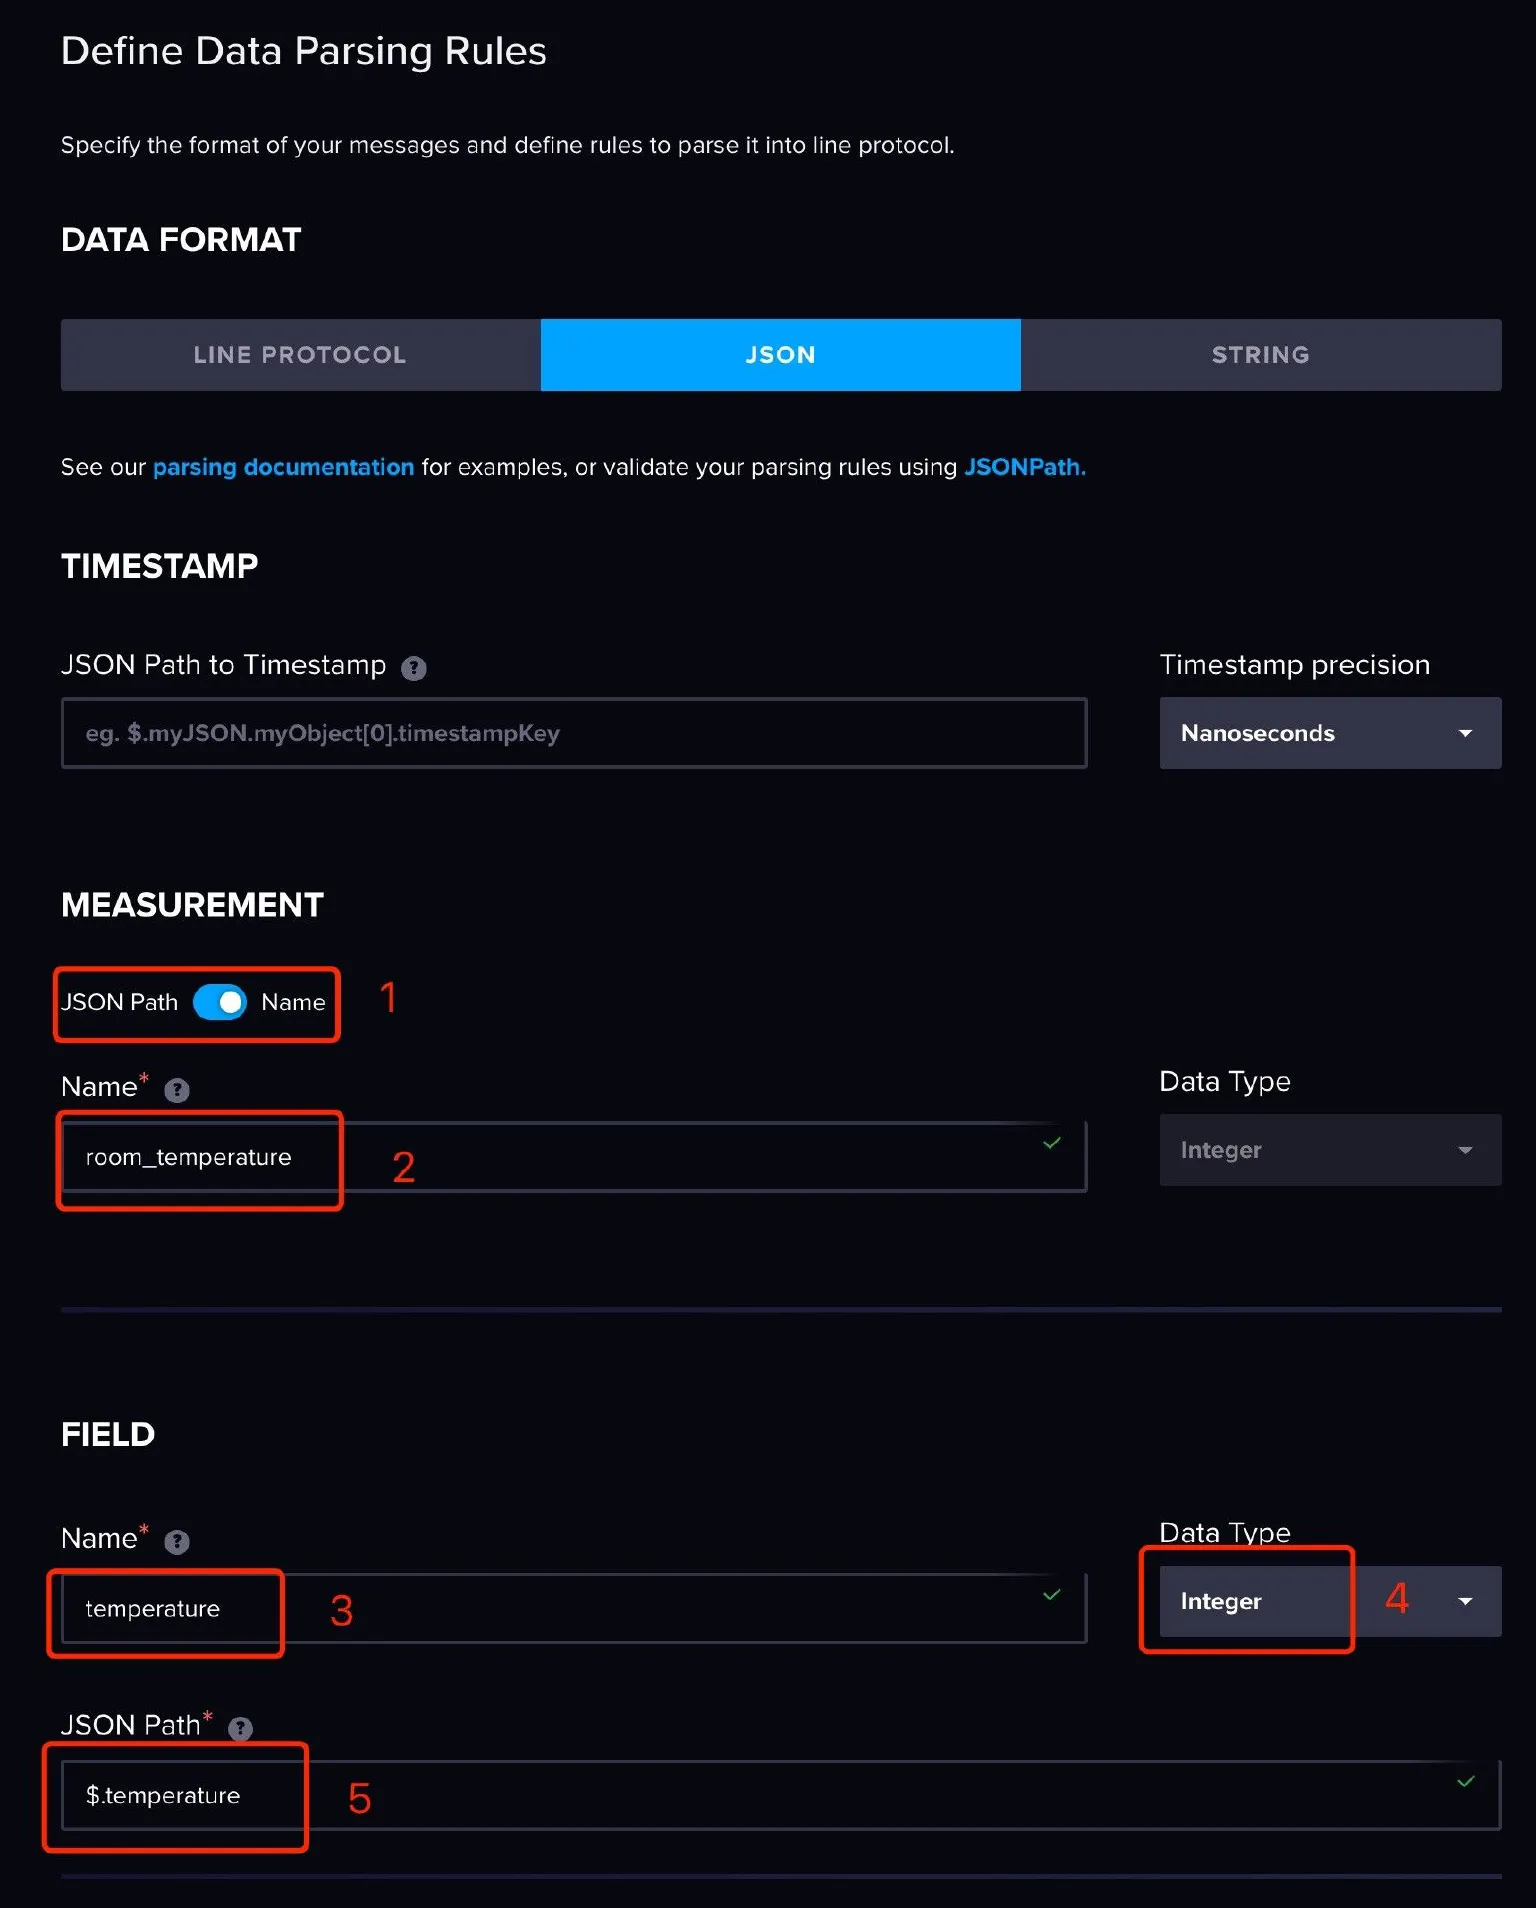
In the data parsing rules, you need to provide information on how to convert JSON data into measurements and fields in InfluxDB.
In the demo, I will use a very simple message with only one temperature data.
Sample JSON payload:
{
  "temperature":25
}
To convert this JSON message to meric in InfluxDB Cloud, we need to perform the following mapping:
TIMESTAMP:
Timestamp is optional. If not provided, it will use the server's timestamp as default value when inserting data.
MEASUREMENT:
Measurement can be parsed from JSON or a static name. To keep this demo as simple as possible, I use the static name "room_temperature" in this demo.
FIELD:
In this demo, I used a JSON message containing only temperature, so I used "temperature" as the name and the JSON path "$.temperature" to get the data from the JSON body. InfluxDB Cloud uses JSONPath to fetch data from a JSON object. Check JSONPath’s doc for its syntax.
Save Subscription
Last but not least, don’t forget to save the subscription.
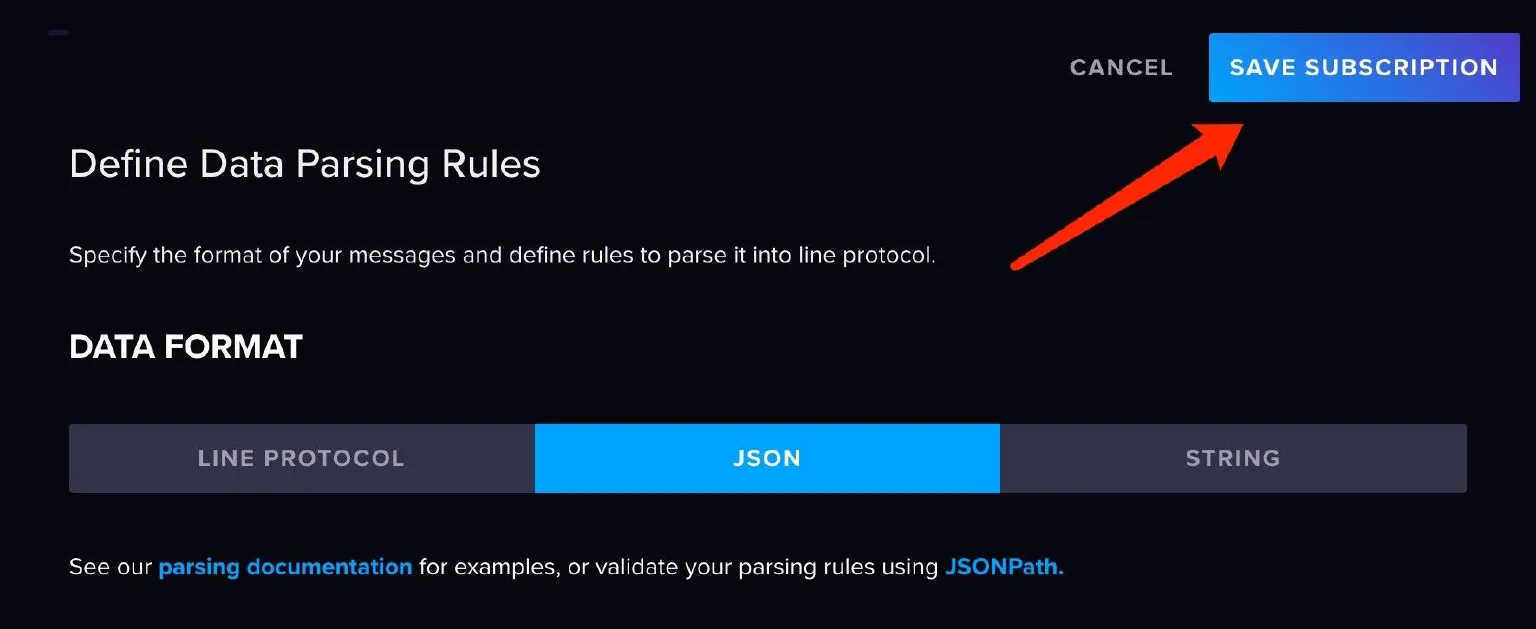
Click ‘SAVE SUBSCRIPTION’ And THAT’S IT!
Verify the subscription is running
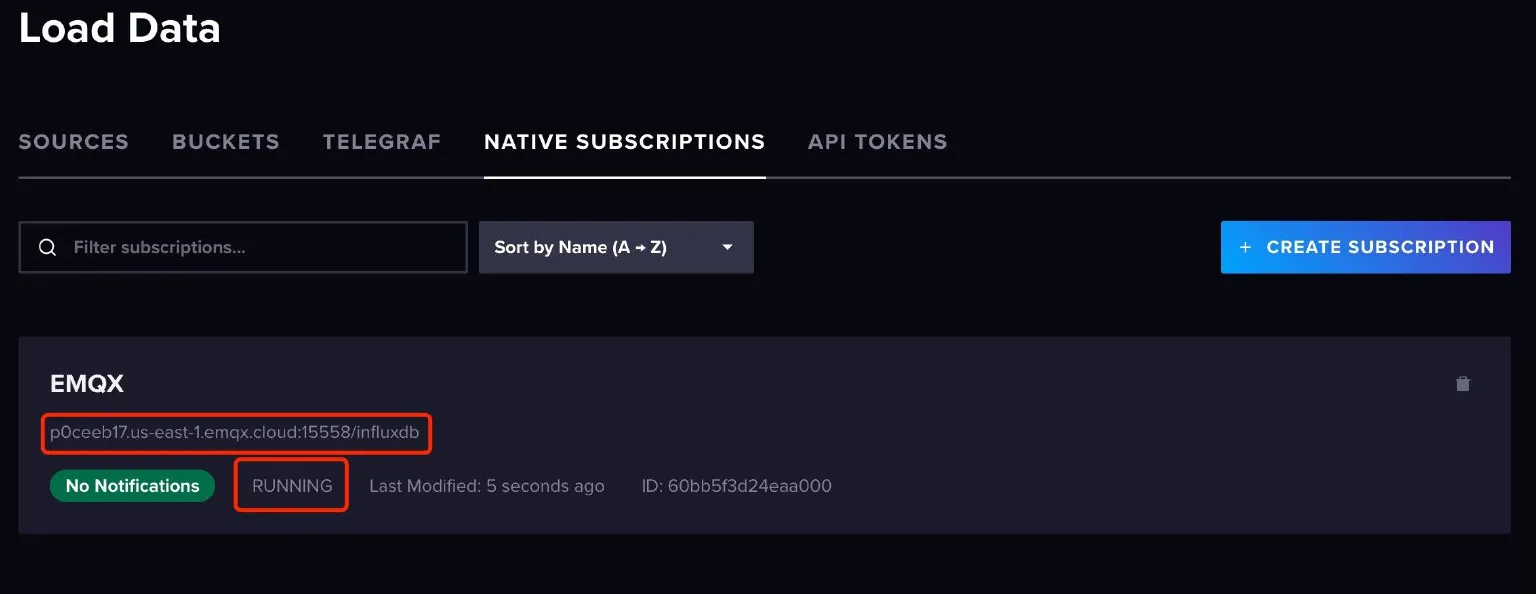
It should show up running on the native subscriptions list.
Everything is settled
Congratulations! You should have successfully integrated InfluxDB Cloud and EMQX Cloud. The temperature data sent to EMQX Cloud should be continuously persisted to the target bucket on InfluxDB Cloud.
Now, let’s move on to the last Step. Check out if it’s working as expected.
Step 4: Verification
How to know if the integration is a success? Simple answer: Let’s send a message to the MQTT broker on EMQX Cloud and see if it appears on the dashboard of InfluxDB cloud!
Choose an MQTT client
Use can use any MQTT client as you like. In this tutorial, I will use MQTTX, a user-friendly MQTT desktop application that is good for testing purposes.
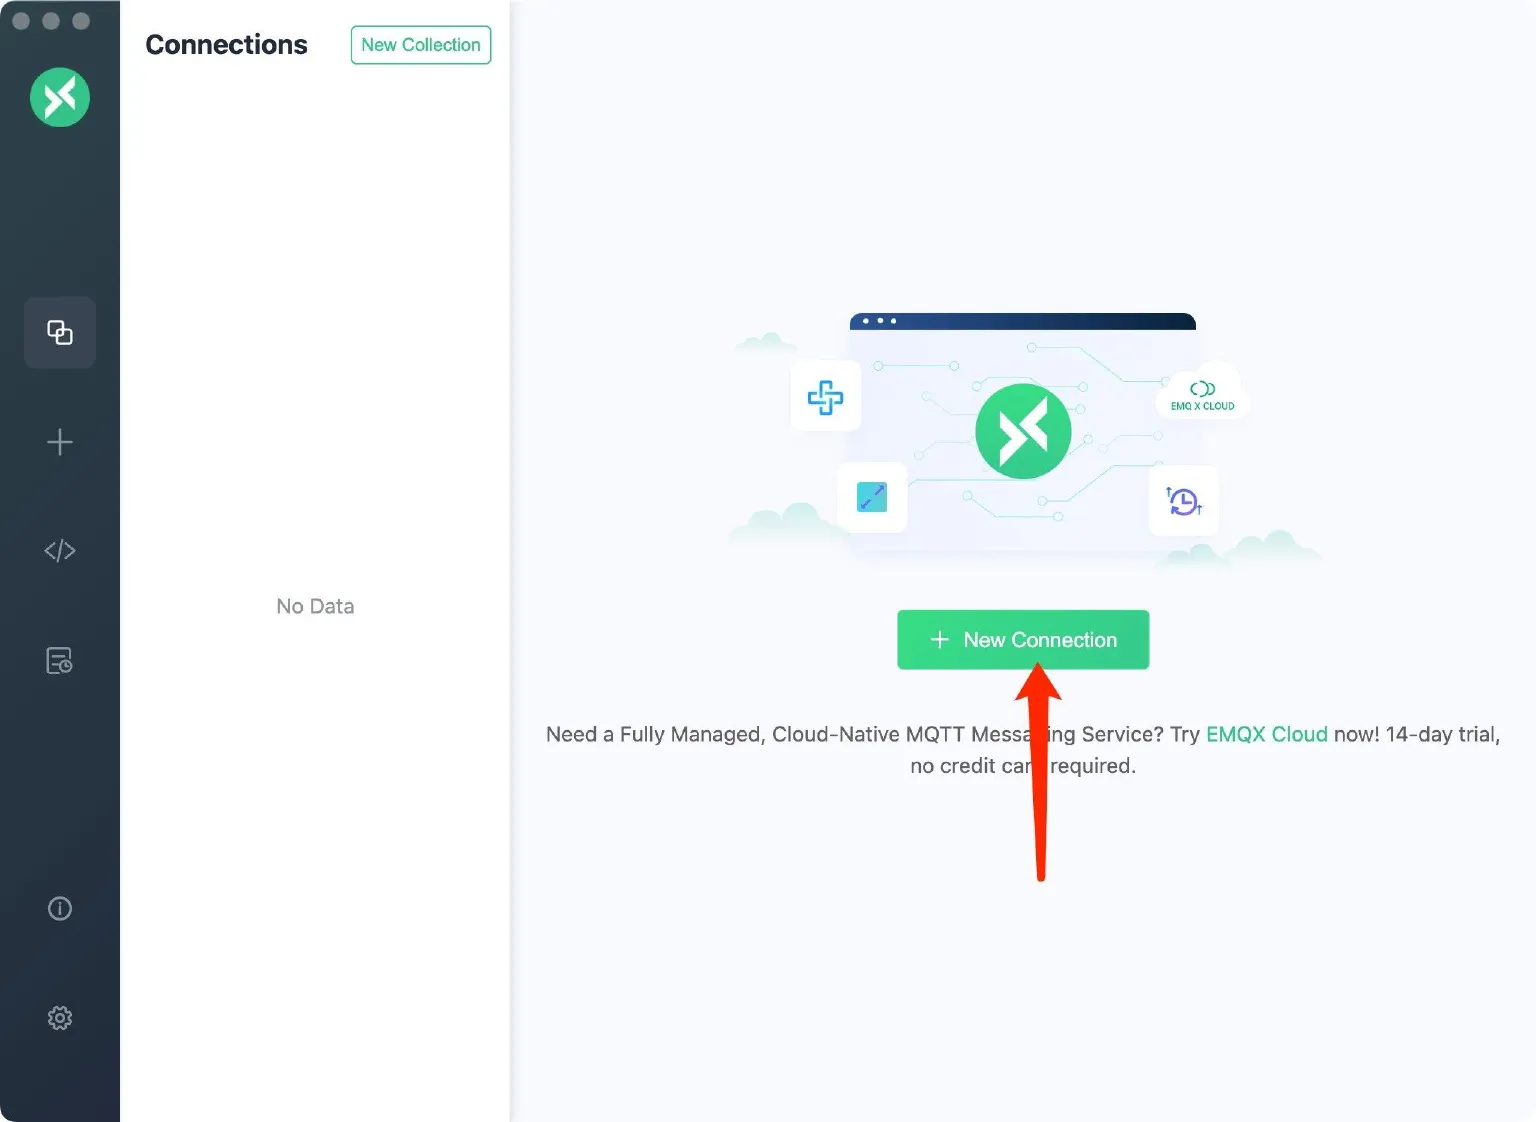
Connect to EMQX Cloud
Click ‘New Connection’ on MQTTX and fill out the connection form:
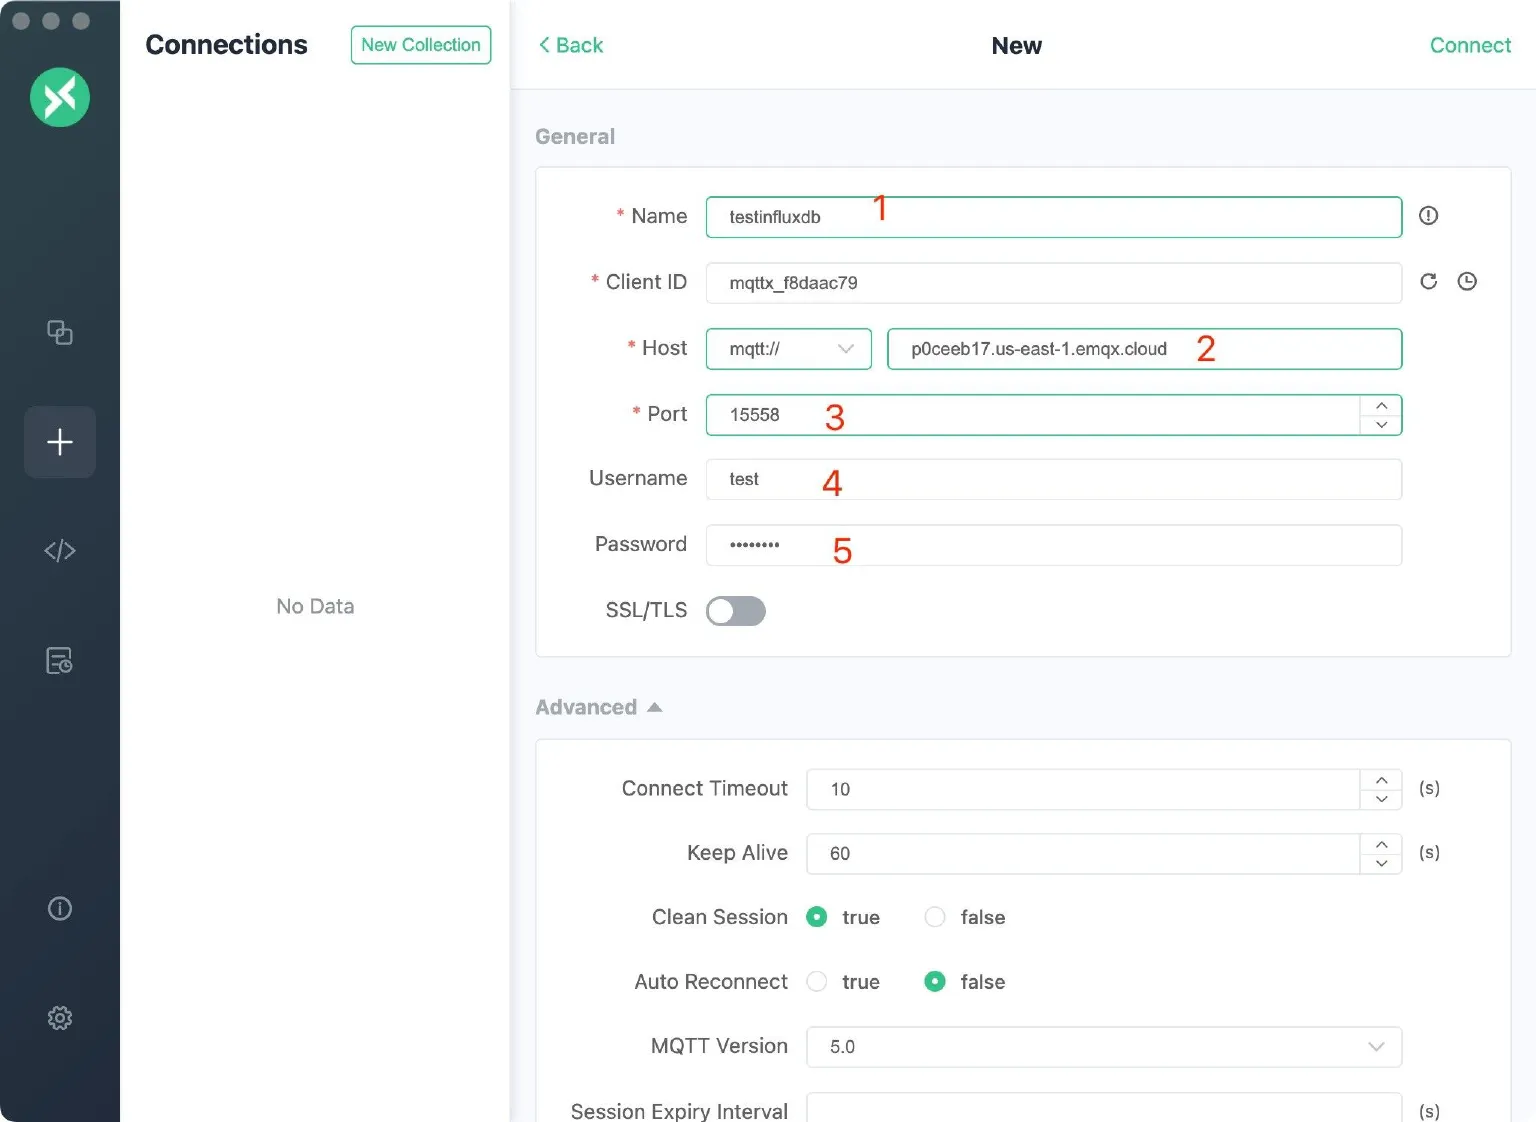
- Name: The connection name. Use whatever name you want.
- Host: The MQTT broker connection address. Same as you used in InfluxDB Cloud setup.
- Port: MQTT broker connection port. Same as you used in InfluxDB Cloud setup.
- Username/Password: In the demo, I use the same credentials as in InfluxDB Cloud Configuration. You can add new credentials in EMQX Cloud if you want.
Click the "Connect" button in the upper right corner and the connection should be set up.
Send messages to EMQX Cloud
Now you can use this tool to send messages to the MQTT broker on EMQX Cloud.

Inputs:
- Set payload format to “JSON”.
- Set the topic: influxdb (the topic of the InfluxDB subscription we just set up)
- JSON body:
{"temperature": 25}
Click the Send icon on the right. You can change the temperature value and send more data to the MQTT broker. The more data, the richer the chart will be displayed on the dashboard.
Check the data on InfluxDB Cloud
Now, it's time to view the data on InfluxDB Cloud. Ideally, the data you send using MQTTX will go into EMQX Cloud and then be persisted to the target bucket in InfluxDB Cloud.
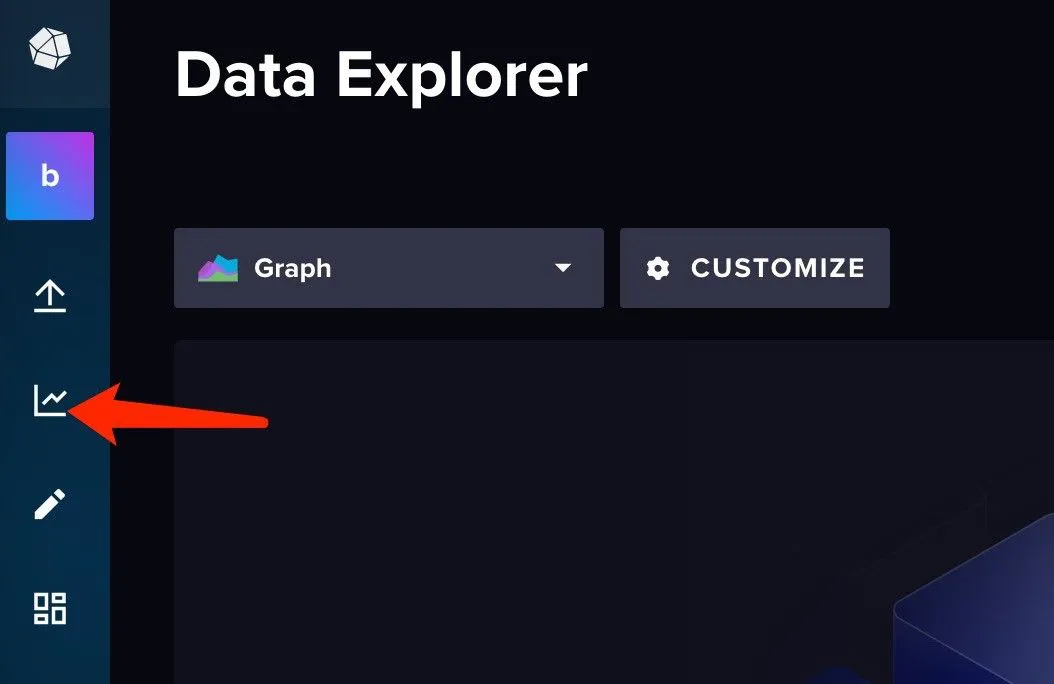
Let’s go back to InfluxDB Cloud and Open the data explorer by clicking the ‘Data Explorer' icon on the left menu.
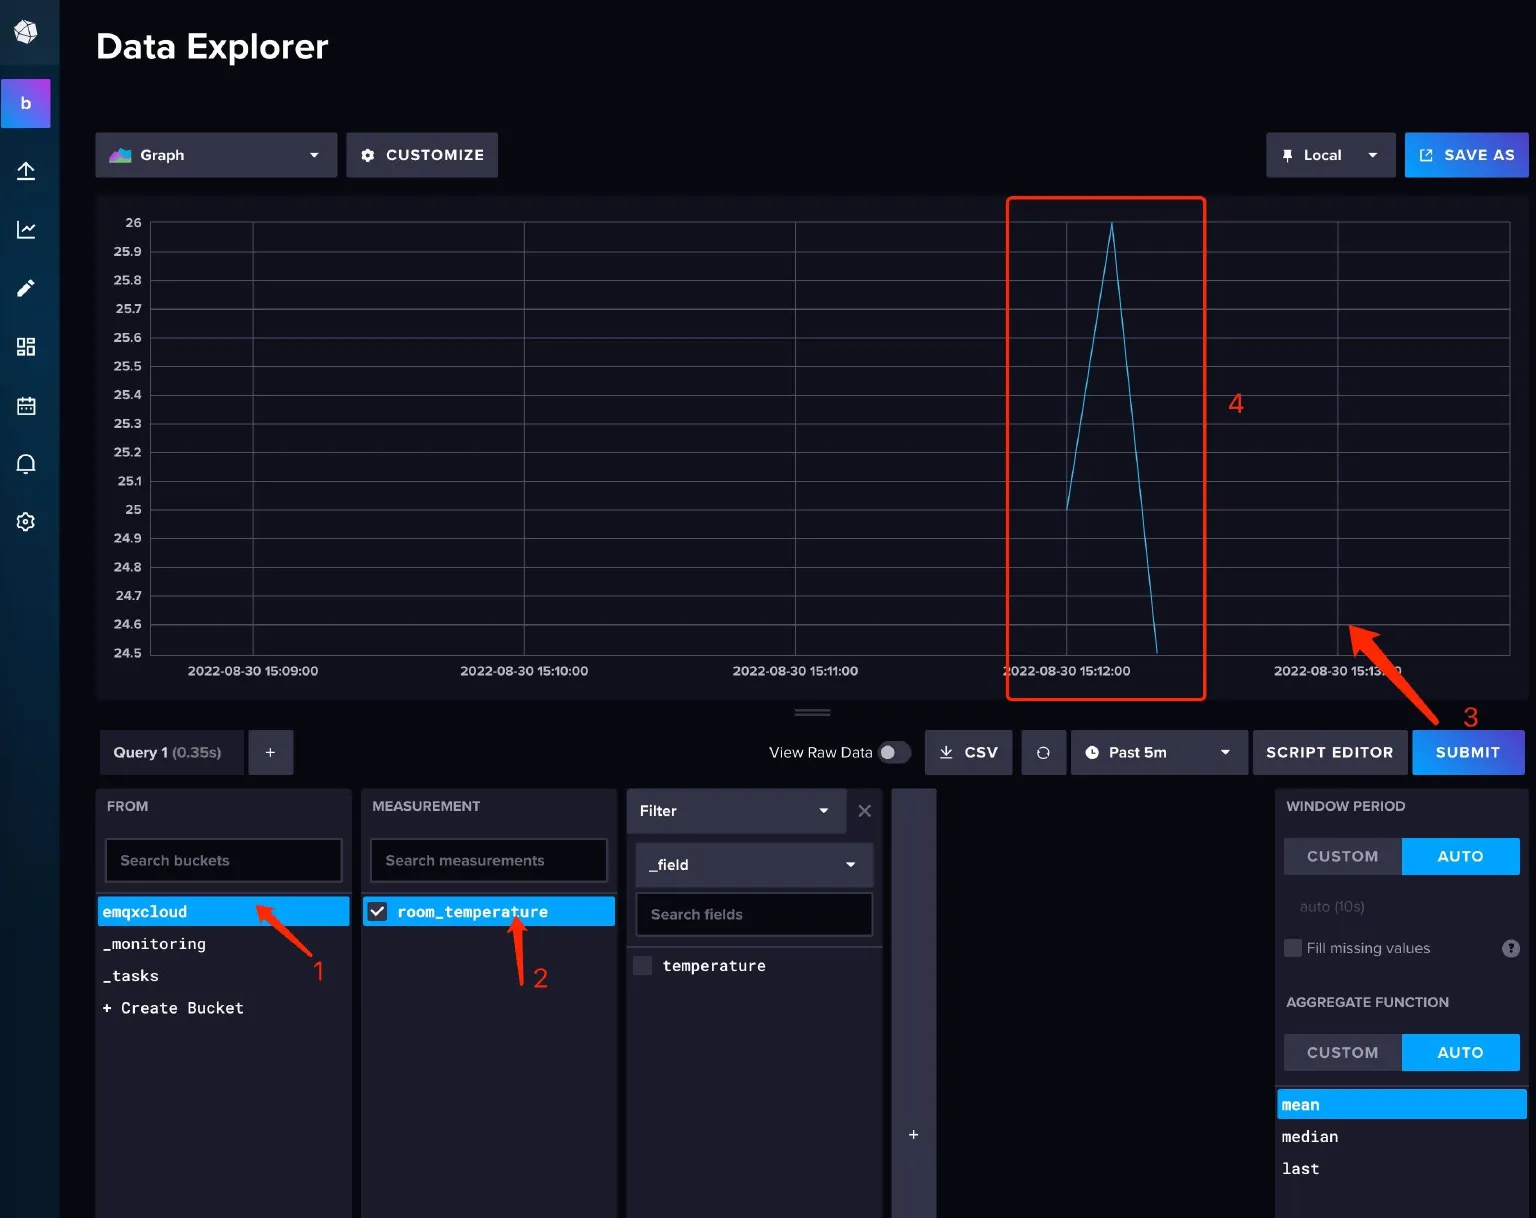
Create a query on the UI by setting FROM, MEASUREMENT, and click the submit button and you should be able to see the data chart. This proves that the data you sent to EMQX Cloud has been successfully persisted to InfluxDB Cloud.
Summary
Well, without a single line of code, now you can use EMQX Cloud to fetch data from any device or clients using standard MQTT protocol and focus on writing your IoT application with data persisted in InfluxDB Cloud.
In less than 10 minutes, you can leverage services from EMQX Cloud and InfluxDB Cloud with the new Native MQTT collector for a complete data flow from ingestion to persistence.
Related resources
- Integrating MQTT Data into InfluxDB for a Time-Series IoT Application
- MQTT Performance Benchmark Testing: EMQX-InfluxDB Integration
- Supercharging IIoT with MQTT, Edge Intelligence, and InfluxDB
- Save MQTT Data from EMQX Cloud on GCP to InfluxDB Cloud through the public network