MQTT for Elixir

Introduction
Recently I have read an excellent book Build a Weather Station with Elixir and Nerves. It introduces Elixir as a tool for building embedded applications.
With Nerves, we can run Elixir code on network-enabled devices interacting with some controlling software and each other.
The book mentioned above mainly focuses on the Nerves part and uses HTTP protocol for network interactions. Although this is a reasonable choice in many situations, I want to introduce another widely used option for production IoT setups: MQTT.
MQTT Protocol
MQTT is a messaging protocol designed specifically for (IoT) device communications. It is used in many areas, such as banking, oil & gas industry, manufacturing, etc.
MQTT protocol has many advantages, but here I want to mention some of them:
- It is a lightweight binary protocol generally running over TCP/IP.
- It is designed for unreliable networking, making it a good choice for outdoor installations.
- It follows pub/sub model simplifying client logic.
We will demonstrate some of MQTT's advantages in our setup.
MQTT Brokers
An essential thing about MQTT is that it simplifies the client's logic, which is critical for embedded devices. This is achieved with the pubsub model: in MQTT, there is no concept of a "server". Instead, all participating entities are clients connecting to a so-called broker. Clients subscribe to topics, publish messages to them, and the broker does the routing (and many other things).
A good production-ready broker, like EMQX generally provides not only MQTT routing capabilities but many other interesting features, like
- other kinds of connection methods, like WebSockets;
- different models of authentication and authorization;
- streaming data to databases;
- custom routing rules based on message introspection;
- and so on.
Sensor Setup
For the sake of simplicity, our device will be represented by an ordinary Mix application: it can be easily converted to a Nerves application.
First, we create a Mix project:
mix new --sup weather_sensor
cd weather_sensor
To interact with an MQTT broker, we need an MQTT client. We take emqtt. Add it to mix.exs as a dependency:
defp deps do
  [
    {:emqtt, github: "emqx/emqtt", tag: "1.4.4", system_env: [{"BUILD_WITHOUT_QUIC", "1"}]}
  ]
end
We will put all our "sensor" code to the main module WeatherSensor, so we need to add it to the application supervisor lib/weather_sensor/application.ex:
defmodule WeatherSensor.Application do
  @moduledoc false

  use Application

  @impl true
  def start(_type, _args) do
    children = [
      WeatherSensor
    ]

    opts = [strategy: :one_for_one, name: WeatherSensor.Supervisor]
    Supervisor.start_link(children, opts)
  end
end
Now, let's implement the main module in lib/weather_sensor.ex:
defmodule WeatherSensor do
  @moduledoc false

  use GenServer

  def start_link([]) do
    GenServer.start_link(__MODULE__, [])
  end

  def init([]) do
    interval = Application.get_env(:weather_sensor, :interval)
    emqtt_opts = Application.get_env(:weather_sensor, :emqtt)
    report_topic = "reports/#{emqtt_opts[:clientid]}/temperature"
    {:ok, pid} = :emqtt.start_link(emqtt_opts)
    st = %{
      interval: interval,
      timer: nil,
      report_topic: report_topic,
      pid: pid
    }

    {:ok, set_timer(st), {:continue, :start_emqtt}}
  end

  def handle_continue(:start_emqtt, %{pid: pid} = st) do
    {:ok, _} = :emqtt.connect(pid)

    emqtt_opts = Application.get_env(:weather_sensor, :emqtt)
    clientid = emqtt_opts[:clientid]
    {:ok, _, _} = :emqtt.subscribe(pid, {"commands/#{clientid}/set_interval", 1})
    {:noreply, st}
  end

  def handle_info(:tick, %{report_topic: topic, pid: pid} = st) do
    report_temperature(pid, topic)
    {:noreply, set_timer(st)}
  end

  def handle_info({:publish, publish}, st) do
    handle_publish(parse_topic(publish), publish, st)
  end

  defp handle_publish(["commands", _, "set_interval"], %{payload: payload}, st) do
    new_st = %{st | interval: String.to_integer(payload)}
    {:noreply, set_timer(new_st)}
  end

  defp handle_publish(_, _, st) do
    {:noreply, st}
  end

  defp parse_topic(%{topic: topic}) do
    String.split(topic, "/", trim: true)
  end

  defp set_timer(st) do
    if st.timer do
      Process.cancel_timer(st.timer)
    end
    timer = Process.send_after(self(), :tick, st.interval)
    %{st | timer: timer}
  end

  defp report_temperature(pid, topic) do
    temperature = 10.0 + 2.0 * :rand.normal()
    message = {System.system_time(:millisecond), temperature}
    payload = :erlang.term_to_binary(message)
    :emqtt.publish(pid, topic, payload)
  end
end
And put some options to config/config.exs:
import Config

config :weather_sensor, :emqtt,
  host: '127.0.0.1',
  port: 1883,
  clientid: "weather_sensor",
  clean_start: false,
  name: :emqtt

config :weather_sensor, :interval, 1000
Let us summarize a bit what happens in WeatherSensor:
- It implements GenServer behaviour.
- When starting, it
- opens an MQTT connection;
- subscribes to commands/weather_sensor/set_interval topic for receiving commands, received data will be sent to the process by
as {:publish, publish} messages. - schedules timer with a predefined interval.
- On timer timeout, it publishes {Timestamp, Temperature} tuple to reports/weather_sensor/temperaturetopic.
- On receiving a message from commands/weather_sensor/set_interval topic, it updates timer interval.
Since our application is not a real Nerves application with a sensor like BMP280 attached, we generate temperature data.
Here we can already see one advantage over HTTP interaction: we can not only send data, but also receive some commands in real-time.
We need a working broker to run the node successfully; we will start it later.
Dashboard Setup
Since there are no "servers" in MQTT, our controlling dashboard will also be an MQTT client. But it will subscribe to reports/weather_sensor/temperature topic and publish commands tocommands/weather_sensor/set_interval.
For a dashboard, we will set up a Phoenix LiveView application.
Let's create it:
mix phx.new --version
Phoenix installer v1.6.2
mix phx.new weather_dashboard --no-ecto --no-gettext --no-dashboard --live
cd weather_dashboard
Add dependencies to mix.exs
  defp deps do
    [
      ...
      {:jason, "~> 1.2"},
      {:plug_cowboy, "~> 2.5"},

      {:emqtt, github: "emqx/emqtt", tag: "1.4.4", system_env: [{"BUILD_WITHOUT_QUIC", "1"}]},
      {:contex, github: "mindok/contex"} # We will need this for SVG charts
    ]
  end
Add some settings to config/dev.exs:
config :weather_dashboard, :emqtt,
  host: '127.0.0.1',
  port: 1883

config :weather_dashboard, :sensor_id, "weather_sensor"

# Period for chart
config :weather_dashboard, :timespan, 60
Now we generate a LiveView controller:
mix phx.gen.live Measurements Temperature temperatures --no-schema --no-context
This generates a lot of files but we will need only some of them, since we need a single page application with a chart.
rm lib/weather_dashboard_web/live/temperature_live/form_component.*
rm lib/weather_dashboard_web/live/temperature_live/show.*
rm lib/weather_dashboard_web/live/live_helpers.ex
Also remove import WeatherDashboardWeb.LiveHelpers from lib/weather_dashboard_web.ex.
Update template for our page (lib/weather_dashboard_web/live/temperature_live/index.html.heex):
<div>
  <%= if @plot do %>
    <%= @plot %>
  <% end %>
</div>

<div>
  <form phx-submit="set-interval">
    <label for="interval">Interval</label>
    <input type="text" name="interval" value={@interval}/>
    <input type="submit" value="Set interval"/>
  </form>
</div>
We have a chart and input control to send commands to our "device" on this page.
Now update the major part, LiveView controller (lib/weather_dashboard_web/live/temperature_live/index.ex):
defmodule WeatherDashboardWeb.TemperatureLive.Index do
  use WeatherDashboardWeb, :live_view

  require Logger

  @impl true
  def mount(_params, _session, socket) do
    reports = []
    emqtt_opts = Application.get_env(:weather_dashboard, :emqtt)
    {:ok, pid} = :emqtt.start_link(emqtt_opts)
    {:ok, _} = :emqtt.connect(pid)
    # Listen reports
    {:ok, _, _} = :emqtt.subscribe(pid, "reports/#")
    {:ok, assign(socket,
      reports: reports,
      pid: pid,
      plot: nil,
      interval: nil
    )}
  end

  @impl true
  def handle_params(_params, _url, socket) do
    {:noreply, socket}
  end

  @impl true
  def handle_event("set-interval", %{"interval" => interval_s}, socket) do
    case Integer.parse(interval_s) do
      {interval, ""} ->
        id = Application.get_env(:weather_dashboard, :sensor_id)
        # Send command to device
        topic = "commands/#{id}/set_interval"
        :ok = :emqtt.publish(
          socket.assigns[:pid],
          topic,
          interval_s,
          retain: true
        )
        {:noreply, assign(socket, interval: interval)}
      _ ->
        {:noreply, socket}
    end
  end

  def handle_event(name, data, socket) do
    Logger.info("handle_event: #{inspect([name, data])}")
    {:noreply, socket}
  end

  @impl true
  def handle_info({:publish, packet}, socket) do
    handle_publish(parse_topic(packet), packet, socket)
  end

  defp handle_publish(["reports", id, "temperature"], %{payload: payload}, socket) do
    if id == Application.get_env(:weather_dashboard, :sensor_id) do
      report = :erlang.binary_to_term(payload)
      {reports, plot} = update_reports(report, socket)
      {:noreply, assign(socket, reports: reports, plot: plot)}
    else
      {:noreply, socket}
    end
  end

  defp update_reports({ts, val}, socket) do
    new_report = {DateTime.from_unix!(ts, :millisecond), val}
    now = DateTime.utc_now()
    deadline = DateTime.add(DateTime.utc_now(), - 2 * Application.get_env(:weather_dashboard, :timespan), :second)
    reports =
      [new_report | socket.assigns[:reports]]
      |> Enum.filter(fn {dt, _} -> DateTime.compare(dt, deadline) == :gt end)
      |> Enum.sort()

    {reports, plot(reports, deadline, now)}
  end

  defp parse_topic(%{topic: topic}) do
    String.split(topic, "/", trim: true)
  end

  defp plot(reports, deadline, now) do
    x_scale =
      Contex.TimeScale.new()
      |> Contex.TimeScale.domain(deadline, now)
      |> Contex.TimeScale.interval_count(10)

    y_scale =
      Contex.ContinuousLinearScale.new()
      |> Contex.ContinuousLinearScale.domain(0, 30)

    options = [
      smoothed: false,
      custom_x_scale: x_scale,
      custom_y_scale: y_scale,
      custom_x_formatter: &x_formatter/1,
      axis_label_rotation: 45
    ]

    reports
    |> Enum.map(fn {dt, val} -> [dt, val] end)
    |> Contex.Dataset.new()
    |> Contex.Plot.new(Contex.LinePlot, 600, 250, options)
    |> Contex.Plot.to_svg()
  end

  defp x_formatter(datetime) do
    datetime
    |> Calendar.strftime("%H:%M:%S")
  end

end
There are some things to note.
- We created a LiveView handler to serve the main page of our app.
- Normally, Phoenix.PubSub is used to update a LiveView process state. But instead, we do a trick: since an MQTT broker already provides a pubsub model, we connect directly to it from our LiveView process.
- On receiving new temperature data, the server updates the temperature chart.
- On receiving a form update from a user, we send an updated interval to the command topic.
Finally, set up routing in lib/weather_dashboard_web/router.ex so that our controller handles the root page:
  scope "/", WeatherDashboardWeb do
    pipe_through :browser

    live "/", TemperatureLive.Index
  end
Tying Parts Together
Now we are ready to set all the things up and running.
We run an MQTT broker. Since we do not want any specific settings, the simplest way is to run broker with docker.
docker run -d --name emqx -p 1883:1883 emqx/emqx:4.3.10
Now we run our "device":
cd weather_sensor
export BUILD_WITHOUT_QUIC=1
iex -S mix
Erlang/OTP 24 [erts-12.1.2] [source] [64-bit] [smp:16:16] [ds:16:16:10] [async-threads:1] [jit] [dtrace]

....

13:17:24.461 [debug] emqtt(weather_sensor): SEND Data: {:mqtt_packet, {:mqtt_packet_header, 8, false, 1, false}, {:mqtt_packet_subscribe, 2, %{}, [{"/commands/weather_sensor/set_interval", %{nl: 0, qos: 1, rap: 0, rh: 0}}]}, :undefined}

13:17:24.463 [debug] emqtt(weather_sensor): RECV Data: <<144, 3, 0, 2, 1>>

13:17:25.427 [debug] emqtt(weather_sensor): SEND Data: {:mqtt_packet, {:mqtt_packet_header, 3, false, 0, false}, {:mqtt_packet_publish, "/reports/weather_sensor/temperature", :undefined, :undefined}, <<131, 104, 2, 110, 6, 0, 179, 156, 178, 158, 125, 1, 70, 64, 38, 106, 91, 64, 234, 212, 185>>}

13:17:26.428 [debug] emqtt(weather_sensor): SEND Data: {:mqtt_packet, {:mqtt_packet_header, 3, false, 0, false}, {:mqtt_packet_publish, "/reports/weather_sensor/temperature", :undefined, :undefined}, <<131, 104, 2, 110, 6, 0, 156, 160, 178, 158, 125, 1, 70, 64, 39, 115, 221, 187, 144, 192, 31>>}
...
We see that our sensor immediately started to send reports.
Now run our dashboard:
cd weather_dashboard
export BUILD_WITHOUT_QUIC=1
iex -S mix phx.server
Erlang/OTP 24 [erts-12.1.2] [source] [64-bit] [smp:16:16] [ds:16:16:10] [async-threads:1] [jit] [dtrace]

[info] Running WeatherDashboardWeb.Endpoint with cowboy 2.9.0 at 127.0.0.1:4000 (http)
[info] Access WeatherDashboardWeb.Endpoint at http://localhost:4000
Interactive Elixir (1.12.3) - press Ctrl+C to exit (type h() ENTER for help)
iex(1)> [watch] build finished, watching for changes...
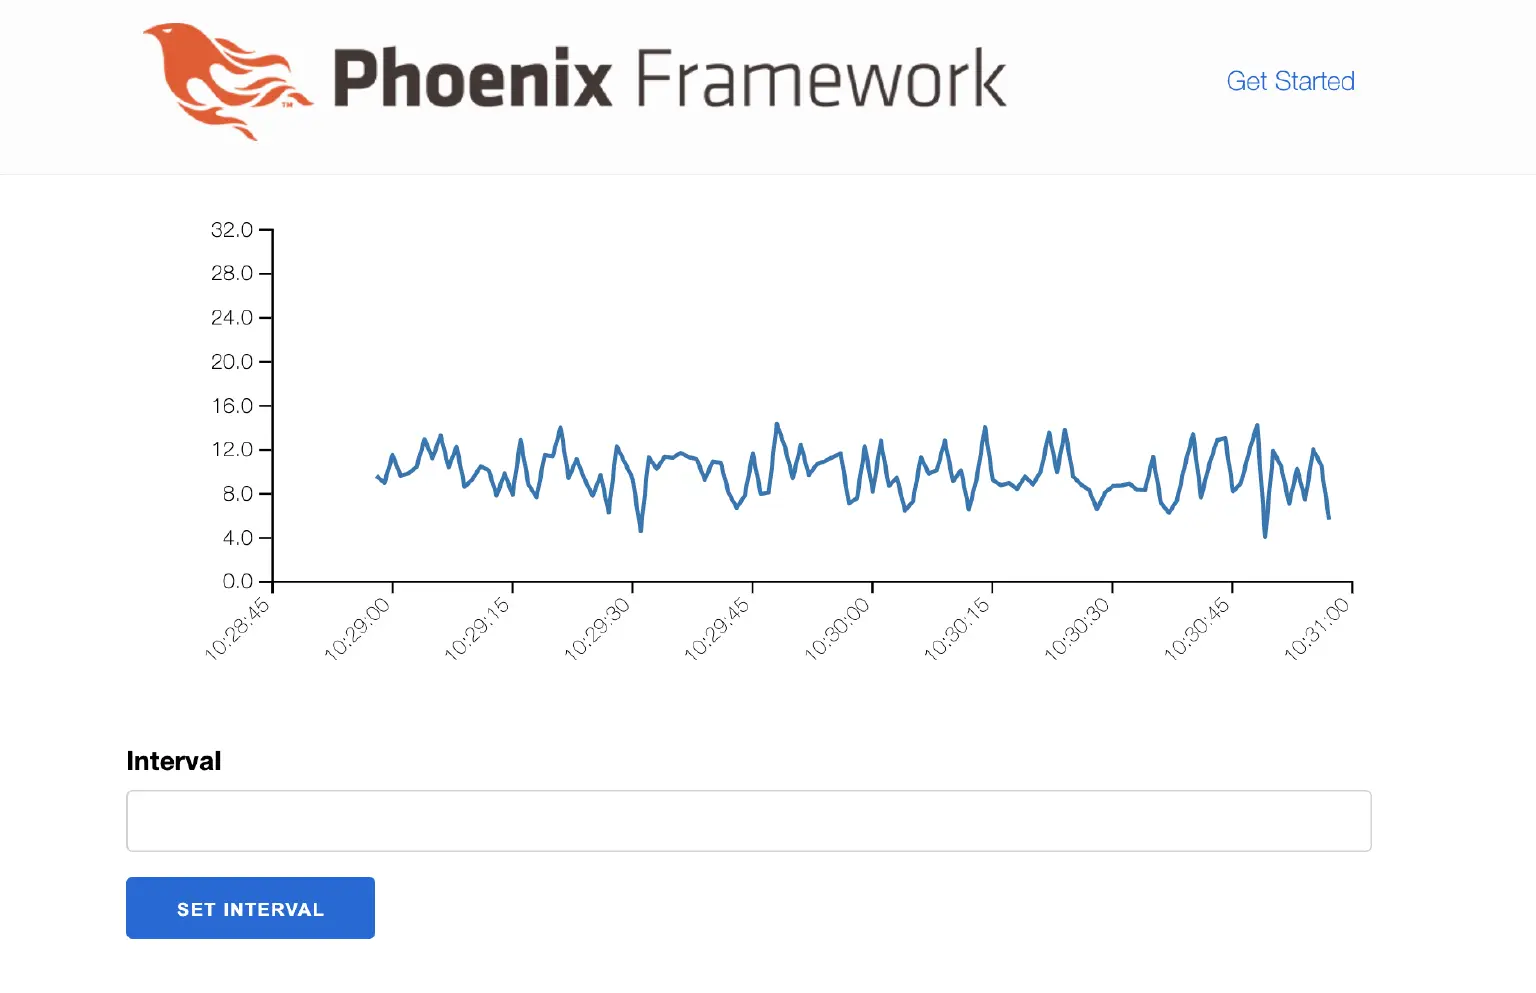
Let's navigate to http://localhost:4000.
We see that a corresponding LiveView process mounted, connected to the broker, and started to receive temperature data:
[info] GET /
[info] Sent 200 in 145ms
[info] CONNECTED TO Phoenix.LiveView.Socket in 129µs
  Transport: :websocket
  Serializer: Phoenix.Socket.V2.JSONSerializer
  Parameters: %{"_csrf_token" => "cwoROxAwKFo7NEcSdgMwFlgaZ1AlBxUa6FIRhAbjHA6XORIF-EUiIRqU", "_mounts" => "0", "_track_static" => %{"0" => "http://localhost:4000/assets/app.css", "1" => "http://localhost:4000/assets/app.js"}, "vsn" => "2.0.0"}
[debug] emqtt(emqtt-MacBook-Pro-iaveryanov-86405372ddbf17052130): SEND Data: {:mqtt_packet, {:mqtt_packet_header, 1, false, 0, false}, {:mqtt_packet_connect, "MQTT", 4, false, true, false, 0, false, 60, %{}, "emqtt-MacBook-Pro-iaveryanov-86405372ddbf17052130", :undefined, :undefined, :undefined, :undefined, :undefined}, :undefined}
[debug] emqtt(emqtt-MacBook-Pro-iaveryanov-86405372ddbf17052130): RECV Data: <<32, 2, 0, 0>>
[debug] emqtt(emqtt-MacBook-Pro-iaveryanov-86405372ddbf17052130): SEND Data: {:mqtt_packet, {:mqtt_packet_header, 8, false, 1, false}, {:mqtt_packet_subscribe, 2, %{}, [{"/reports/#", %{nl: 0, qos: 0, rap: 0, rh: 0}}]}, :undefined}
[debug] emqtt(emqtt-MacBook-Pro-iaveryanov-86405372ddbf17052130): RECV Data: <<144, 3, 0, 2, 0>>
[debug] emqtt(emqtt-MacBook-Pro-iaveryanov-86405372ddbf17052130): RECV Data: <<48, 58, 0, 35, 47, 114, 101, 112, 111, 114, 116, 115, 47, 119, 101, 97, 116,
  104, 101, 114, 95, 115, 101, 110, 115, 111, 114, 47, 116, 101, 109, 112, 101,
  114, 97, 116, 117, 114, 101, 131, 104, 2, 110, 6, 0, 180, 251, 188, 158, 125,
...
Also, the page started to update immediately:
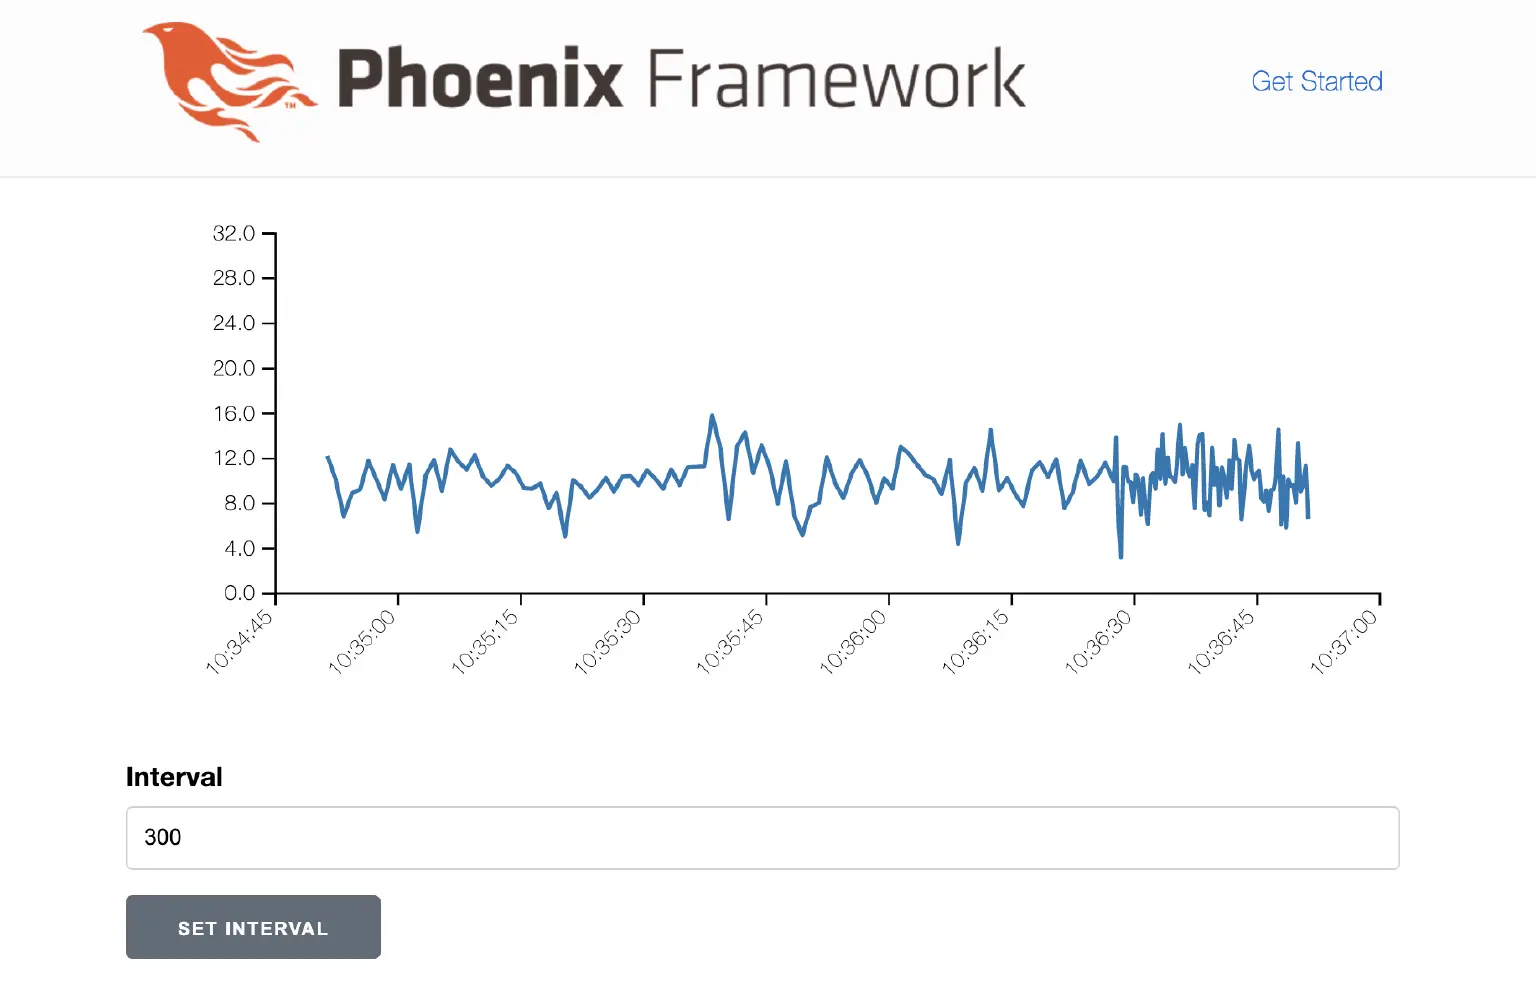
If we update the interval, we see that the device node receives the command immediately and starts to update more frequently:
Now we demonstrate one important thing: let's stop our "device" node, wait a bit and start it again. We see that the node continued to send data with the updated frequency.
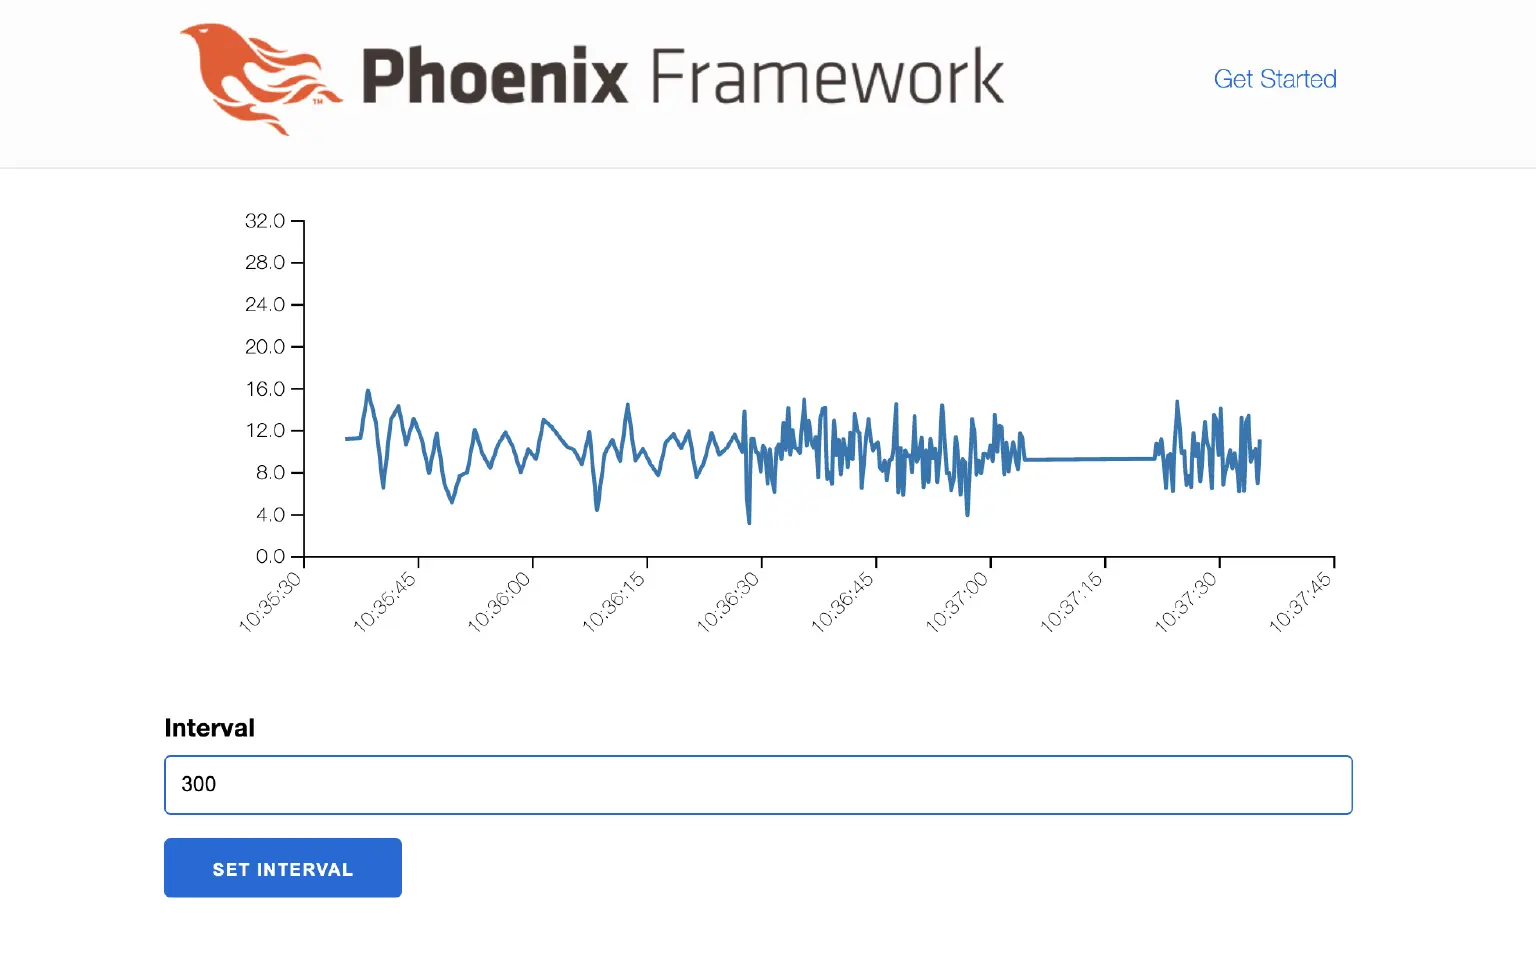
How could that happen? The secret is simple: the retain flag of command messages we send to the command topic.
:ok = :emqtt.publish(
  socket.assigns[:pid],
  topic,
  interval_s,
  retain: true
)
When we send a message with retain flag to a topic, this message also becomes a "default" message. The broker keeps it, and each subscriber to the topic receives this message on subscribe.
This feature is significant for embedded devices that may go offline often and do not have any easy-to-use local storage to keep their state. This is the way to get them correctly configured on connect.
Conclusion
In this article we
- demonstrated a popular way of interaction with embedded devices — MQTT protocol;
- we introduced it's usage in Elixir;
- we also demonstrated some advantages of MQTT, such as pubsub model and message retaining.
Other powerful features thaw we might want to use even in a simple setup are:
- streaming topic data into a database so that we could display history on connecting without "manual" saving;
- using MQTT.js to connect to the broker directly from the frontend through WebSockets.
All the code is available at https://github.com/savonarola/mqtt-article .