Using EMQX Cloud Data Integrations to Save Data to ClickHouse Cloud
ClickHouse is a column-oriented database management system (DBMS) for online analytical processing of queries (OLAP). ClickHouse’s performance exceeds all other column-oriented database management systems. It processes billions of rows and tens of gigabytes of data per server second.
A couple days ago, ClickHouse announced the launch of ClickHouse Cloud, a lightning-fast cloud-based database that simplifies and accelerates insights and analytics for modern digital enterprises.
In this article, we will simulate temperature and humidity data and report these data to EMQX Cloud via the MQTT protocol and then use the EMQX Cloud Data Integrations to save the data into ClickHouse Cloud.
EMQX Cloud Introduction
EMQX Cloud is the world's first fully managed MQTT 5.0 public cloud service for IoT from EMQ. EMQX Cloud provides a one-stop O&M colocation and a unique isolated environment for MQTT services. In the era of Internet of Everything, EMQX Cloud can help you quickly build industry applications and easily realize the collection, transmission, computation and persistence of IoT data.
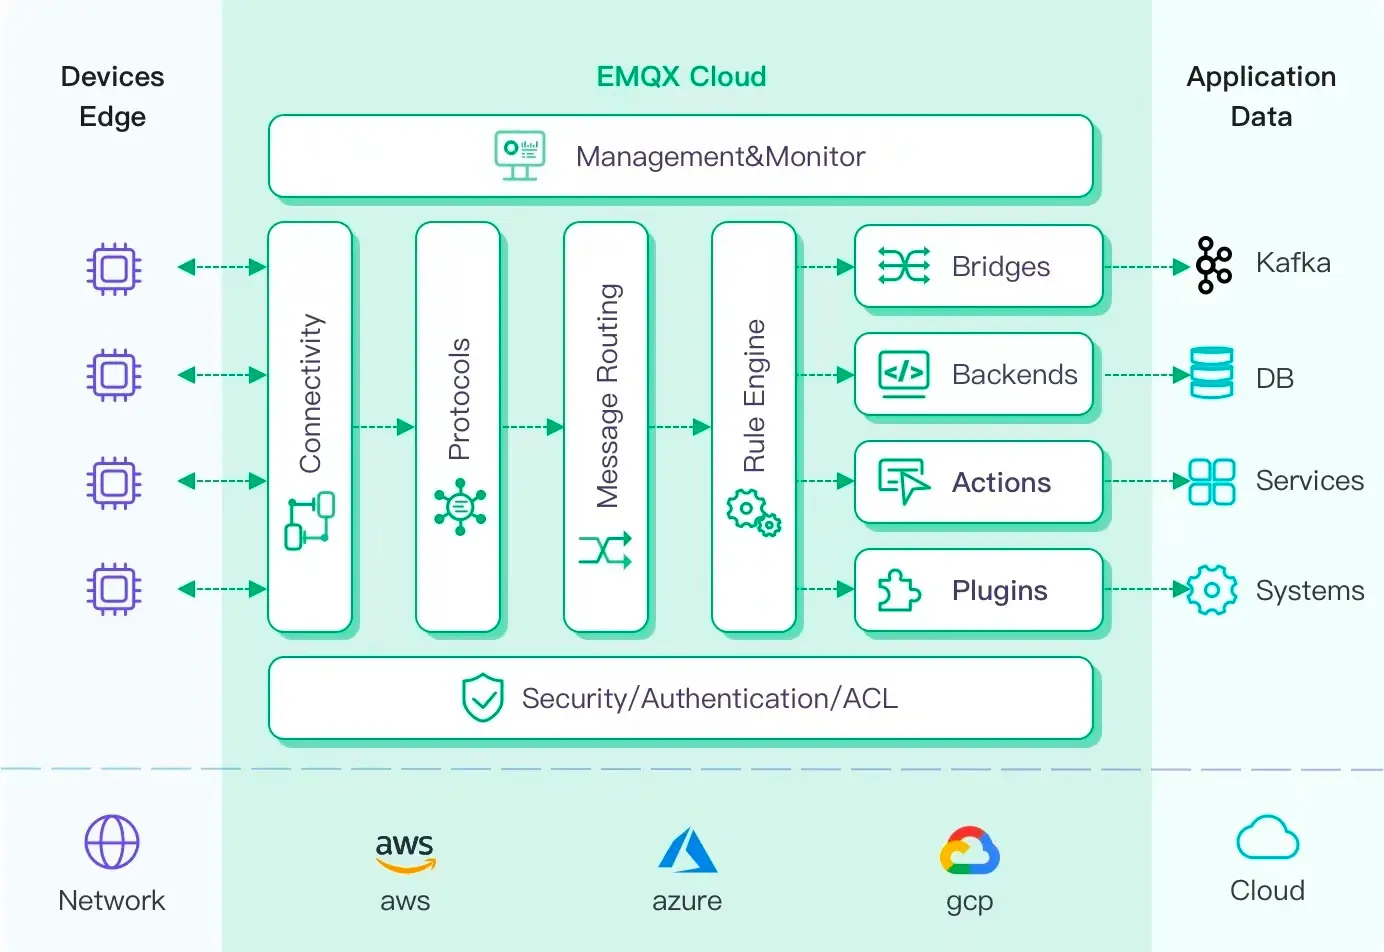
With the infrastructure provided by cloud providers, EMQX Cloud is available in dozens of countries and regions around the world, providing low-cost, secure, and reliable cloud services for 5G and Internet of Everything applications.
For more information, please go to the EMQX Cloud website or see the EMQX Cloud documentation.
Get Your ClickHouse Cloud Service
ClickHouse Cloud is in public beta and you can apply for a free trial at the official ClickHouse website. It offers a 14-day free trial.
ClickHouse provides a quick start, just follow the steps on the doc and you will get an instance up and running in minutes. During this setup, Iwe deployed my ClickHouse instance on AWS in N. Virginia (us-east-1), as a EMQX Cloud instance was also deployed in the same region.
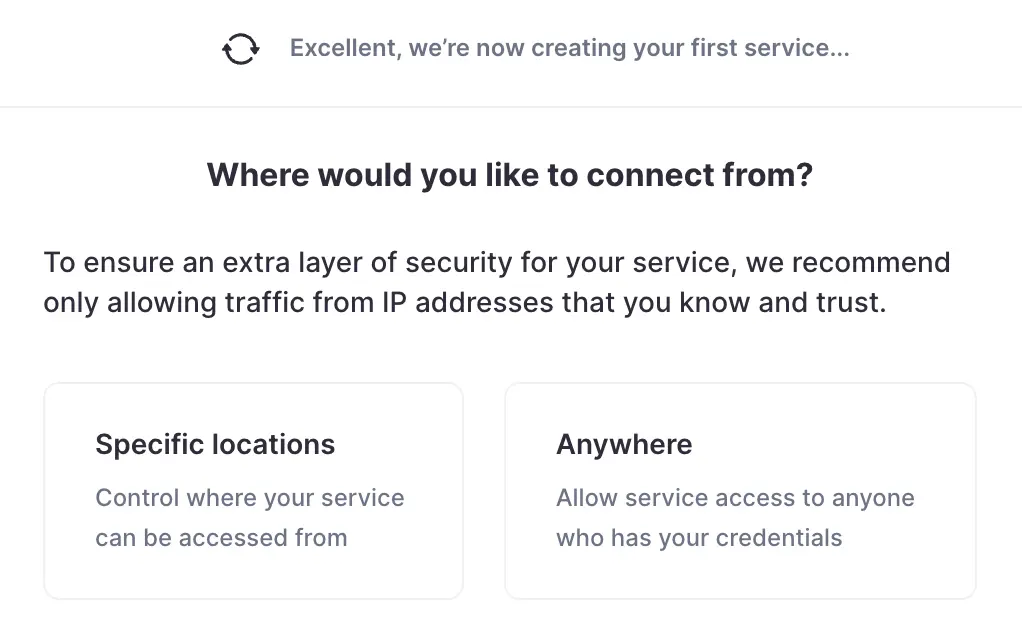
During the setup process, you will also need to pay attention to the connection settings. In this tutorial, we use "Anywhere", but if you choose a specific location, you will need to add the NAT gateway IP address you got from your EMQX Cloud deployment to the whitelist.
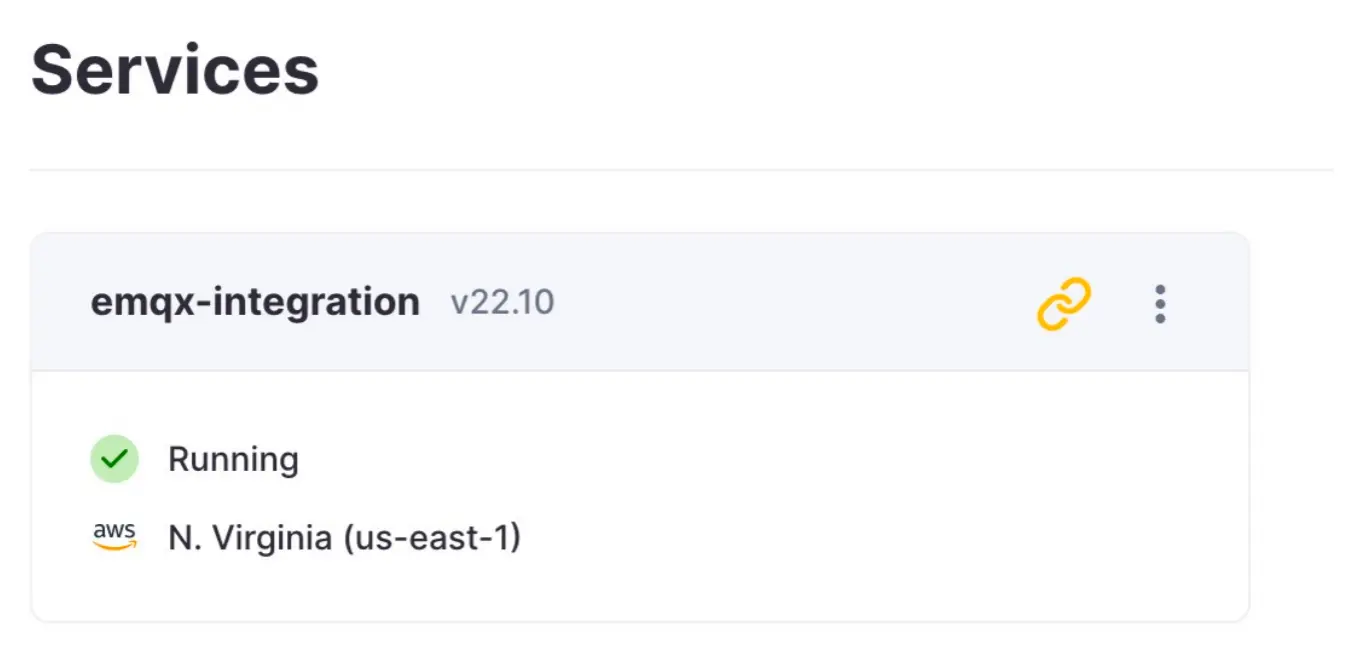
After the provisioning, you should be able to see the service running:
Click on the link in the panel and you will find the connection string, which is needed when setting up the integration with EMQX Cloud.
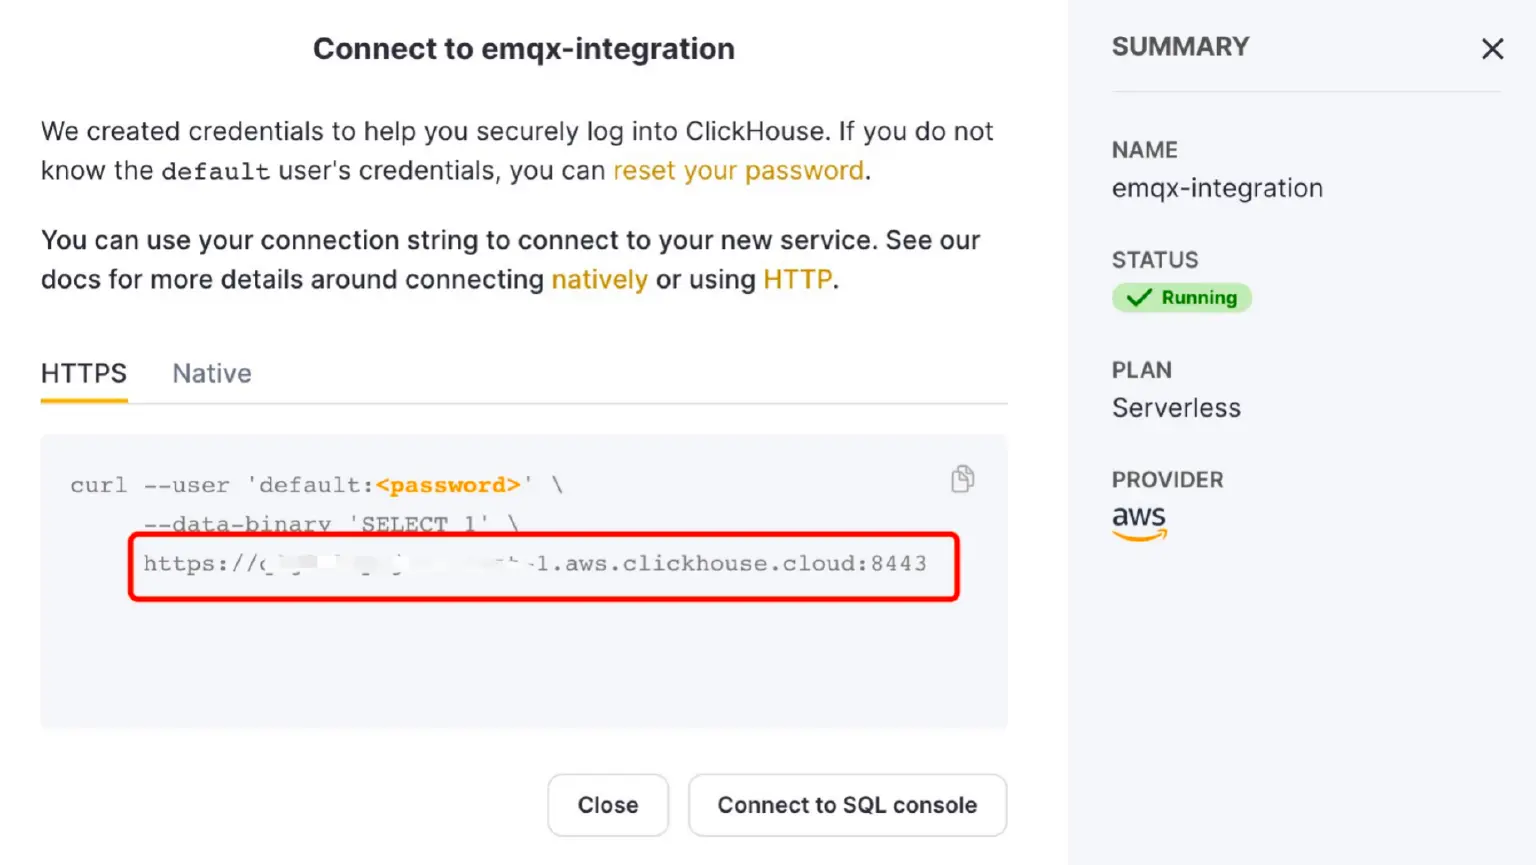
The credentials you created are also needed for the integration.
Setup the Database and Table
Click ‘Connect to SQL console’ button and let’s create a database and table.
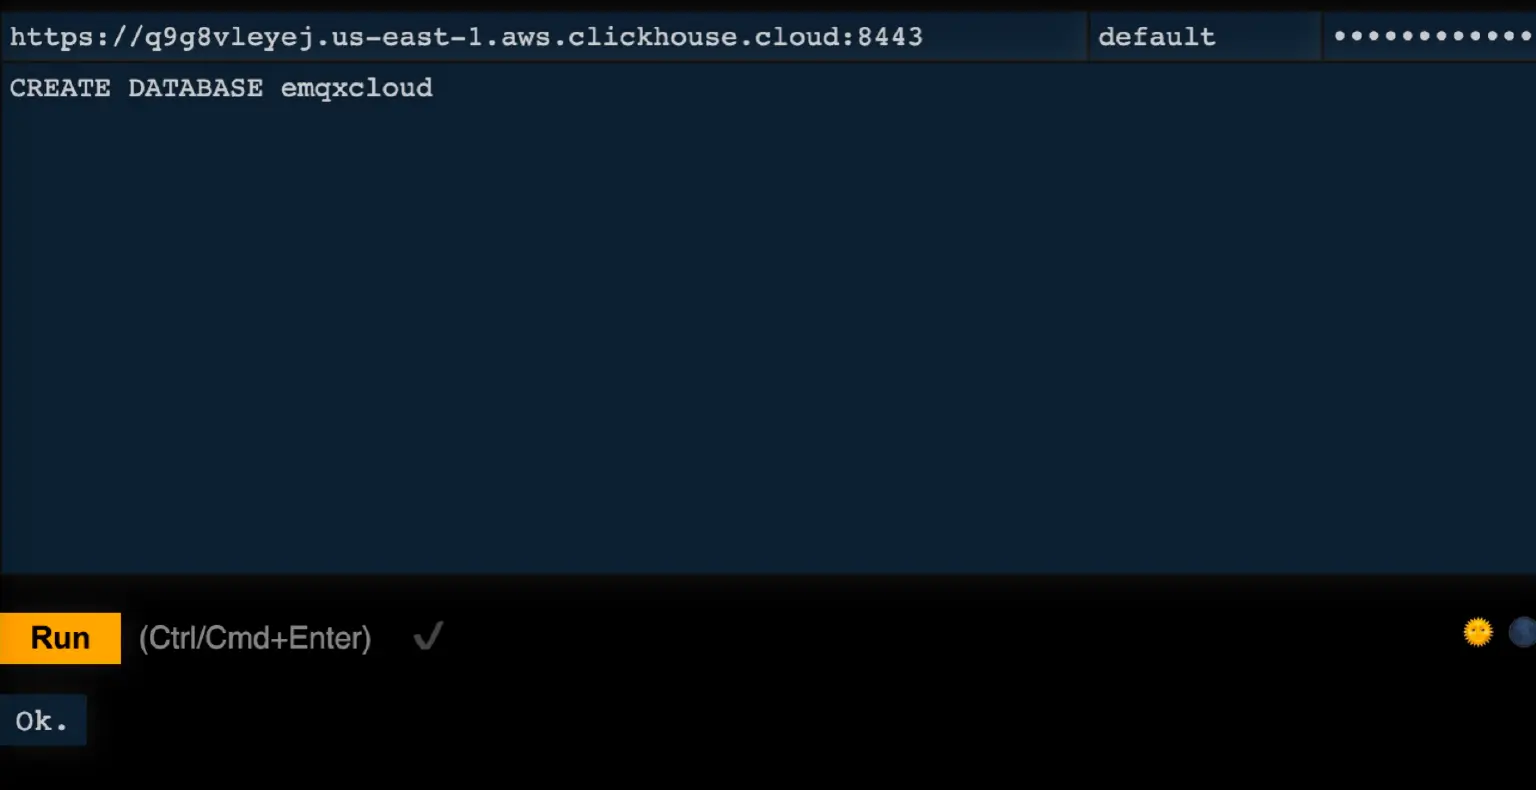
In this tutorial, we created a database named ‘emqxcloud’. Then create a table named "temp_hum" to store the temperature and humidity data from the EMQX cloud.
CREATE TABLE emqxcloud.temp_hum
(
    client_id String,
    timestamp DateTime,
    topic String,
    temp Float32,
    hum Float32
)
ENGINE = MergeTree()
PRIMARY KEY (client_id, timestamp)
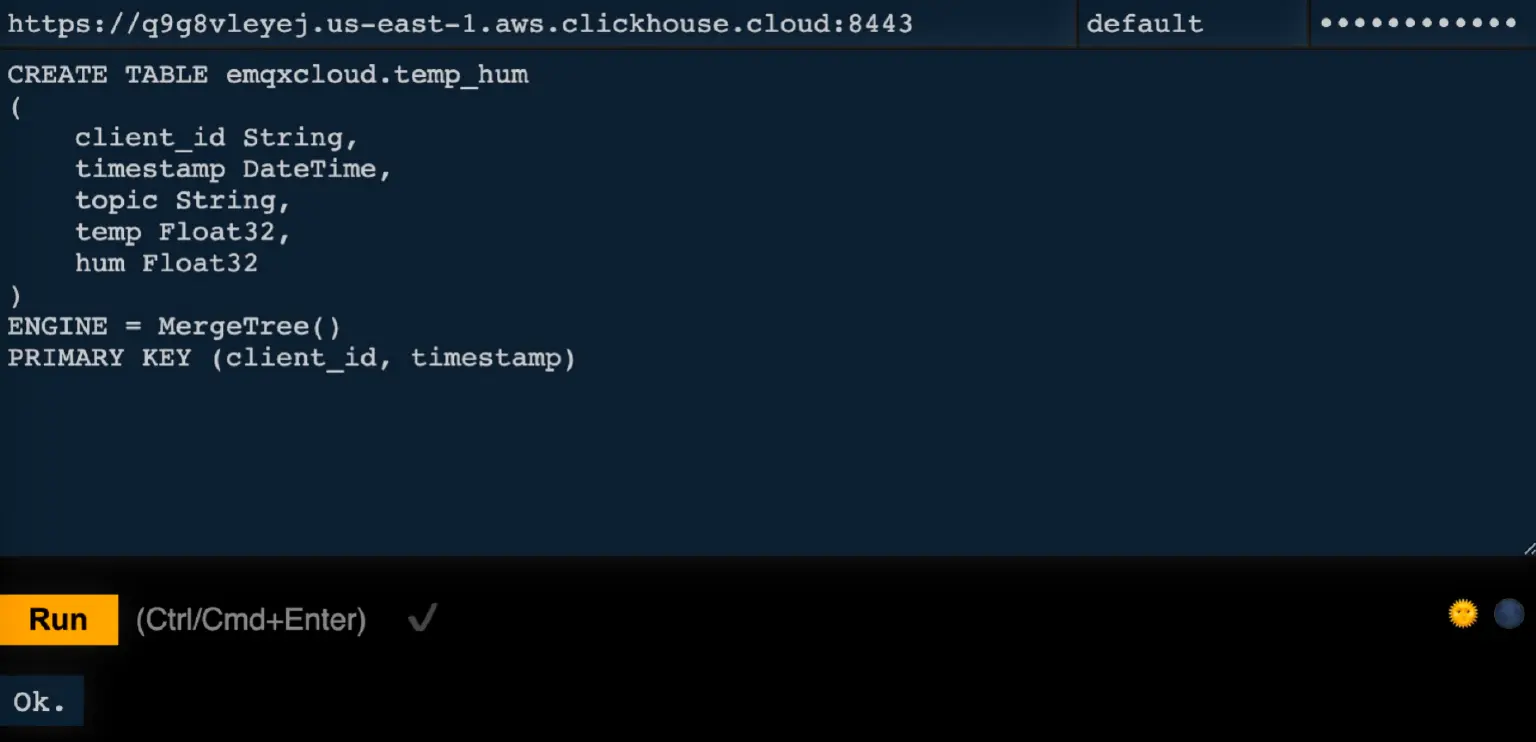
As you can see, this table has 5 columns and in addition to temperature and humidity, it also records the topic name, client id, and timestamp.
Now we have all the settings for the ClickHouse service. Let's move to the EMQX Cloud section.
Create an MQTT service on EMQX Cloud
Creating a dedicated MQTT broker on EMQX Cloud is as easy as a few clicks.
Get an account
Go to EMQX Cloud and click start free to register an account if you are new to EMQX Cloud.
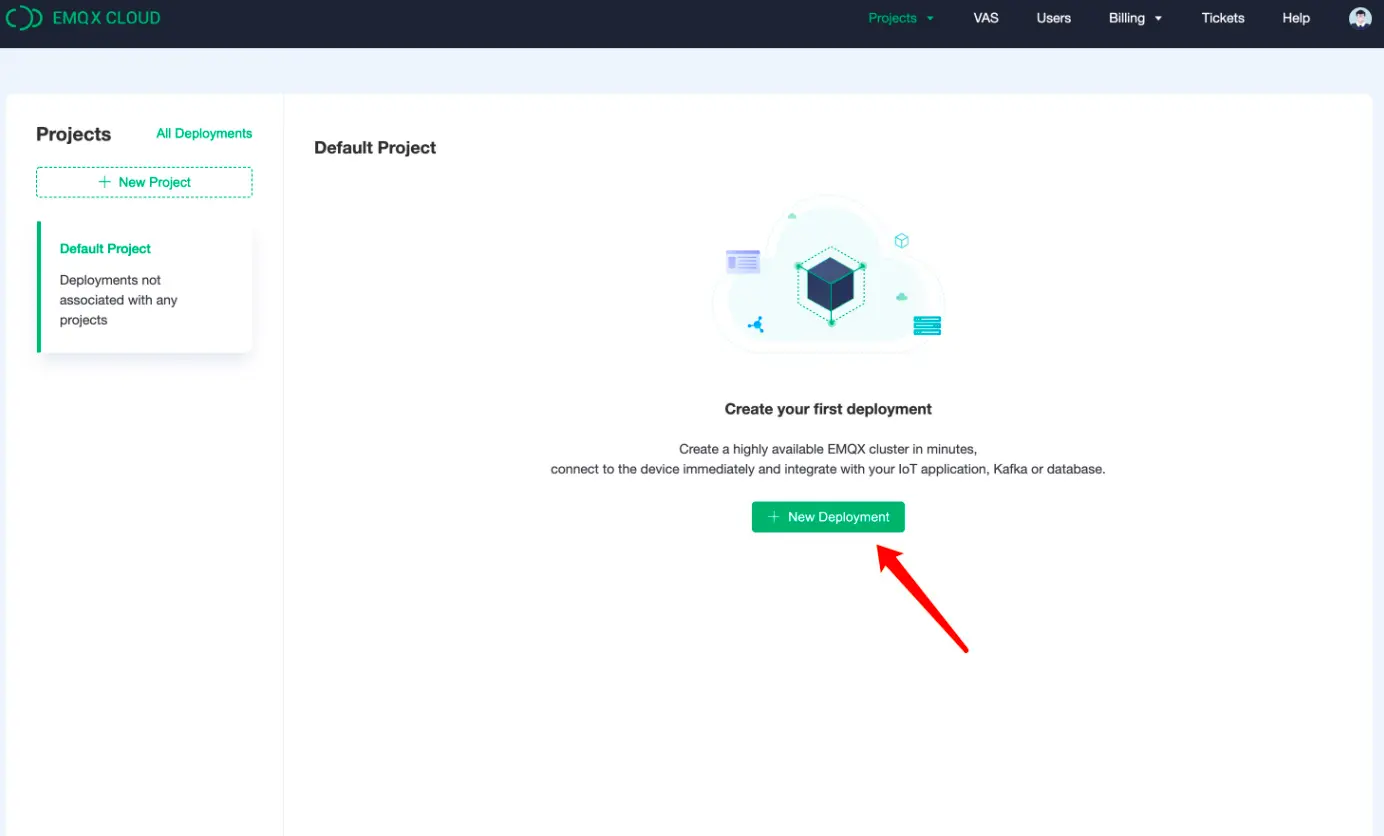
Create an MQTT cluster
Once logged in, click on "Cloud Console" under the account menu and you will be able to see the green button to create a new deployment.
EMQX Cloud provides 14 days free trial for both Standard Plan and Professional Plan. In this tutorial, we will use the Professional Plan because only Pro version provides the data integration functionality, which can send MQTT data directly to ClickHouse without a single line of code.
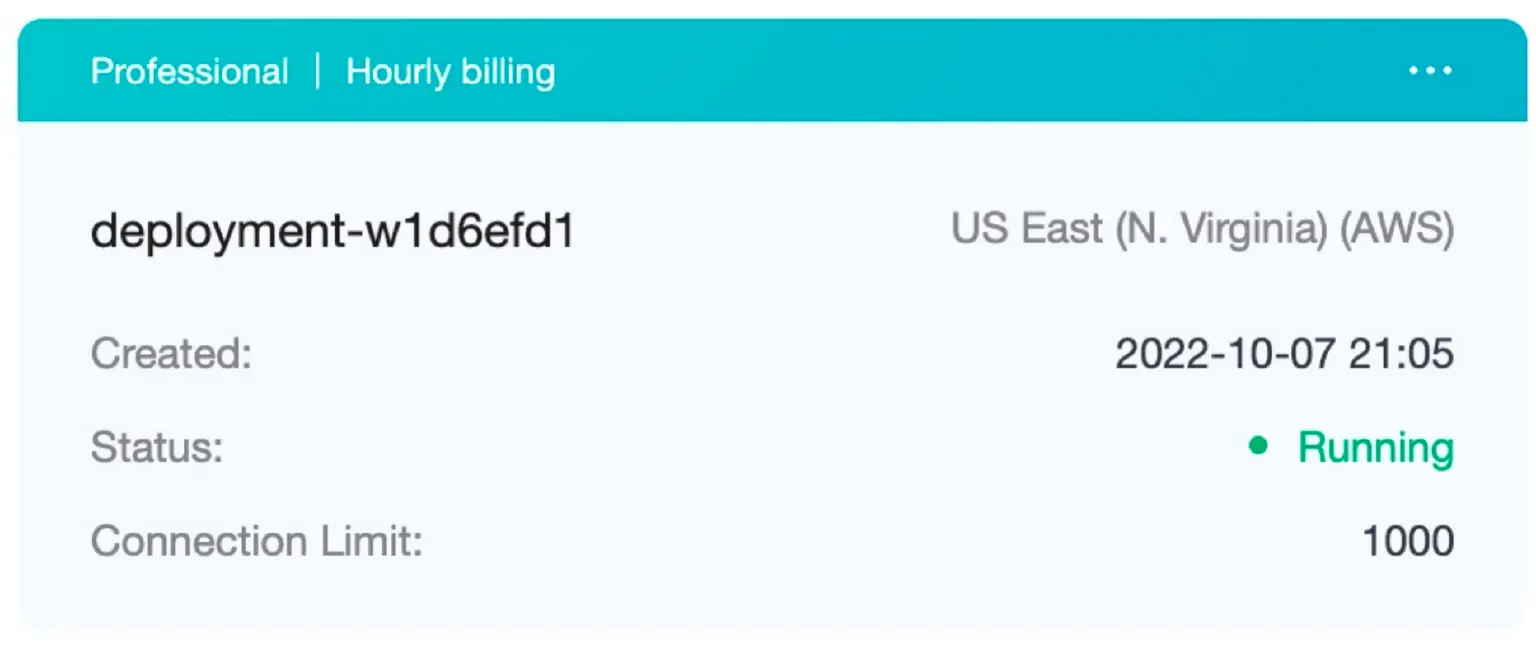
Select Pro version and choose ‘N.Virginial’ region and click ‘Create Now’. In just a few minutes, you will get a fully managed MQTT broker:
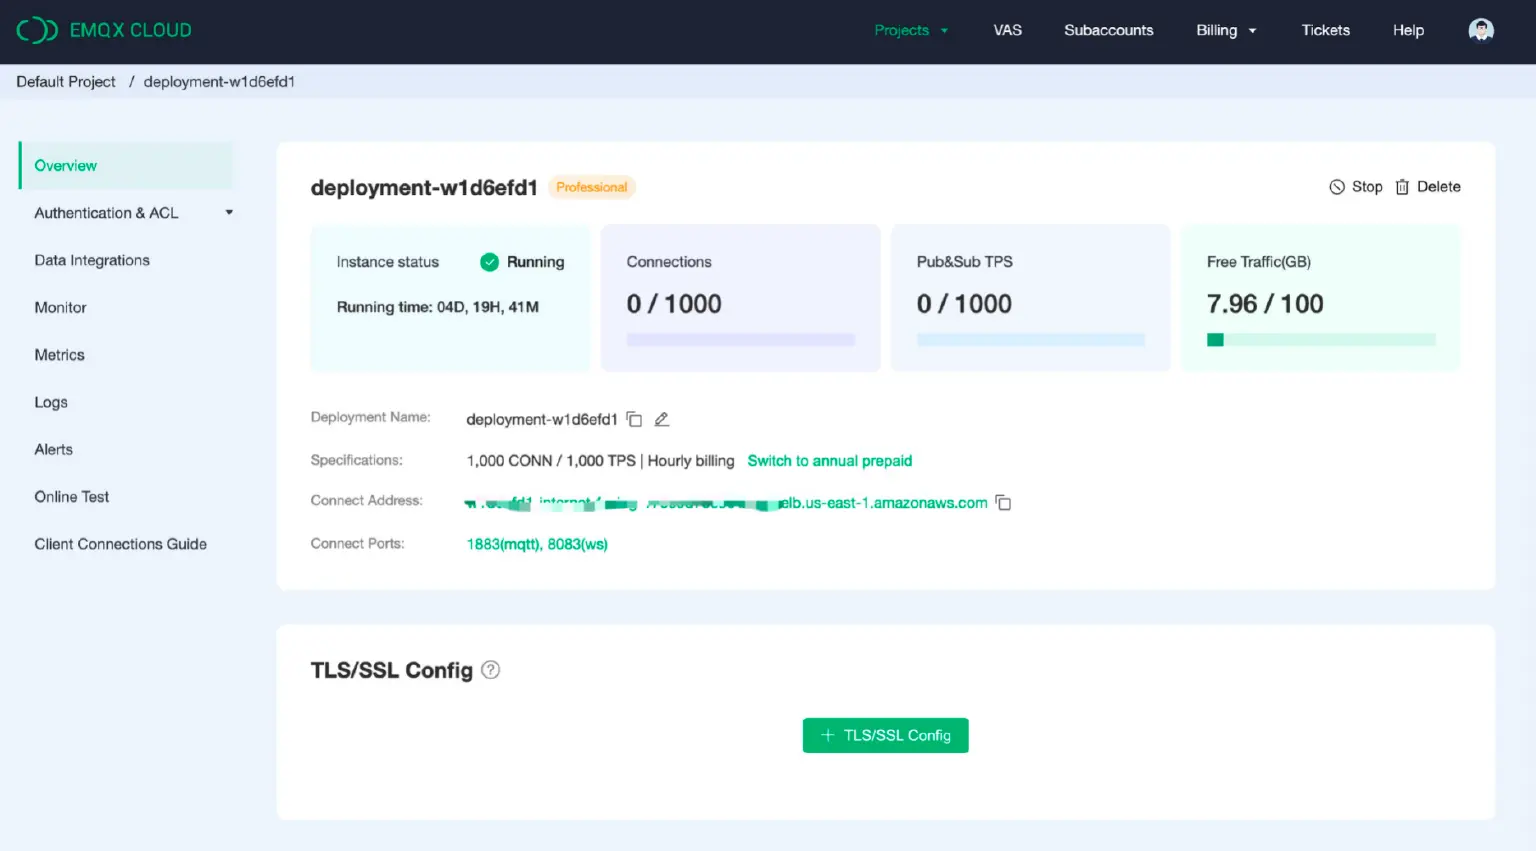
Now click the panel to go to the cluster view. On this dashboard, you will see the overview of your MQTT broker.
Add Client Credential
Now, let’s add a client credential so we can use the MQTT client tool to send data to this broker.
Click ‘Authentication & ACL’ on the left menu and click ‘Authentication’ in the submenu.
Click the ‘Add’ button on the right and give a username and password for the MQTT connection later. Here we will use ‘test’ and ‘clickhouse’ for the username and password.
Click ‘Confirm’ and now we have a fully managed MQTT broker ready.
Integration EMQX Cloud with ClickHouse Cloud
Now let’s see how to get data from EMQX Cloud to ClickHouse Cloud.
EMQX Cloud offers more than 30 native integrations with popular data systems. ClickHouse is one of them.

But before we can start setting up the ClickHouse integration, first we need to enable the NAT gateway. By default, the MQTT broker is deployed in a private VPC, which can not send data to third-party systems over the public network. There are two ways to resolve this. One is to enable the NAT gateway and allow the broker to send data to ClickHouse through that gateway. The other solution is to set up VPC peering, which depends on whether the target cloud service supports VPC peering. In this tutorial, we will use the first solution.
- Create NAT gateway
Go back to the Overview page and scroll down to the bottom of the page where you will see the NAT Gateway widget. Click the Subscribe button and follow the instructions. Note that NAT Gateway is a value-added service, but it also offers a 14-day free trial.
Once it has been created, you will find the public IP address in the widget. Please note that if you select “Connect from a specific location” during ClickHouse Cloud setup, you will need to add this IP address to the whitelist.
Now let’s create the ClickHouse native integration. - Create ClickHouse Resource
Click ‘Data Integrations’ on the left menu and click ‘View All Resouces’. You will find the ClickHouse in the Data Persistence section or you can search for ClickHouse.
Click the ClickHouse card to create a new resource.
① Note: add a note for this resource
② Server address: this is the address of your ClickHouse Cloud service, remember don’t forget the port.
③ Database name: ‘emqxcloud’ we created in the above steps.
④ User: the username for connecting to your ClickHouse Cloud service.
⑤ Key: the password for the connection.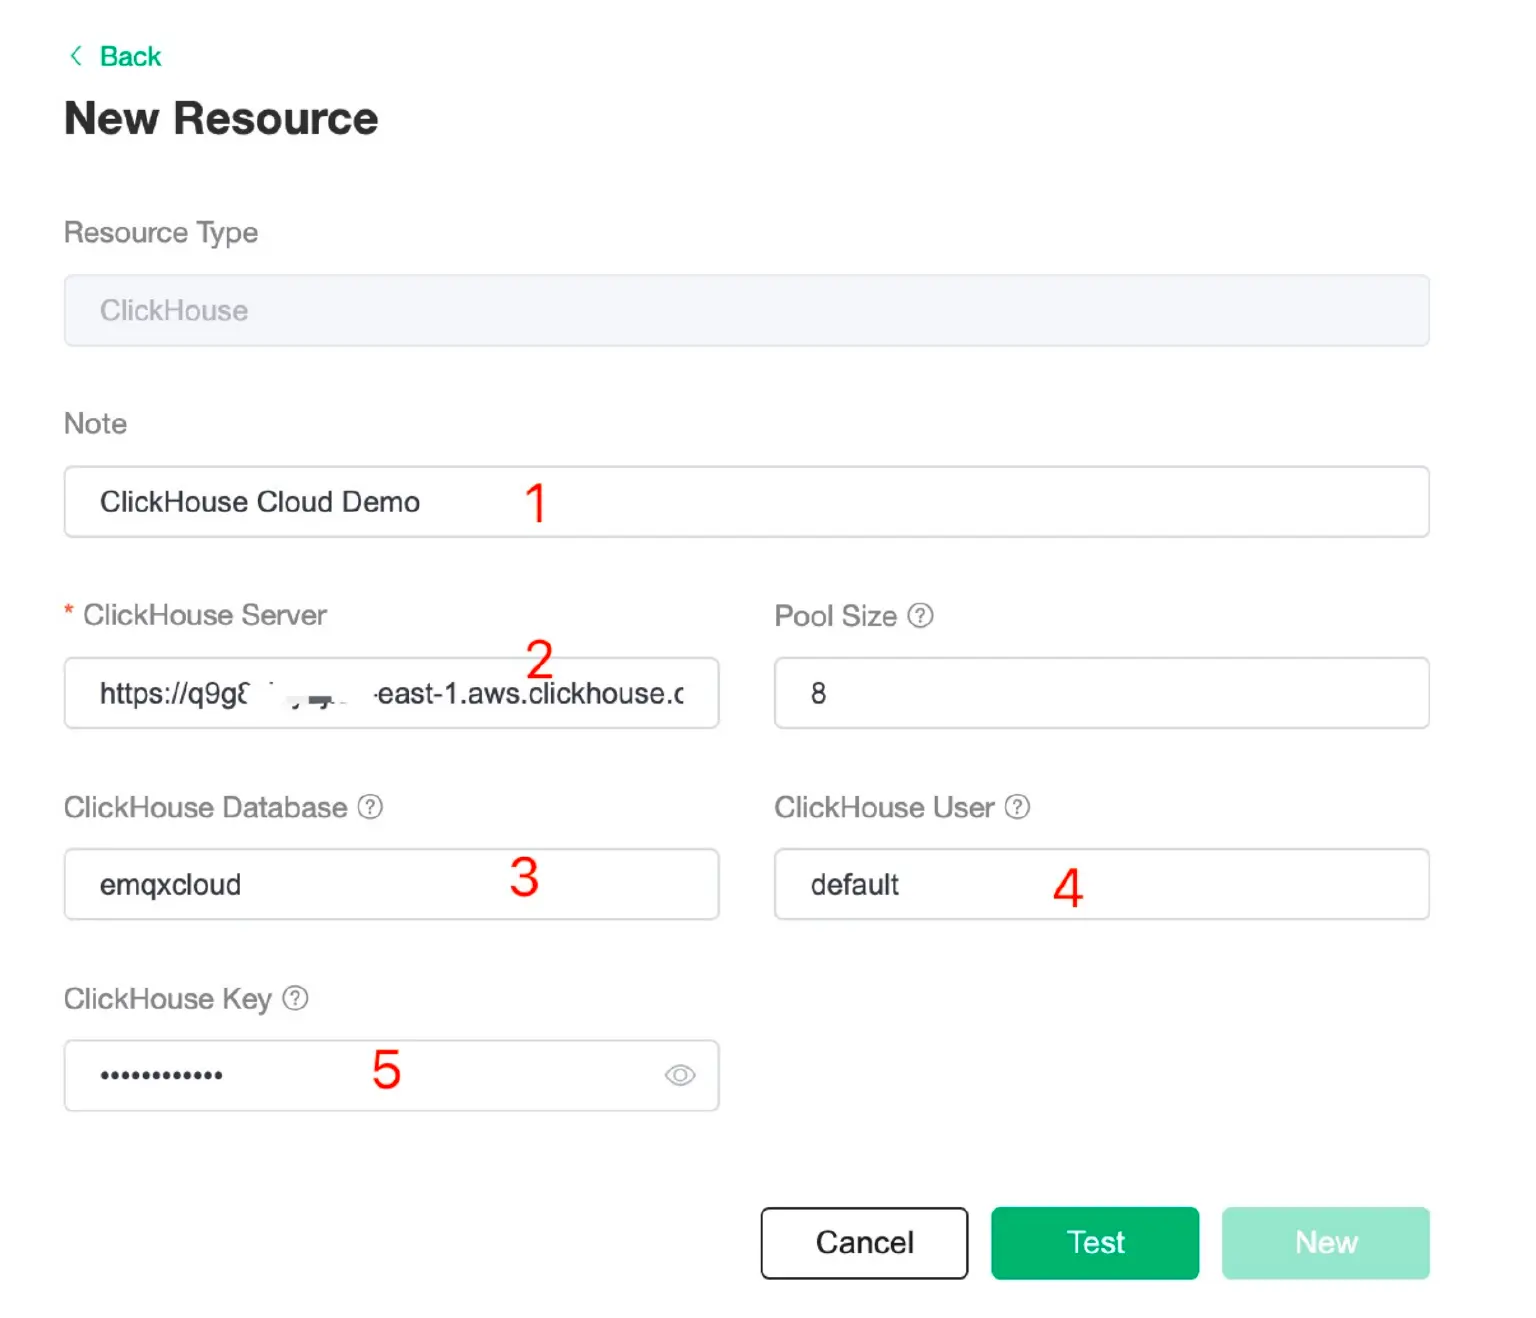
Click ‘Test’ to see if the connection works. If the verification passed, you can click ‘NEW’ button the create the resource.
Now we just created a ClickHouse resource, we still need to tell how to send data to this resource, so we need to create a rule. - Create A New Rule
During the resource creation, you will see a popup, and click ‘New’ will lead you to the rule creation page.
EMQX provides a powerful rule engine that can transform, and enrich the raw MQTT message before sending it to third-party systems. You can learn more info about the usage of the rule engine here.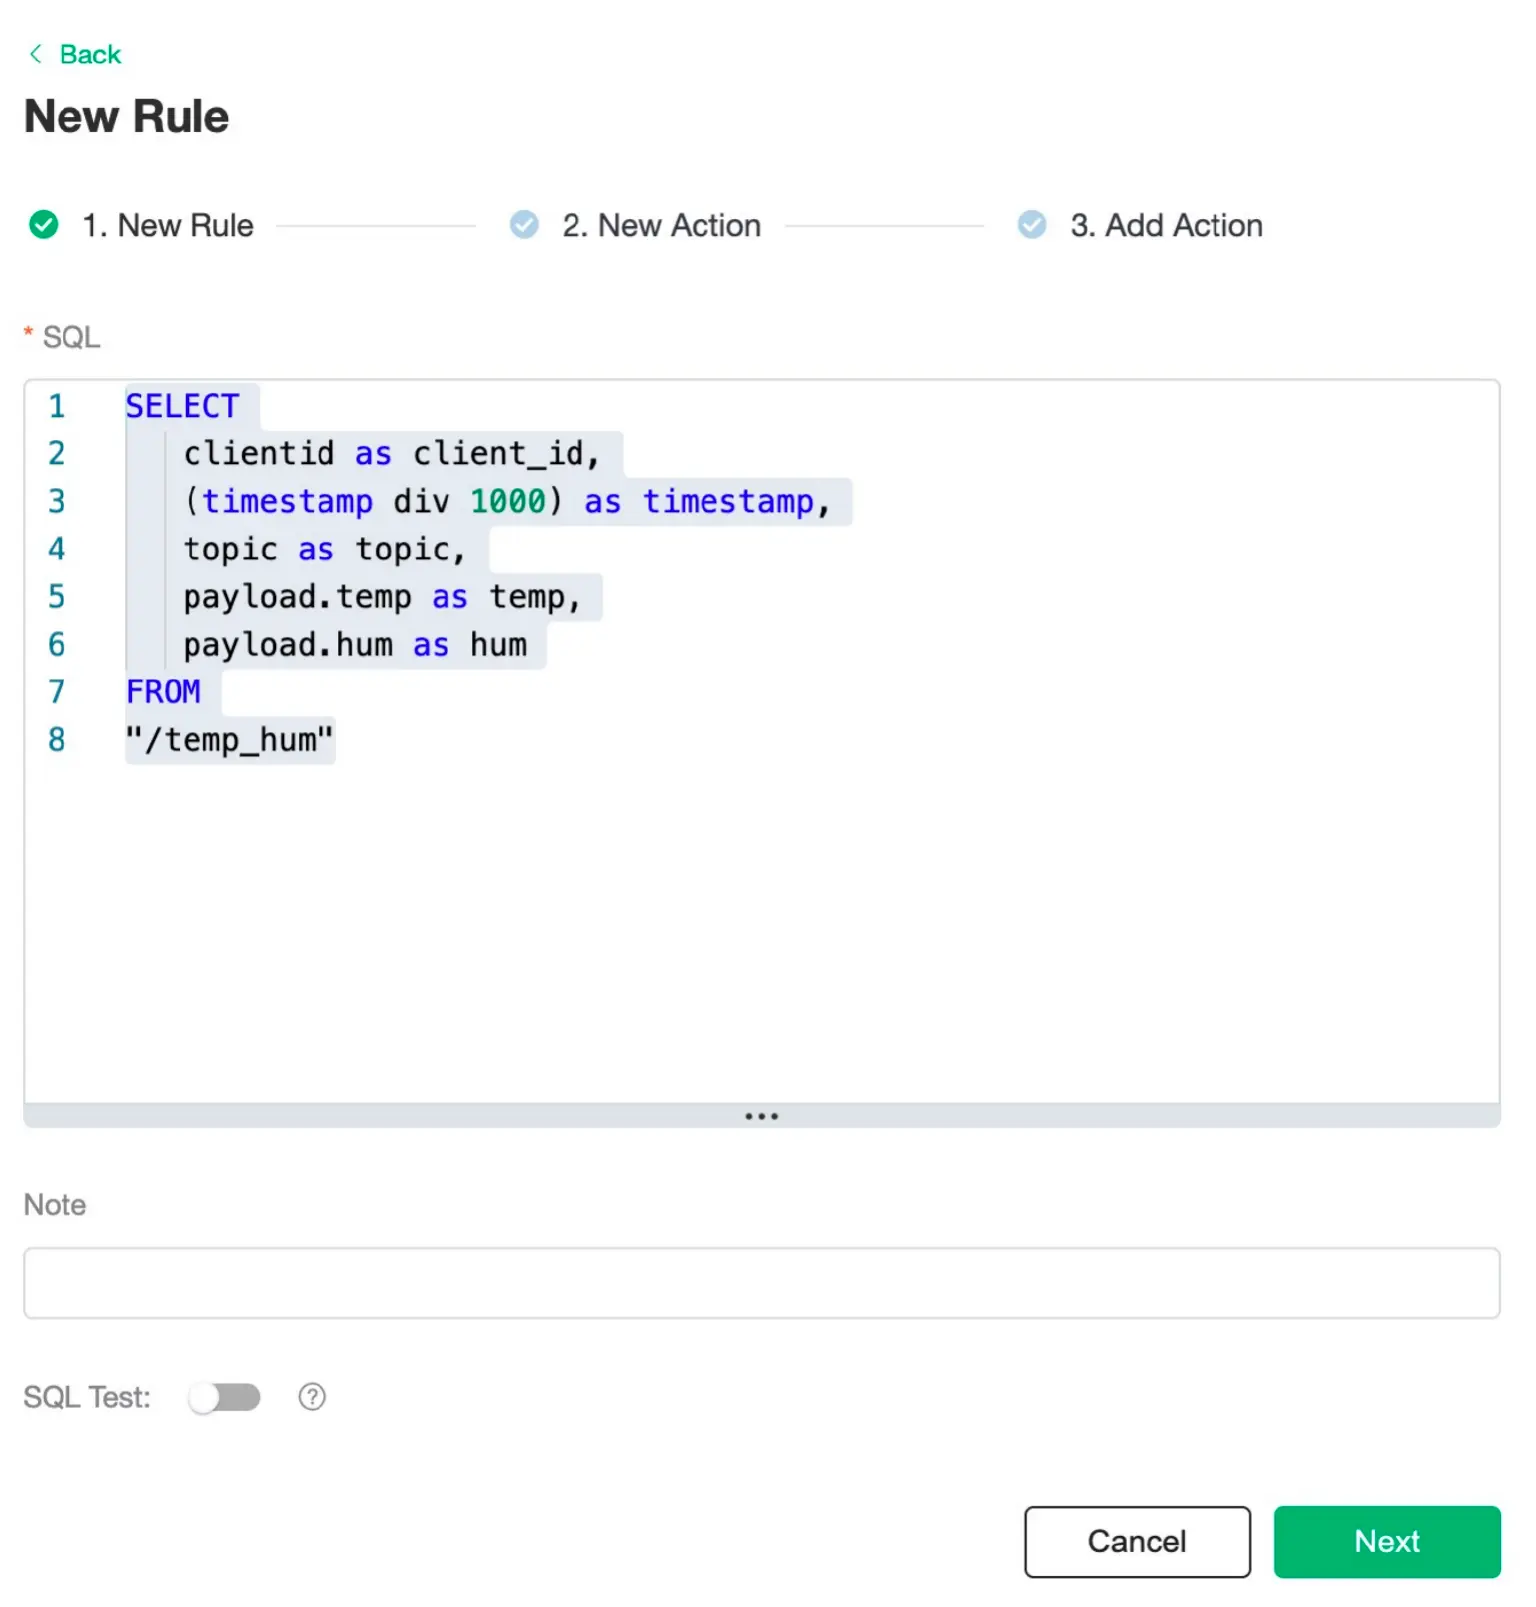
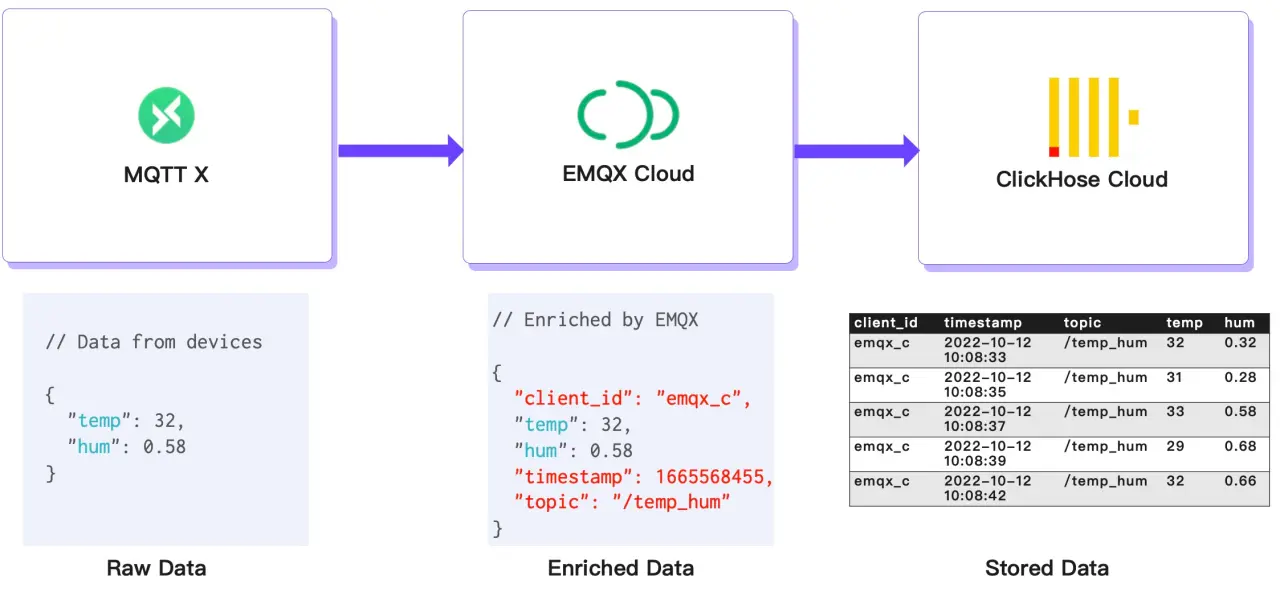
Here’s the rule used in this tutorial:SELECT
clientid as client_id, (timestamp div 1000) as timestamp, topic as topic, payload.temp as temp, payload.hum as hum FROM "/temp_hum"
It will read the messages from the ‘/temp_hum’ topic and enrich the JSON object by adding client_id, topic, and timestamp info.

So, the raw JSON you send to the topic:
{"temp": 28.5, "hum": 0.68}
Will be converted into:
{ "client_id": "c_emqx", "hum": 0.68, "temp": 28.5, "timestamp": 1665568455, "topic": "/temp_hum" }
Now click on the “NEXT” button. This step is to tell EMQX Cloud how to insert refined data into your ClickHouse database.

If you have only one resource, you don’t need to modify the ‘Resource’ and ‘Action Type’.
You only need to set the SQL template. Here’s the example used for this tutorial:
INSERT INTO temp_hum (client_id, timestamp, topic, temp, hum) VALUES ('${client_id}', ${timestamp}, '${topic}', ${temp}, ${hum})
This is a template for inserting data into Clickhouse, you can see the variables are used here.
4. **View Rules Details**
Click ‘Confirm’ and ‘View Details’
Now, everything should be well set. You can see the data integration works from rule details page.

All the MQTT messages sent to the ‘/temp_hum’ topic will be enriched and persisted into your ClickHouse Cloud database.
## Verification
1. **Publish MQTT messages to EMQX Cloud**
You can use any MQTT client or SDK to publish the message. In this tutorial, we will use [MQTTX](https://mqttx.app/), a user friendly MQTT client application provided by EMQ.

Click ‘New Connection’ on MQTTX and fill the connection form:

1. Name: Connection name. Use whatever name you want.
2. Host: the MQTT broker connection address. You can get it from the EMQX Cloud overview page.
3. Port: MQTT broker connection port. You can get it from the EMQX Cloud overview page.
4. Username/Password: Use the credential created above, which should be ‘test’ and ‘clickhouse’ in this tutorial.
Click the ‘Connect’ button on top right and the connection should be established.

Now you can send messages to the MQTT broker using this tool.
Inputs:
1. Set payload format to ‘JSON’.
2. Set to topic: /temp_hum (the topic we just set in the rule)
3. JSON body:
{ "temp": 26.5, "hum": 0.38 }
Click the send button on the right. You can change the temperature value and send more data to MQTT broker.

The data sent to EMQX Cloud should be processed by the rule engine and inserted into ClickHouse Cloud automatically.

2. **Check the data persisted**

Now it’s time to take a look at the data on the ClickHouse Cloud. Ideally, the data you send using MQTTX will go to the EMQX Cloud and persist to the ClickHouse Cloud’s database with the help of native data integration.

You can connect to the SQL console on ClickHouse Cloud panel or use any client tool to fetch data from Your ClickHouse. In this tutorial, we used the SQL console.

By executing the SQL:
SELECT * FROM emqxcloud.temp_hum
You will see the data you published to EMQX Cloud is now stored in ClickHouse Cloud.

## Summary
We didn’t write any piece of code, and we now have the MQTT data move from EMQX cloud to ClickHouse Cloud. With EMQX Cloud and ClickHouse Cloud, you don’t need to manage the infra and just focus on wiring you IoT applications with data storied securely in ClickHouse Cloud.
<section class="promotion">
<div>
Try EMQX Cloud for Free
<div class="is-size-14 is-text-normal has-text-weight-normal">No credit card required</div>
</div>
<a href="https://accounts.emqx.com/signup?continue=https://cloud-intl.emqx.com/console/deployments/0?oper=new" class="button is-gradient px-5">Get Started →</a>
</section>