Upload Sensor Data to MQTT Cloud Service via NodeMCU (ESP8266)
Introduction
This example will demonstrate how to report the temperature and humidity data collected by the DHT11 sensor to the MQTT service in the cloud through the MQTT protocol and the NodeMCU based on ESP8266 , and show how the application subscribes to and processes the data. The reason why mqtt protocol is used in this article is that it is lightweight and energy-saving, which is very suitable for the use scenarios of the Internet of things. At present, all major public cloud providers have basically opened IOT hub services based on MQTT protocol. For example, the IOT Core of AWS and the IOT Hub of Azure can easily access these data to these public cloud services through MQTT protocol.
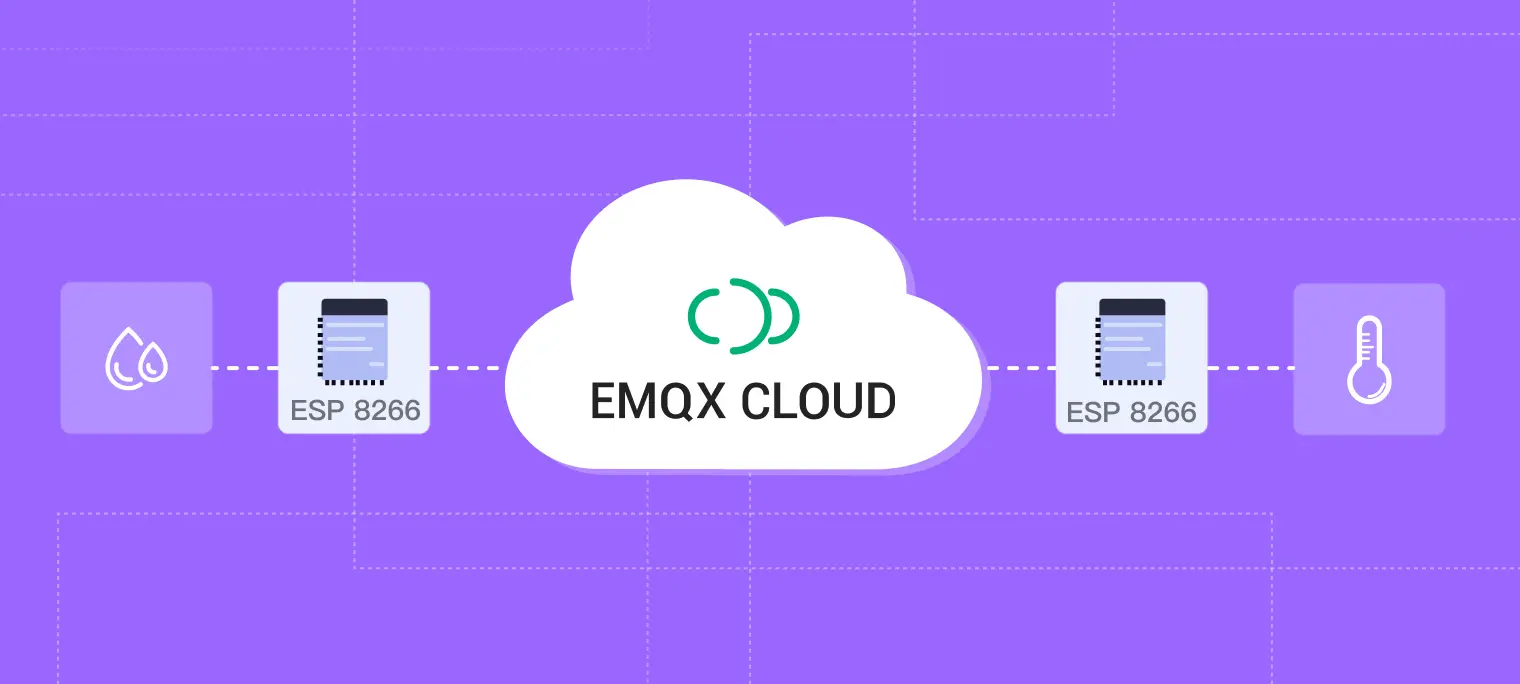
The overall architecture of this example is as follows:

Configuration
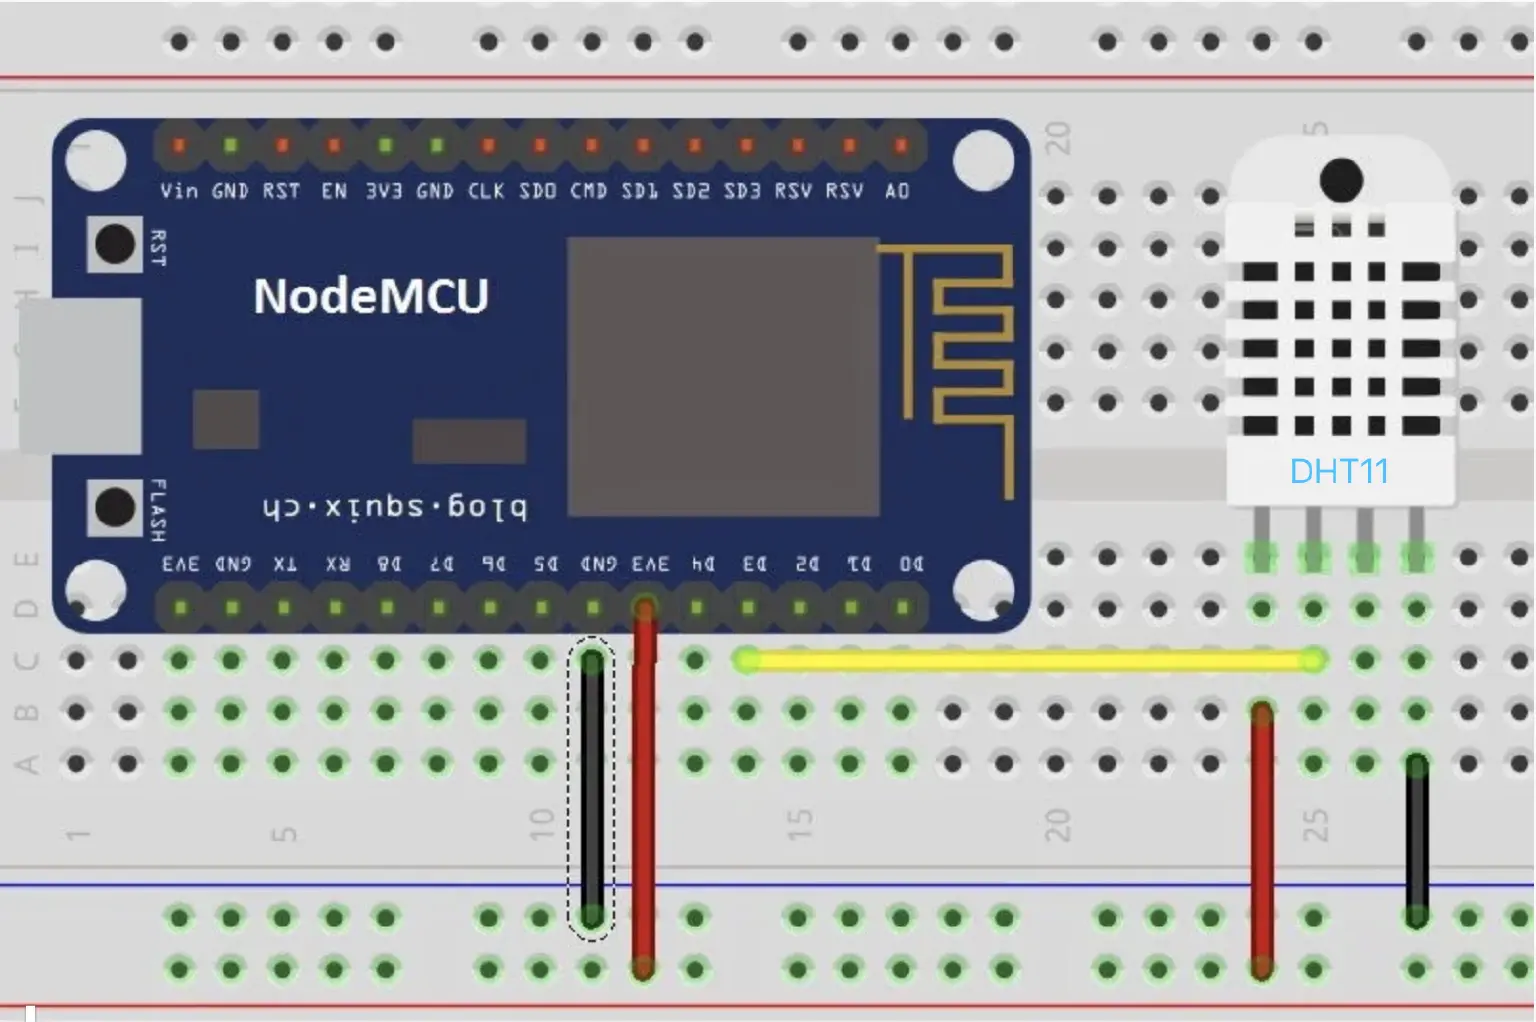
Hardware Configuration
- NodeMCU board x 1: NodeMCU is an open source IoT platform. It includes firmware which runs on the ESP8266 Wi-Fi SoC, and hardware which is based on the ESP-12 module. The term "NodeMCU" by default refers to the firmware rather than the development kits . The firmware uses the Lua scripting language.
- DHT11 temperature / humidity sensor x 1: DHT11 digital temperature and humidity sensor is a composite sensor with calibrated digital signal output
- Breadboard x 1
- Several jumper wires
- Please refer to the following screenshot for Connection Graph
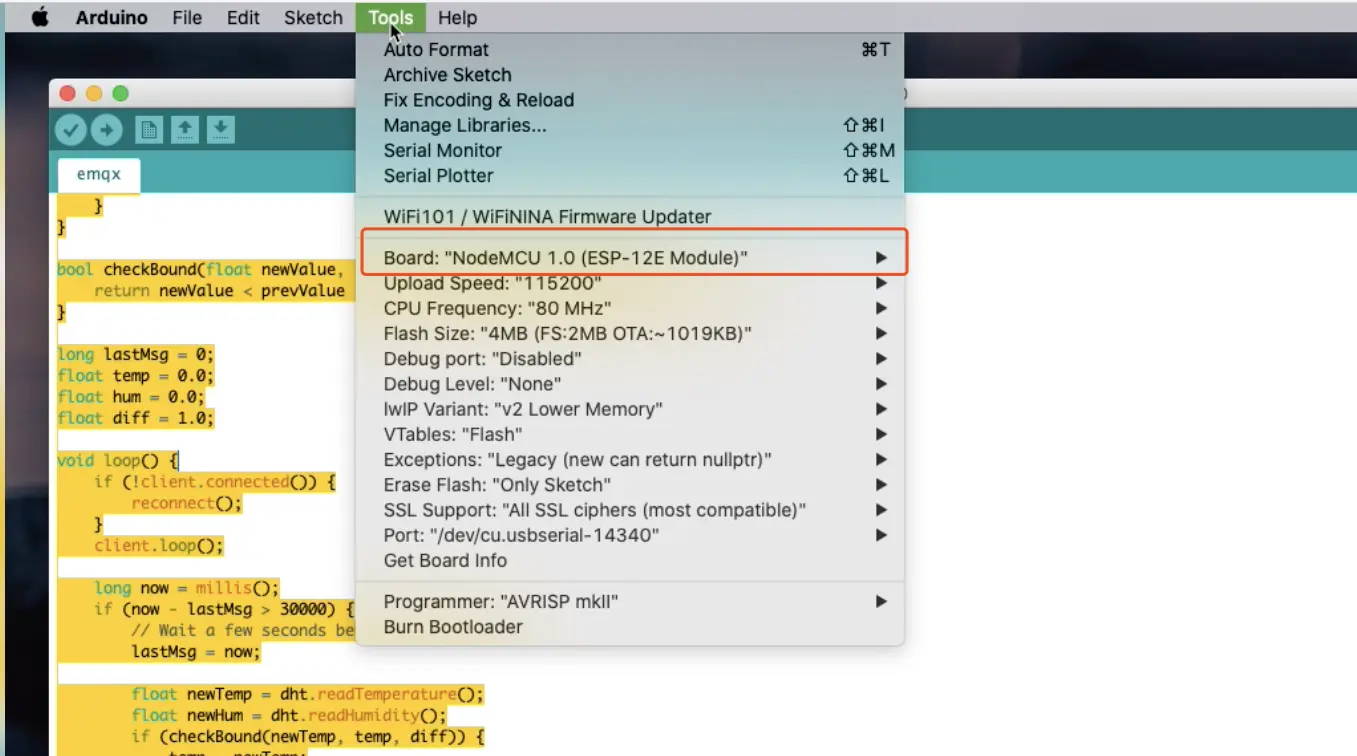
Arduino Configuration
- Download and install CH340G USB driver
- Install ESP8266 module
- Install PubSubClient library (by Nick O'Leary)
Sketch -> Include Library -> Manage Libraries... -> Type PubSub in Search field -> Install
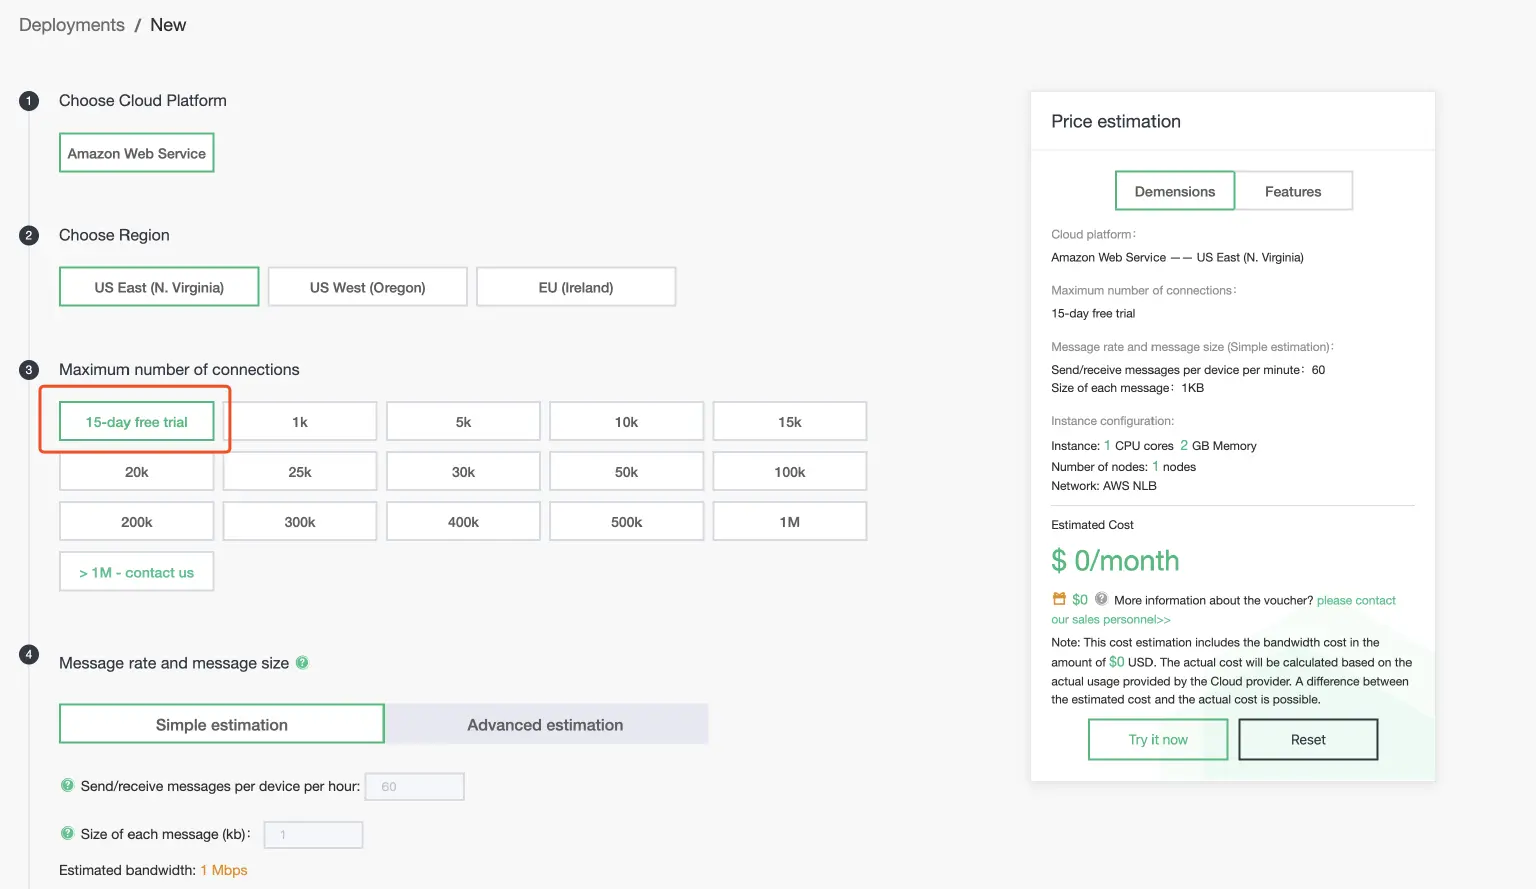
MQTT Cloud Service
After the data is successfully collected through NodeMCU, it needs to be sent to the MQTT cloud service in the cloud. This article uses the MQTT cloud service provided by EMQX. Readers can also choose other MQTT cloud services according to their own circumstances, such as Azure IoT Hub or AWS IoT Core. Each cloud service needs to provide different authentication methods when accessing. Therefore, when connecting to the MQTT service in the cloud via NodeMCU, it is required to set the connection method according to the security requirements of the target cloud service. For the sake of simplicity, this article uses a non-secure connection method. In a formal production environment, a connection with a secure authentication method must be set.
- Click EMQX Cloud registration address to register
- After registration, click EMQX Cloud to apply for a free trial of 15-day deployment
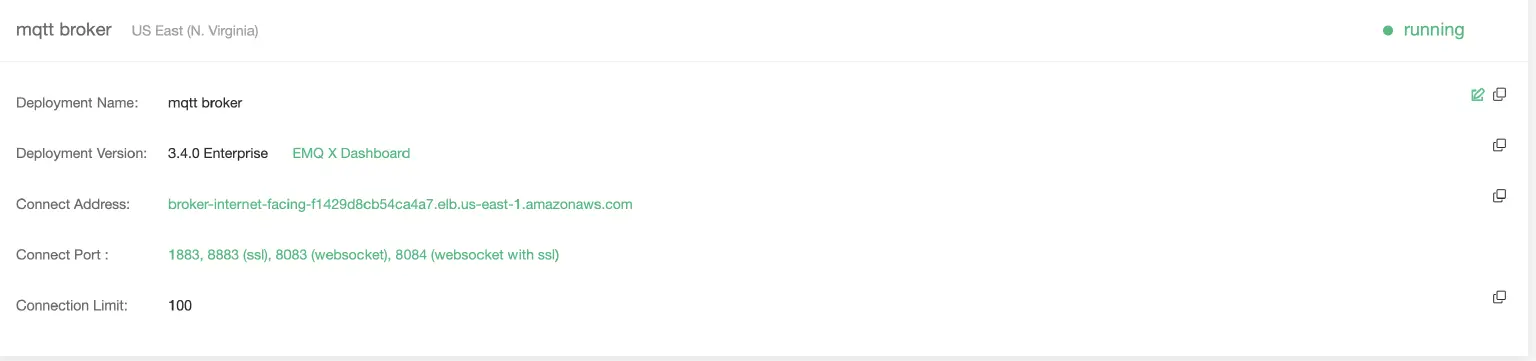
- View the broker connection address
Coding
#include <ESP8266WiFi.h>

#include <PubSubClient.h>

#include "DHT.h"

#define DHTPIN D4     // what pin we're connected to
#define wifi_ssid "xxxxx"
#define wifi_password "xxxxx"

#define mqtt_server "broker-internet-facing-f1429d8cb54ca4a7.elb.us-east-1.amazonaws.com"  // MQTT Cloud address
#define humidity_topic "humidity"
#define temperature_topic "temperature"

#define DHTTYPE DHT11   // DHT 11

WiFiClient espClient;
PubSubClient client(espClient);
DHT dht(DHTPIN, DHTTYPE);

void setup() {
    Serial.begin(115200);
    setup_wifi();
    client.setServer(mqtt_server, 1883);
    dht.begin();
}

void setup_wifi() {
    delay(10);
    WiFi.begin(wifi_ssid, wifi_password);
    while (WiFi.status() != WL_CONNECTED) {
        delay(500);
        Serial.print(".");
    }
}

void reconnect() {
    // Loop until we're reconnected
    while (!client.connected()) {
        Serial.print("Attempting MQTT connection...");
        if (client.connect("nodeMcuDHT11")) {
            Serial.println("connected");
        } else {
            Serial.print("failed, rc=");
            Serial.print(client.state());
            Serial.println(" try again in 5 seconds");
            delay(5000);
        }
    }
}

bool checkBound(float newValue, float prevValue, float maxDiff) {
    return newValue < prevValue - maxDiff || newValue > prevValue + maxDiff;
}

long lastMsg = 0;
float temp = 0.0;
float hum = 0.0;
float diff = 1.0;

void loop() {
    if (!client.connected()) {
        reconnect();
    }
    client.loop();

    long now = millis();
    if (now - lastMsg > 30000) {
        // Wait a few seconds between measurements
        lastMsg = now;

        float newTemp = dht.readTemperature();
        float newHum = dht.readHumidity();
        if (checkBound(newTemp, temp, diff)) {
            temp = newTemp;
            Serial.print("New temperature:");
            Serial.println(String(temp).c_str());
            client.publish(temperature_topic, String(temp).c_str(), true);
        }

        if (checkBound(newHum, hum, diff)) {
            hum = newHum;
            Serial.print("New humidity:");
            Serial.println(String(hum).c_str());
            client.publish(humidity_topic, String(hum).c_str(), true);
        }
    }
}
Follow these steps to edit the code to suit your own Wi-Fi and MQTT settings
- Wi-Fi Setting
#define wifi_ssid "" #define wifi_password "" - Broker server setting
#define mqtt_server "broker-internet-facing-f1429d8cb54ca4a7.elb.us-east-1.amazonaws.com" - Arduion configuration
Running
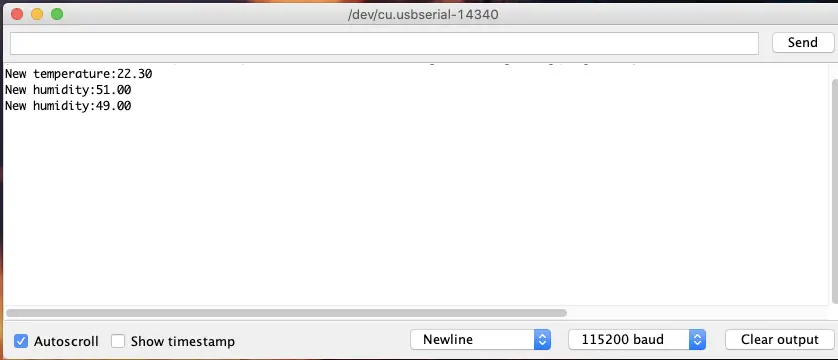
- Code upload
Connect the NodeMCU to the PC via USB and select the 115200 port in the Arduion IDE. Use the upload button to compile the sketch and upload it to the device. - Open Arduino monitor window to view data reporting.
- MQTT client receives messages
In this post, we will use the MQTT client tool provided by MQTTX that supports browser access: https://mqttx.app/web-client/. MQTT X also provides a desktop client and a command line tool.- Create an MQTT connection

- Subscribe to topics and receive test messages
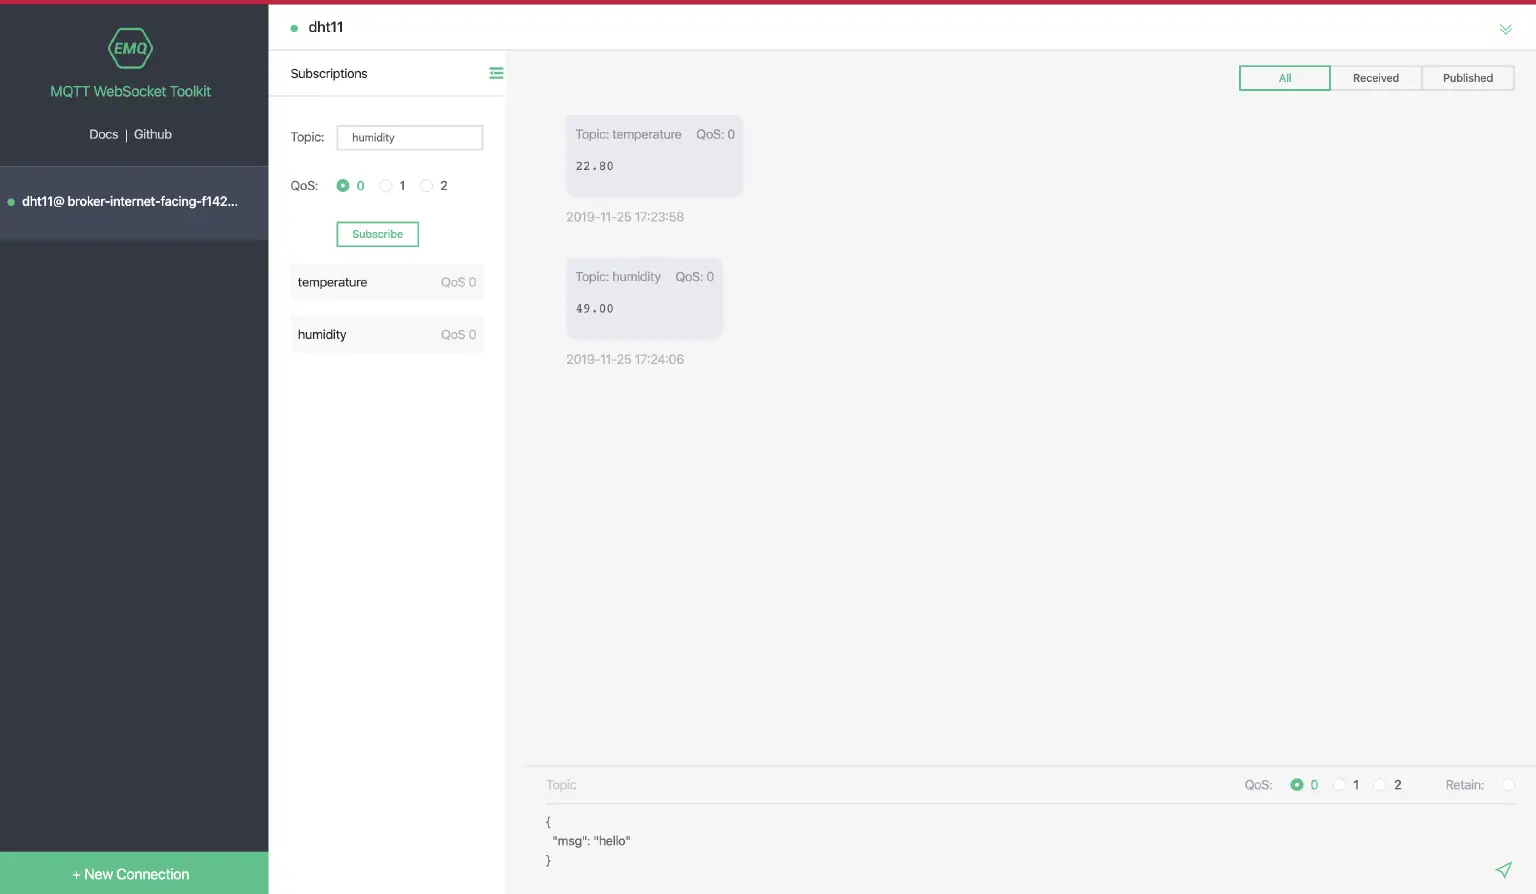
- Create an MQTT connection
- Use Python MQTT client to view reported messages
from paho.mqtt import client as mqtt

def on_connect(client, userdata, flags, rc):
    # connect mqtt broker
    client.subscribe([("temperature", 0), ("humidity", 0)])

def on_message(client, userdata, msg):
    # sub dht11 temperature/humidity data
    print(f"{msg.topic}: {msg.payload.decode()}")

def run():
    client = mqtt.Client()
    # Edit MQTT Cloud address
    client.connect("broker-internet-facing-f1429d8cb54ca4a7.elb.us-east-1.amazonaws.com", 1883)
    client.on_connect = on_connect
    client.on_message = on_message
    client.loop_forever()

if __name__ == '__main__':
    run()
Screenshot of Python script running:

- Troubleshooting: In order to perform troubleshooting, connecte the USB adapter to the PC and select the port of USB-TTL adapter in the Arduino IDE. Open the Serial Monitor to view the debug information generated by the serial output
Summary
So far, it has completed the simple process of collecting data from NodeMCU, uploading it to the MQTT cloud service provided by EMQ, and processing the data by the back-end program written by Python. However, in actual production applications, higher requirements will be required, for example,
- More secure connection method
- Real-time processing of IoT data
- Persistence of data
- Larger scale connection
EMQX Enterprise and its Cloud service have provided good solutions to solve the above problems. Readers can refer to related links for more information.
In order to achieve high data security (avoid uploading to the cloud), reduce business processing delays, and reduce data transmission costs, edge computing can be considered in the solution. Azure IoT Edge and AWS's Greengrass provide solutions at the edge. EMQ also provides an open-sourced ultra-lightweight edge IoT edge streaming analytics solution eKuiper. Readers can refer to this Article for more detailed information.
Resources
- MQTT on ESP32: A Beginner's Guide
- How to Use MQTT on Raspberry Pi with Paho Python Client
- MicroPython MQTT Tutorial Based on Raspberry Pi
- Remote control LED with ESP8266 and MQTT
- ESP8266 Connects to MQTT Broker with Arduino