Connecting to Serverless MQTT Broker using MQTTX: A Quick Guide
MQTTX is an open-source MQTT Client Toolbox developed by EMQ. It is designed to be cross-platform and can be used on desktops (macOS, Linux, and Windows), CLI, and web. MQTTX fully supports MQTT 5.0, 3.1.1, and 3.1 protocols, ensuring it meets all testing requirements.
The user interface (UI) of MQTTX features a chat-based layout, which simplifies the operational logic. It allows users to establish multiple MQTT connections, making it convenient to test MQTT/MQTTS connections and subscribe to and publish messages.
In this blog, we will guide you on how to use MQTTX for testing Serverless MQTT connections, including publishing, subscribing, and messaging.
Install MQTTX
Please download the latest version of MQTTX from the MQTTX download page and install it. At the time of writing this article, I used MQTTX v1.9.4, which was the latest version available.
Free Serverless MQTT Broker
Serverless architecture in cloud computing allows developers to focus on code development and deployment without the hassle of infrastructure management. Serverless MQTT, in particular, provides an MQTT messaging service that scales automatically based on demand, reducing the need for manual intervention.
EMQX Cloud Serverless is the latest offering for an MQTT Broker on the public cloud, providing all the advantages of serverless technology. You can quickly initiate a Serverless deployment with just a few clicks. Additionally, users can enjoy 1 million free session minutes per month, which is ample for maintaining 23 devices online for an entire month, making it ideal for small-scale IoT testing scenarios.
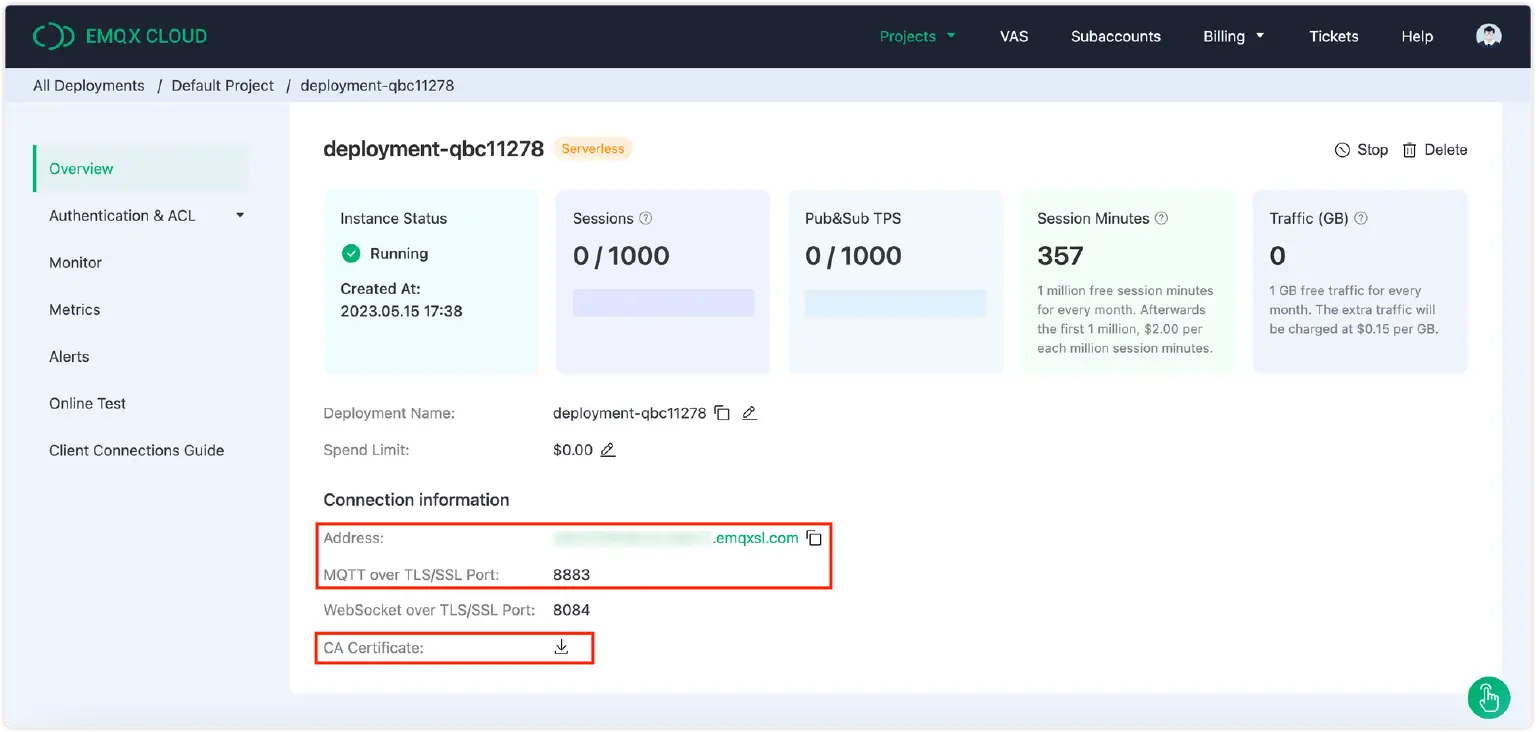
If you haven't experienced serverless deployment yet, we encourage you to follow the step-by-step guide in this blog to create a free deployment. Upon completing the registration process, you will have a running instance that offers similar information as displayed in your deployment's "Overview" section. We will utilize the connection information and CA certificate later on.
Connection Configuration
Once the Serverless MQTT Broker is ready, navigate to the main page of MQTTX and click the "+" icon in the menu bar on the left. If the page appears empty, you can alternatively click the New Connection button on the right to quickly set up a new client connection.

When you enter the New Connection page, you will need to configure the necessary information for the client connection. When connecting to a serverless MQTT broker, the settings you need to configure include the Broker Host, Broker Port, Client ID,Username, Password,SSL/TLS, SSL Secure, Certificate, CA File, and more.

Then follow this guide to configure the connection parameters using your EMQX connection information and login credentials:
- Broker Host and port: Obtain the
connection addressandport informationfrom the server deployment overview page. - Client ID: Each MQTT client must have a unique
client ID. You can click the refresh button next to the Client ID field to quickly generate a new one. - Username and password: If user authentication is enabled on your serverless broker, fill in the
usernameandpasswordinformation in the configuration. The"Authentication & ACL - Authentication"section on the server side demonstrates how to configure these credentials.
- SSL/TLS: When connecting to EMQX Serverless, note that it operates on a multi-tenant architecture, allowing multiple users to share a single EMQX cluster. To ensure secure and reliable data transmission within this environment, TLS is required. Set the SSL/TLS configuration to
true. - SSL Secure: The SSL secure switch in your MQTT configuration determines whether to verify the server certificate chain and hostname during the connection. It is recommended to enable the switch for secure communications, especially in production environments or when communicating with external networks.
- Certificate: If you choose the
Self signedoption, you can configure the certificate. Click the folder button on the right and select the appropriate certificates that have been generated. For a one-way connection, select yourCA File. For two-way authentication, you also need to configure theClient Certificate FileandClient Key File.
Finally, to establish a connection with your Serverless MQTT Broker, simply click the "Connect" button located in the upper right-hand corner of the screen.

Publish
Once the connection is established, you can easily send a test message by entering the Topic and Payload in the input boxes located at the bottom of the connection page. To publish the message to the topic, simply click the button in the lower-right corner.

Subscribe
To subscribe to a topic, click the New Subscription button in the lower left corner. This allows you to quickly subscribe to the same topic. Each topic is assigned a random color mark, but you also have the option to customize the color by opening the color picker. Once the topic is successfully subscribed, it will begin receiving messages immediately.

Let's create a new message and click the send button on the far right to send a message to the connected client that has subscribed to the topic. The client will promptly receive the message after it is successfully sent.

Note that in the message box, the right column represents the sent message, while the left column represents the received message.
Run Script
MQTTX also provides an advanced feature called Script, which allows you to write custom JavaScript code for unique payload conversions.
To access the script editing page, click the Script button in the left menu bar. Here, you can write, import and test your JavaScript code. In this blog post, we utilized the default script template that extracts message from JSON data. Once you have finished your script, please save it and provide a name. This will make the script available for use on the connection page.

Next, navigate to the connection page, select Run script from the drop-down menu, and apply your pre-saved script.

Apply your script to the received message.

Let's create a JSON message and send it to the connected client. The client will promptly receive, extract and display the message.

This feature offers remarkable flexibility and expandability. Combined with the timed sending function, it enables automated testing and simulation of data reporting. For more examples of script usage, visit the scripts-example repository on GitHub.
Summary
This blog provides a step-by-step guide on using MQTTX to test a Serverless MQTT Broker and how to use Run Script for unique payload conversions. By following these instructions, you will be able to connect to a Serverless MQTT broker for development, testing, and learning purposes.
Join the EMQ Community
To dive deeper into this topic, explore our GitHub repository for the source code, join our Discord for discussions, and watch our YouTube tutorials for hands-on learning. We value your feedback and contributions, so feel free to get involved and be a part of our thriving community. Stay connected and keep learning!