Connecting to Serverless MQTT Broker in Node.js
Serverless architecture in cloud computing allows developers to focus on code development and deployment without the hassle of infrastructure management. Serverless MQTT, in particular, provides an MQTT messaging service that scales automatically based on demand, reducing the need for manual intervention.
To learn more about serverless MQTT, read our blog post Next-Gen Cloud MQTT Service: Meet EMQX Cloud Serverless.
In this blog series, we'll guide you through using various client libraries to set up MQTT connections, subscriptions, messaging, and more with a serverless MQTT broker for your specific project.
Introduction
Benefiting from the reliability and small resource footprint, Node.js + serverless MQTT can be used for real-time applications, such as lightweight chat applications. This blog will provide a step-by-step guide on how to connect a serverless MQTT broker using the MQTT.js library. You can download the project from the Github repo MQTT Client Examples.
Free Serverless MQTT broker
EMQX Cloud Serverless is the latest MQTT Broker offering on the public cloud with all the serverless advantages. You can start the Serverless deployment in seconds with just a few clicks. Additionally, users can get 1 million free session minutes every month, sufficient for 23 devices to be online for a whole month, making it perfect for tiny IoT test scenarios.
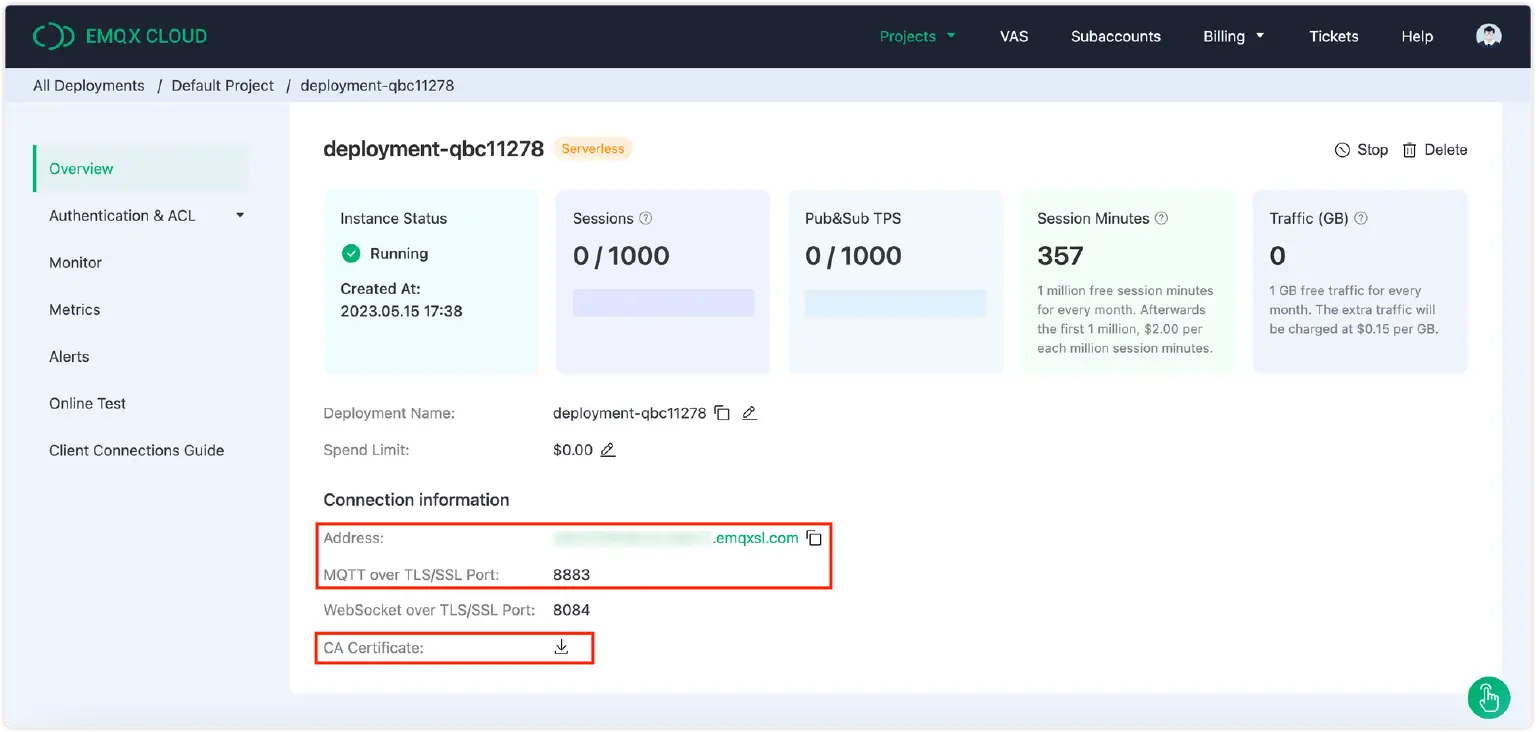
If you have not tried serverless deployment yet, please follow the guide in this blog to create one for free. Once you have completed the registration process with the online guide, you will get a running instance with the following similar information from the “Overview” in your deployment. We will use the connection information and CA certificate later.
Connection Code Demo
1. Install Node.js and NPM
The Node.js installer carries the Node.js core file. Therefore, you don’t need to install NPM separately. Official installers for all the major platforms are available at https://nodejs.org/en/download.
2. Install the MQTT.js
MQTT.js is a client library for the MQTT protocol, written in JavaScript for node.js and the browser. It is currently the most widely used MQTT client library in the JavaScript ecosystem. We can use NPM to install MQTT.js.
# create a new project
npm init -y

# Install dependencies
npm install mqtt --save
After installation, create a new index.js file in the current directory. This file will serve as the entry point for the project, and where we can implement the complete logic of the MQTT connection test.
3. Create an MQTT connection
Import the MQTT.js client library.
Note: In the Node.js environment, please use the commonjs specification to import dependency modules.*
const mqtt = require('mqtt')
To establish an MQTT connection, you need to set the connection address, port, and client ID. In this example, we use the built-in JavaScript function to generate a random number as the client ID.
const fs = require('fs')
const protocol = 'mqtts'
// Set the host and port based on the connection information.
const host = '******.emqxsl.com'
const port = '8883'
const clientId = `mqtt_${Math.random().toString(16).slice(3)}`
const connectUrl = `${protocol}://${host}:${port}`
EMQX Serverless relies on a multi-tenant architecture that enables multiple users to share one EMQX cluster. Therefore, when connecting to EMQX serverless, we need to use TLS to ensure the security and reliability of data transmission in the multi-tenant environment. If the server is using a self-signed certificate, you need to download the CA file from the deployment overview panel and specify it.
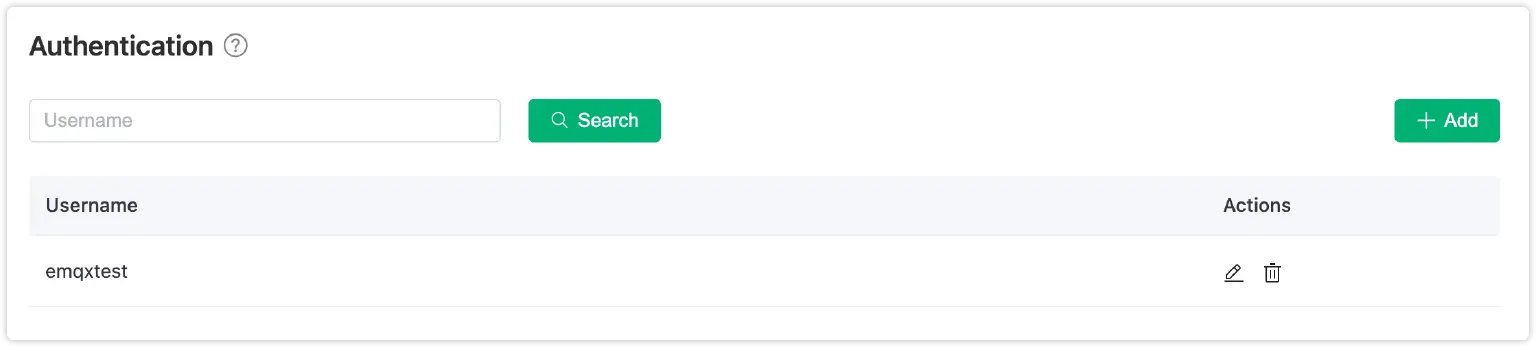
Next, we establish the connection using the URL constructed by splicing the host and port. Additionally, we need to configure the username and password, which must be set from Authentication & ACL - Authentication in advance.
We call the built-in connect function of the MQTT module to achieve the connection. Once the connection is established, it returns a Client instance.
const client = mqtt.connect(connectUrl, {
  clientId,
  clean: true,
  connectTimeout: 4000,
  username: 'emqxtest',
  password: '******',
  reconnectPeriod: 1000,
  // If the server is using a self-signed certificate, you need to pass the CA.
  ca: fs.readFileSync('./broker.emqx.io-ca.crt'),
})
To learn more, please check out the blog How to Set Parameters When Establishing an MQTT Connection.
4. Subscribe to an MQTT topic
We use the on function of the returned Client instance to monitor the connection status and subscribe to the topic /nodejs/mqtt in the callback function after the successful connection.
const topic = '/nodejs/mqtt'

client.on('connect', () => {
  console.log('Connected')
  client.subscribe([topic], () => {
    console.log(`Subscribe to topic '${topic}'`)
  })
})
After subscribing to a topic, we can monitor incoming messages using the on function. When a new message arrives, we can obtain the corresponding topic and message within the callback function. This enables us to handle the received message and respond accordingly effectively.
Note: The message received within the callback function is of type Buffer and needs to be converted into a string by the toString function.*
client.on('message', (topic, payload) => {
  console.log('Received Message:', topic, payload.toString())
})
5. Publish MQTT messages
Once the topic subscription and message monitoring tasks are completed, we can proceed to write a function for publishing messages.
Note: The message should be published after the MQTT connection is successful. Therefore, we write it in the callback function once the connection has been established.*
client.on('connect', () => {
  client.publish(topic, 'nodejs mqtt test', { qos: 0, retain: false }, (error) => {
    if (error) {
      console.error(error)
    }
  })
})
Complete code
The code for connecting to the server, subscribing to topics, and publishing and receiving messages is below. For a complete demonstration of all functions, see the project's git repository.
const mqtt = require('mqtt')

const fs = require('fs')
const protocol = 'mqtts'
// Set the host and port based on the connection information.
const host = 'qbc11278.ala.us-east-1.emqxsl.com'
const port = '8883'
const clientId = `mqtt_${Math.random().toString(16).slice(3)}`
const connectUrl = `${protocol}://${host}:${port}`

const client = mqtt.connect(connectUrl, {
  clientId,
  clean: true,
  connectTimeout: 4000,
  username: 'emqxtest',
  password: '123456',
  reconnectPeriod: 1000,
  // If the server is using a self-signed certificate, you need to pass the CA.
  ca: fs.readFileSync('./broker.emqx.io-ca.crt'),
})

const topic = '/nodejs/mqtt'

client.on('connect', () => {
  console.log('Connected')

  client.subscribe([topic], () => {
    console.log(`Subscribe to topic '${topic}'`)
    client.publish(topic, 'nodejs mqtt test', { qos: 0, retain: false }, (error) => {
    if (error) {
      console.error(error)
    }
  })
})
})

client.on('message', (topic, payload) => {
  console.log('Received Message:', topic, payload.toString())
})
Test
We need to add a line of startup script to the "scripts" field in the package.json file.
"scripts": { "start": "node index.js" }
Then we can simply run the project using the command npm start.
npm start
Once the project is running, we can see the output information of the console as follows:

The client appears to have successfully connected to the MQTT broker, subscribed to the topic, and received and published messages. We will use MQTT Client Tool - MQTTX as another client for the message publishing and receiving the test.

We can see that the message sent by MQTTX is printed in the console.

Summary and complete code example
This code demo explains how to connect to the Serverless deployment via the MQTT.js client library. If you've followed the process, you now have a Node.js application that can publish and subscribe. For more ways to connect to MQTT brokers in Node.js, please refer to the tutorial blog How to use MQTT in Node.js.
Join the EMQX Community
To dive deeper into this topic, explore our GitHub repository for the source code, join our Discord for discussions, and watch our YouTube tutorials for hands-on learning. We value your feedback and contributions, so feel free to get involved and be a part of our thriving community. Stay connected and keep learning!