MQTT Sparkplug in Action: A Step-by-Step Tutorial
Introduction to MQTT Sparkplug
Sparkplug is an Industrial IoT protocol that provides a standardized way to communicate with industrial devices and applications. An efficient, comprehensive Sparkplug solution can facilitate communication between devices and applications and empower the decision-making of IIoT adopters through insights from data.
MQTT Sparkplug is a messaging protocol built on top of MQTT, a widely used messaging protocol for IoT. It already has all advantages of MQTT protocol. MQTT Sparkplug is designed specifically for the IIoT and includes additional features that make it suitable for industrial applications. It is an open-source protocol that is widely adopted in the industry
This blog will give a practical example of implementing an MQTT Sparkplug solution.
Essential Components of MQTT Sparkplug Solution
To implement an MQTT Sparkplug solution, we need two components: an MQTT Broker and an edge node.
An MQTT broker is used as the central broker for handling the communication between devices and applications in an IIoT environment. The MQTT broker is responsible for receiving messages from devices, forwarding them to the appropriate subscribers, and storing messages for later retrieval if necessary.
An edge node is a device or gateway that acts as an intermediary between devices and the MQTT broker. It can handle local data processing and aggregation, as well as buffering and forwarding data to the MQTT broker. Edge nodes are typically used in IIoT environments where numerous devices generate large amounts of data and where network bandwidth is limited.
In the context of MQTT Sparkplug, edge nodes are responsible for implementing the Sparkplug specification, which includes handling the registration of devices, encoding and decoding data using the Sparkplug payload format, and organizing data using the Sparkplug topic namespace format. The edge node communicates with the MQTT broker using the MQTT protocol, and it may also run additional software to perform local analytics or processing on the data.
In this blog, we will demonstrate how to get started with MQTT Sparkplug using EMQX and Neuron.
EMQX is a popular MQTT broker that supports the Sparkplug protocol, while Neuron is an industrial IoT platform that can be used to collect data from industrial devices and generate Sparkplug messages for applications.
Neuron can collect the data from the devices and publish Sparkplug messages to the EMQX broker based on the data by reporting changes. EMQX will forward the messages to the application that subscribes to the relevant Sparkplug topic. However, EMQX is able to decode the Sparkplug messages through the rules engine. The messages are then used for data platforms, persistent storage for historical, and so on.
Install and Configure an MQTT Broker
Install EMQX
Download and install the EMQX MQTT broker on your server or machine. EMQX provides a community edition that can be downloaded for free from their website. Visit the website https://docs.emqx.com/en/emqx/latest/deploy/install.html and follow the documentation.
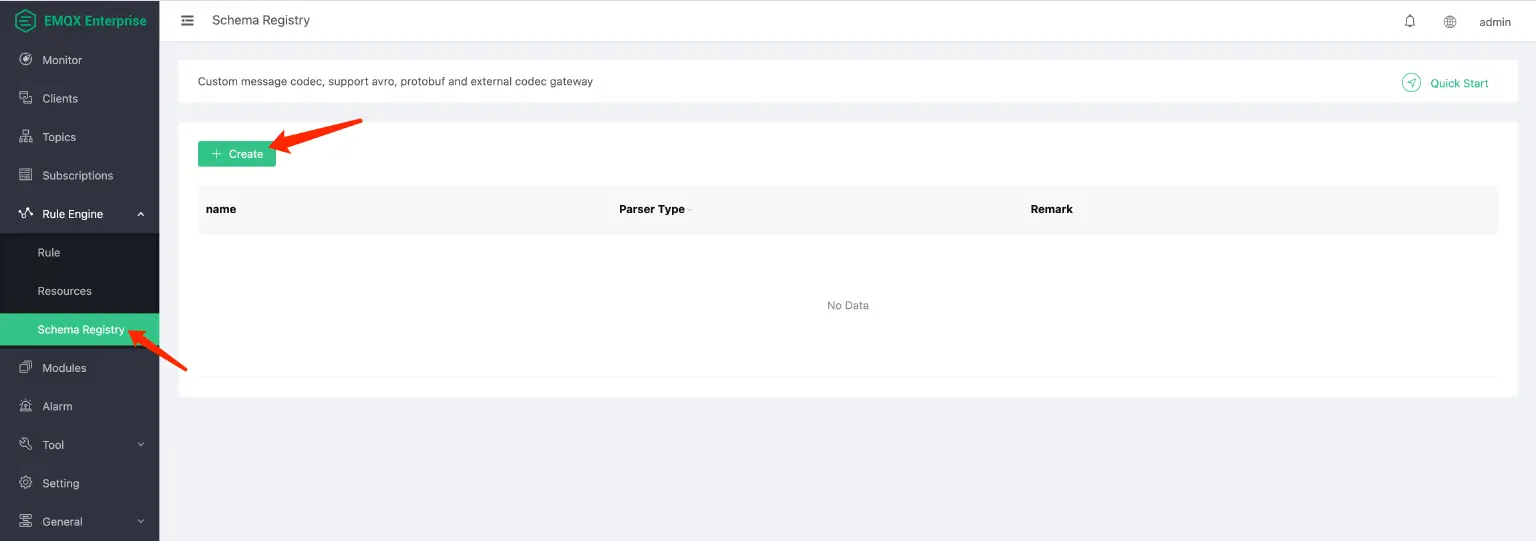
Create Schema Registry in EMQX
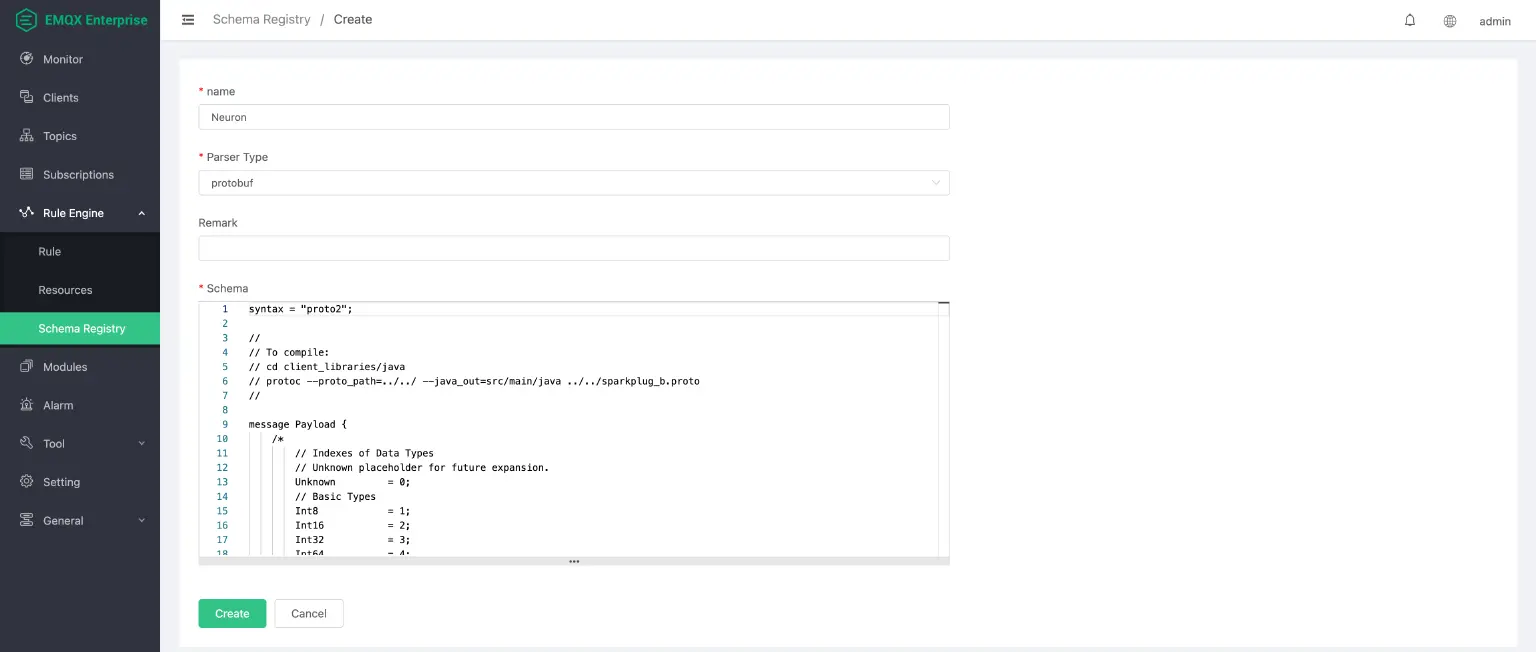
Click the Create button in Schema Registry.
Select the protobuf for Parse Type and fill in the schema with Sparkplug schema.
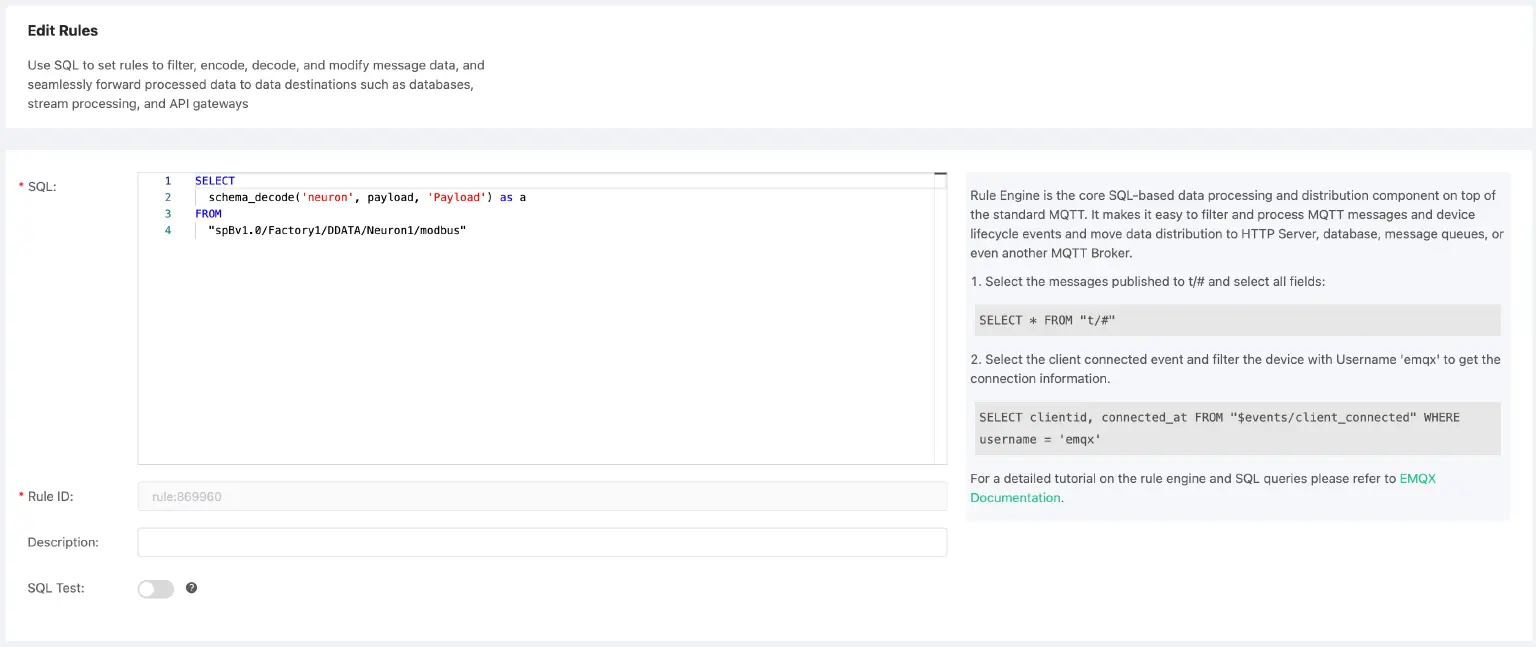
Create Rules in EMQX
The SQL statement used for decoding.
SELECT
 schema_decode('neuron', payload, 'Payload') as SparkPlugB
FROM
 "spBv1.0/group1/DDATA/node1/modbus"
The key point here is schema_decode('neuron', payload, 'Payload') :
schema_decode()decodes the content of the payload field according to the Schema 'protobuf_person'.as SparkPlugBstores the decoded value in the variable "SparkPlugB".- The last parameter
Payloadindicates that the message type in the payload is the 'Payload' type defined in the protobuf schema.
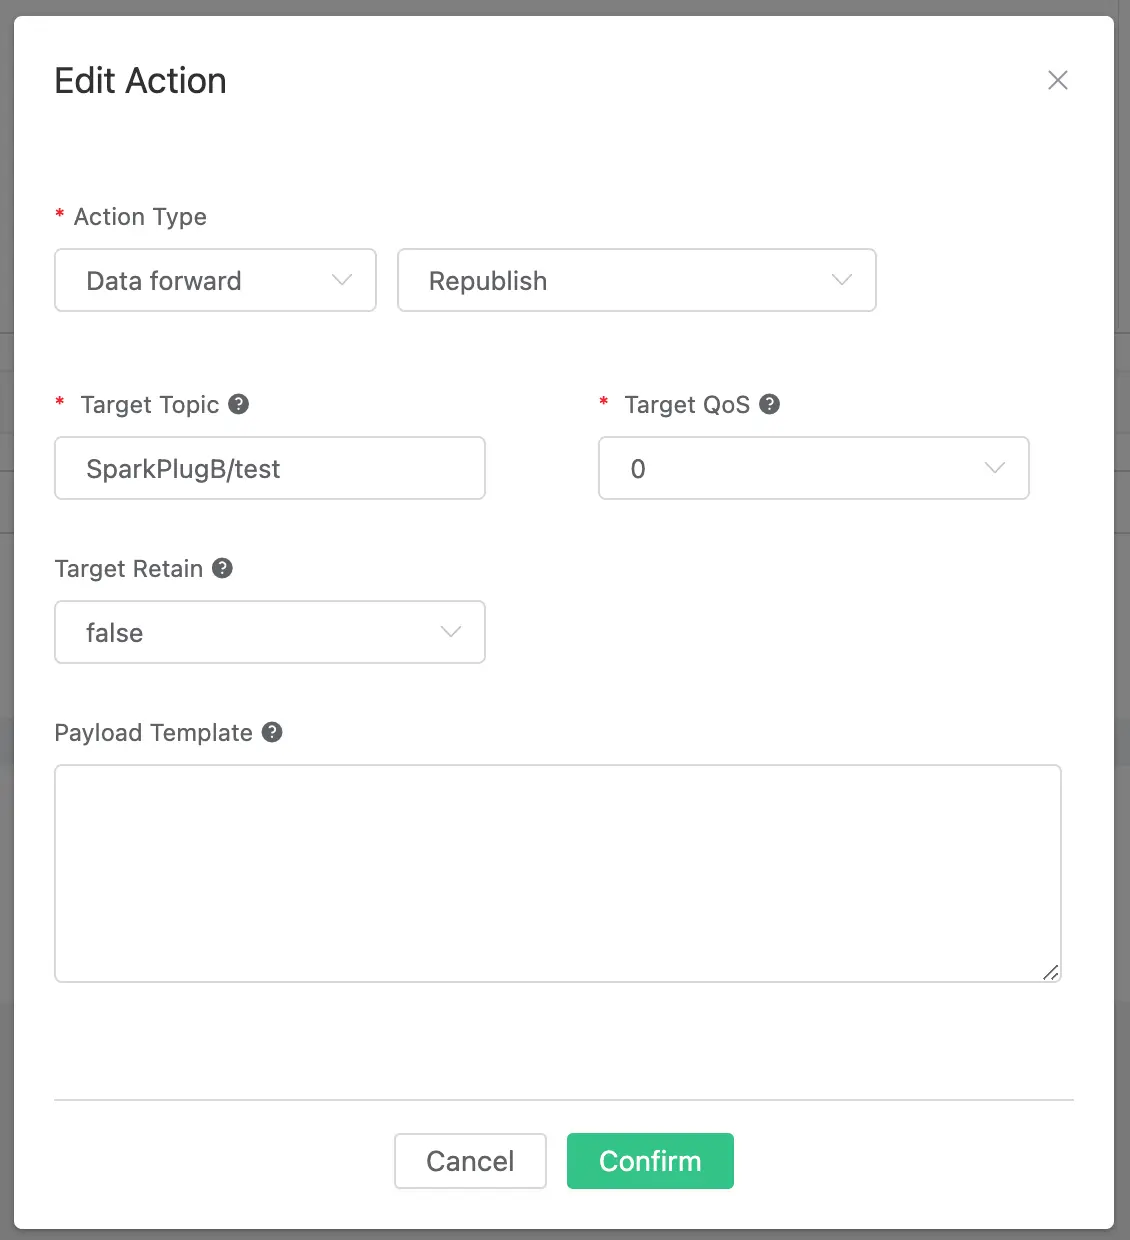
Then add the action with the following parameters:
- Action Type: Message Repost
- Purpose topic: SparkPlugB/test
This action sends the decoded "Payload" to the SparkPlugB/test topic in JSON format.
Install and Configure an Edge Node
Neuron is an industrial IoT platform that can be used to collect, store, and analyze data from industrial devices. You can download and install Neuron from their website. Visit the website https://docs.emqx.com/en/neuron/latest/installation/installation.html and follow the documentation.
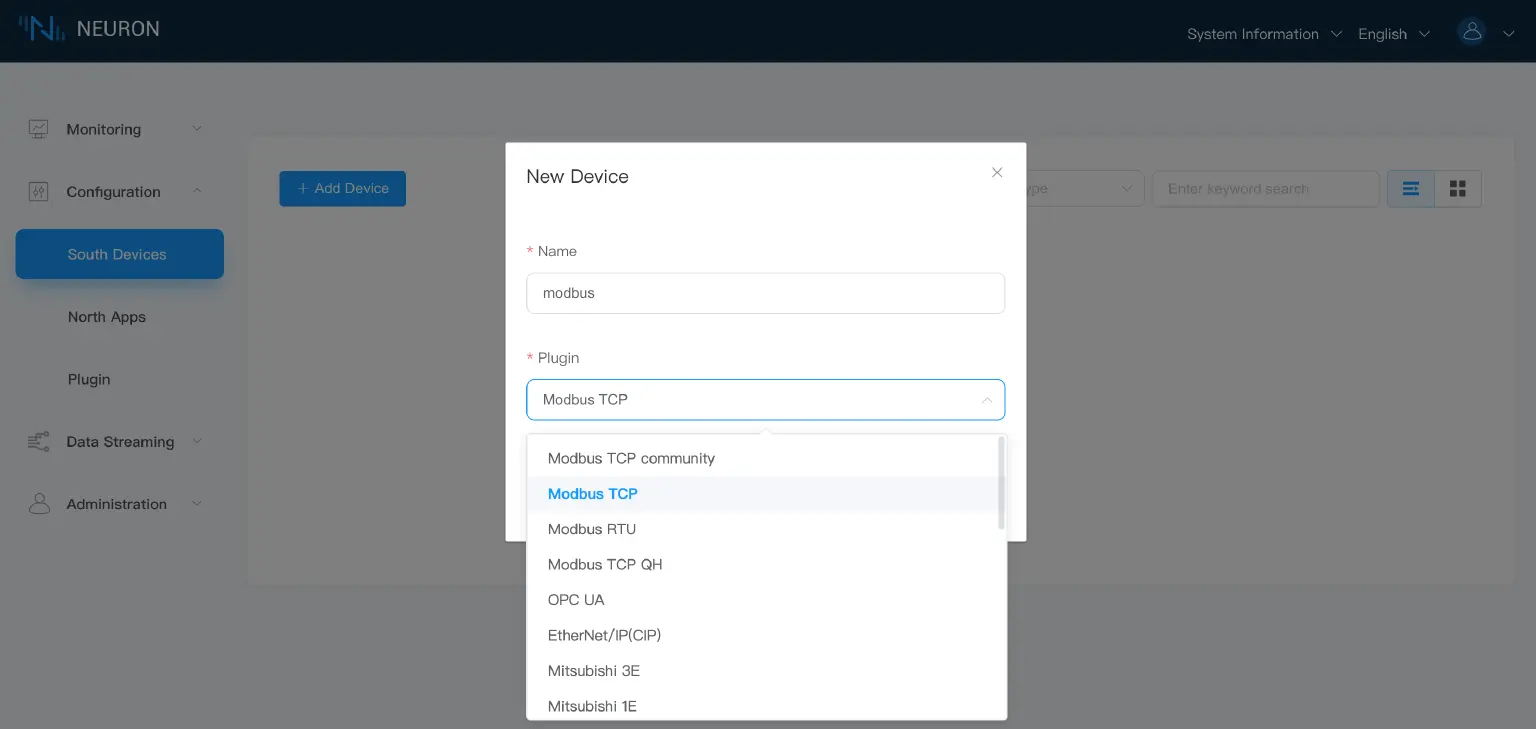
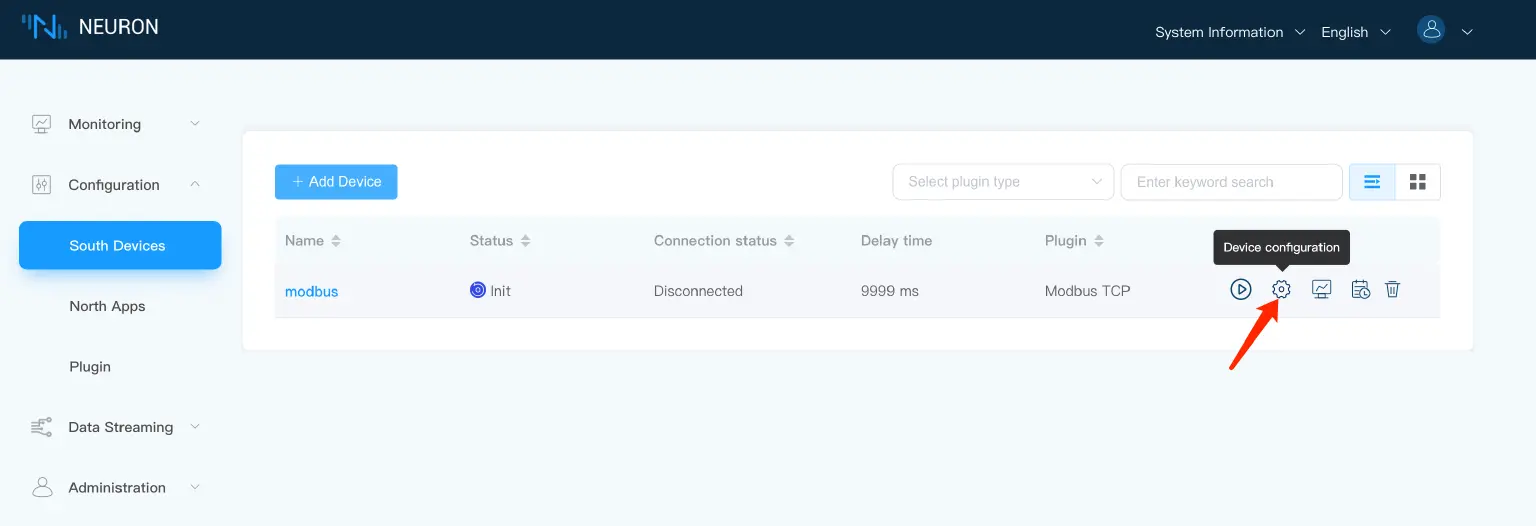
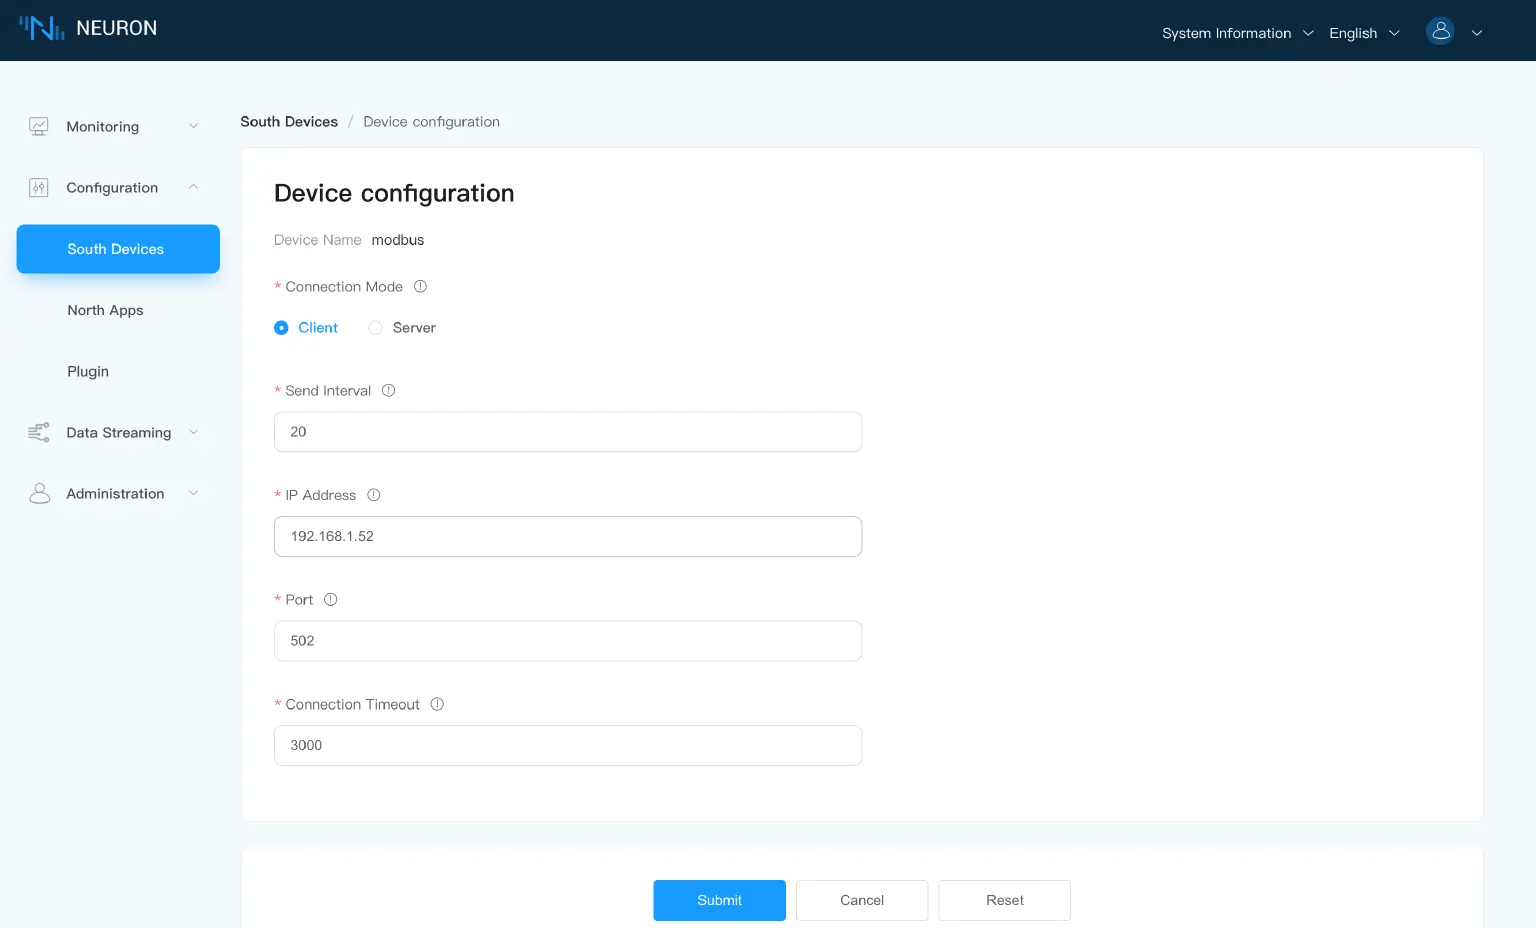
Configure Devices in Neuron
Sparkplug devices are configured with a set of data points that define their capabilities and properties. You can configure Sparkplug devices using the Neuron platform by defining the data points and assigning them to specific devices.
Select the driver plugin module for devices.
Set up the driver parameters for device communication.
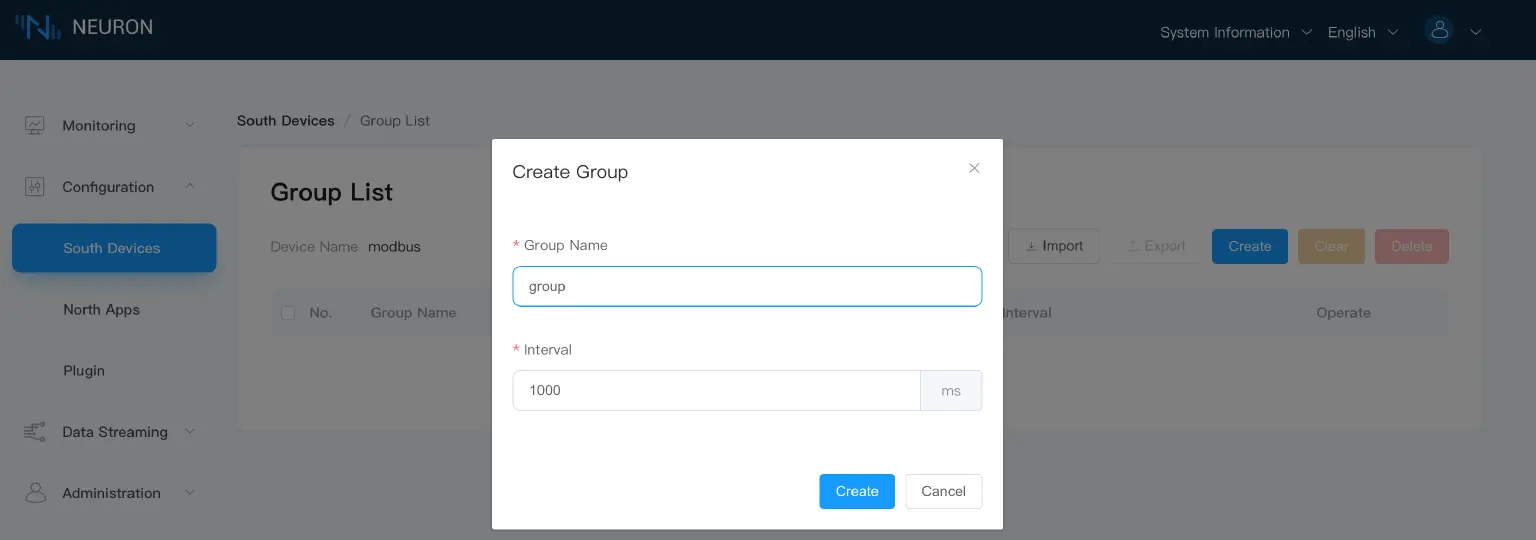
Create Group and set up polling interval.
Add Tags to the Group and set up an address for each Tag.

Connect Neuron to EMQX for MQTT Sparkplug
Once Neuron is installed, you need to connect it to the EMQX broker. You can do this by configuring the MQTT connection settings in Neuron to point to the EMQX broker.
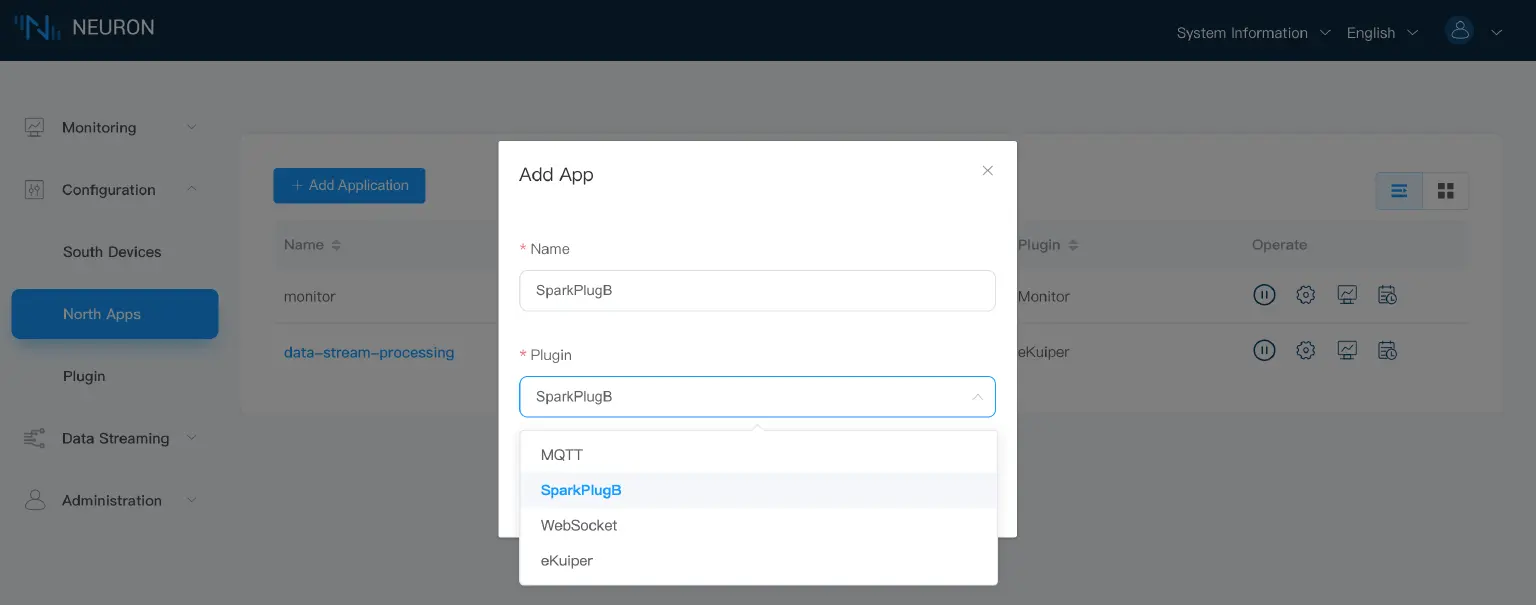
Select the Northbound communication driver (SparkplugB).
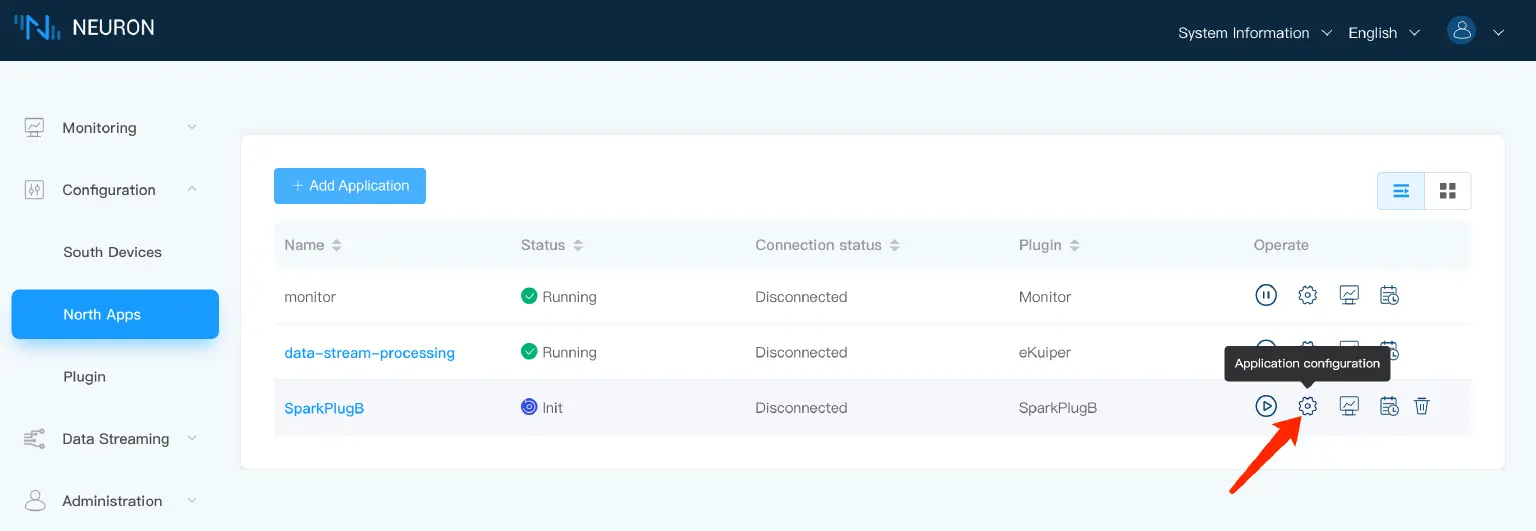
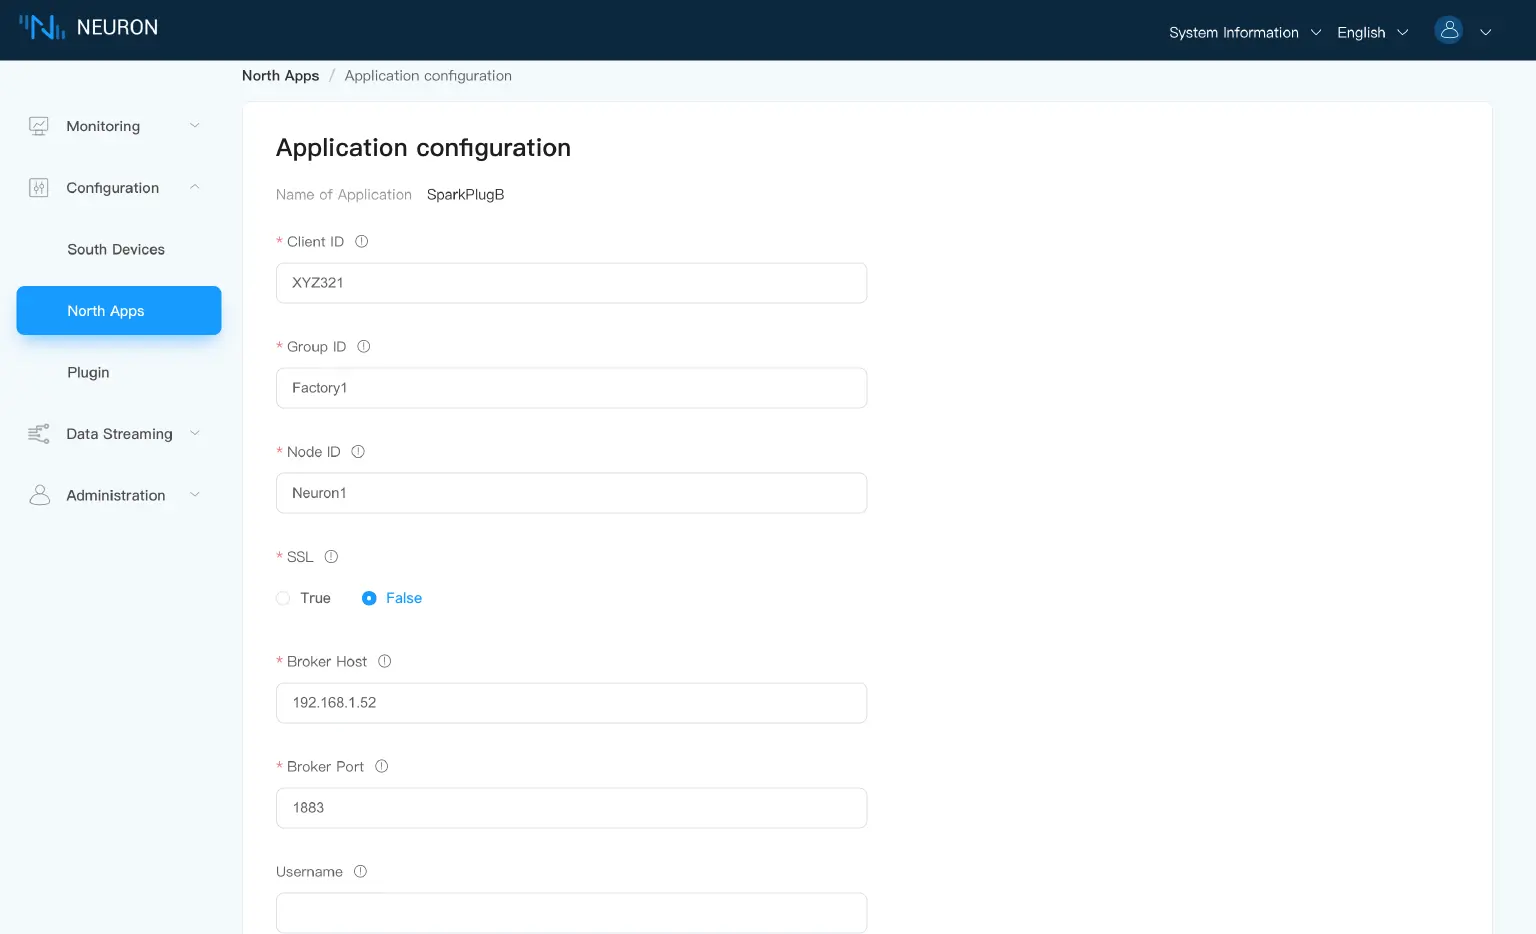
Set up the driver parameters for EMQX connection.
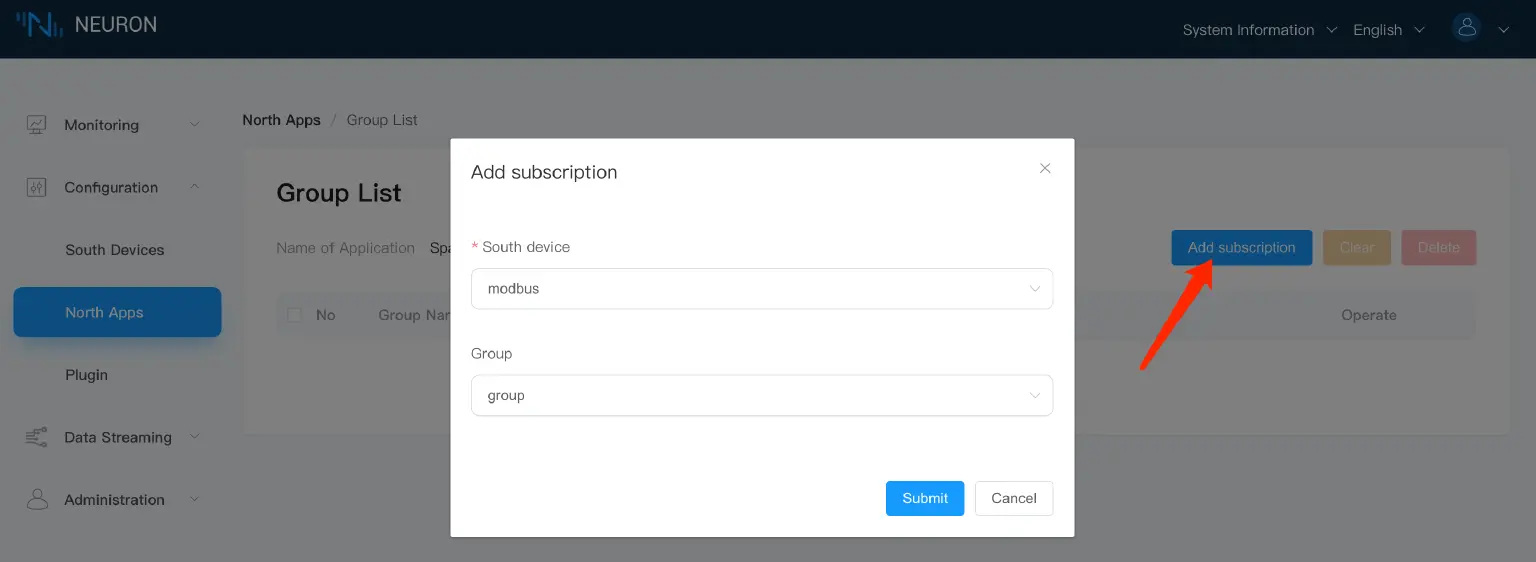
Subscribe to the Group you interested in.
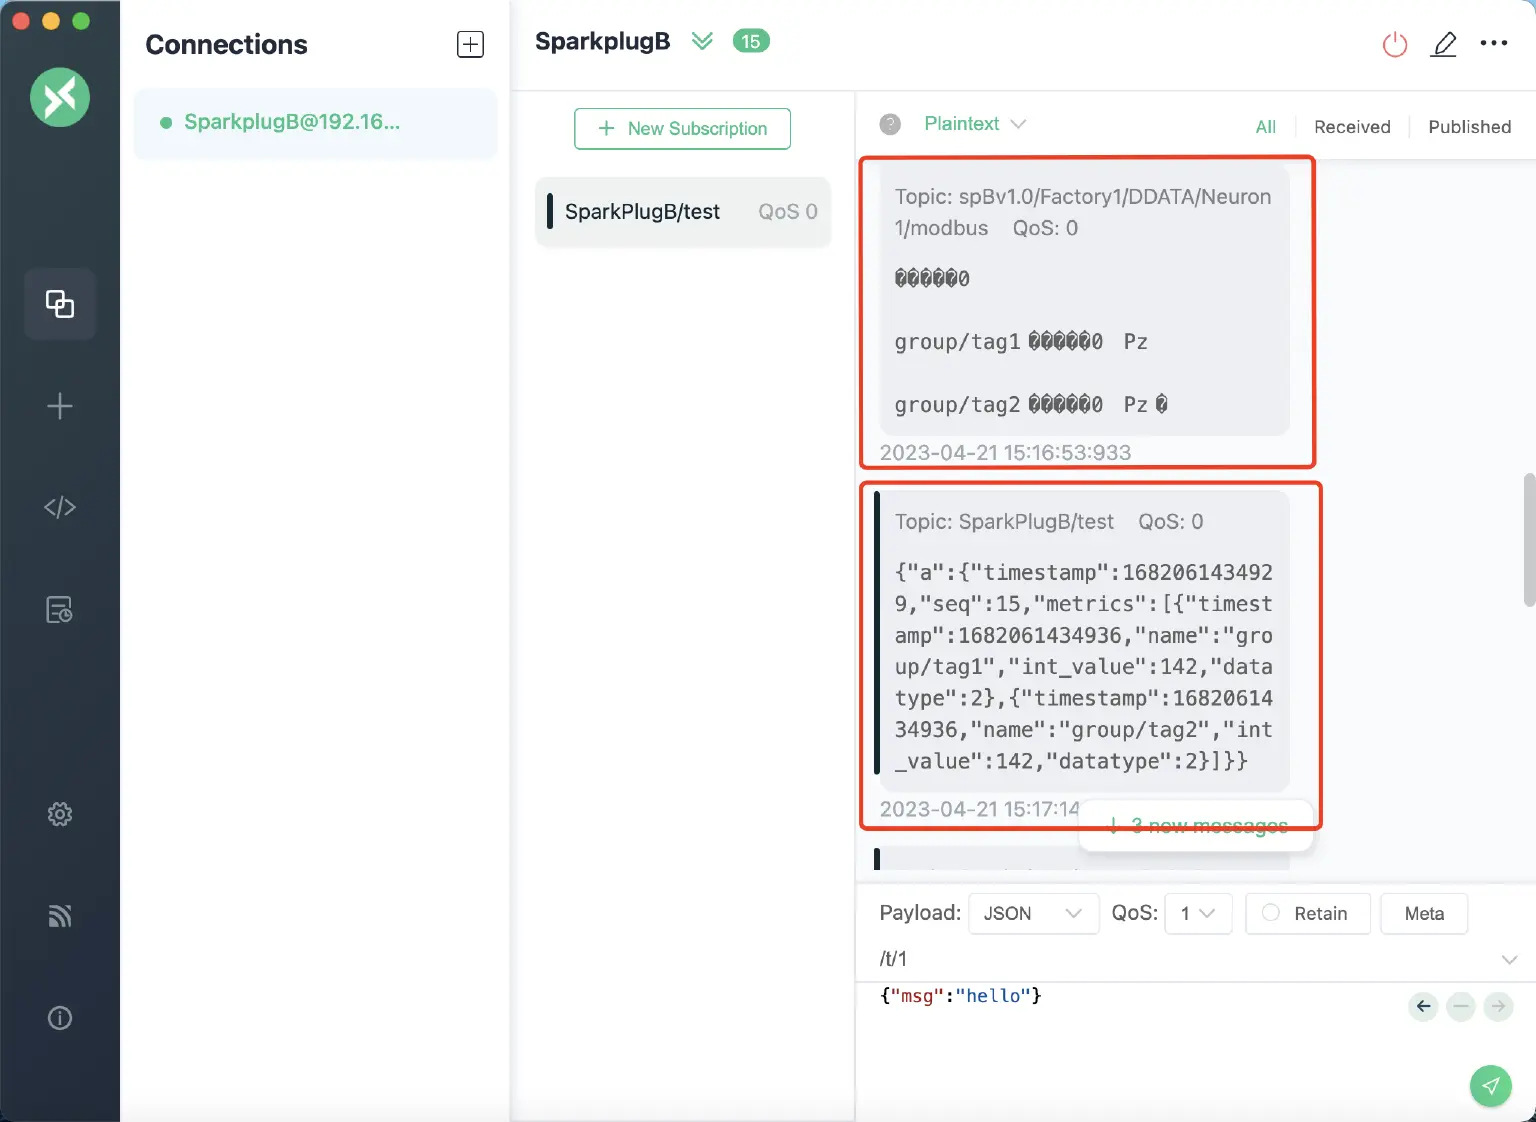
Check up on the Result in MQTTX
With EMQX and Neuron configured and connected, you can now publish and subscribe to Sparkplug data. You can use the Neuron platform to publish data to Sparkplug devices and subscribe to data from those devices.
MQTTX tool is used to subscribe to the data decoded by the codec function of the EMQX rule engine, as shown in the following:
Conclusion
By following these steps, you can get started with MQTT Sparkplug using EMQX and Neuron. Keep in mind that this is just a basic overview, and there are many more advanced features and configurations that you can explore to customize your setup. We highly recommend you explore the powerful features of EMQX and Neuron to accelerate your IIoT development.