How to Use MQTT in C# with MQTTnet
Introduction: C# .NET for IoT and the MQTT Protocol
With the rise of the Internet of Things (IoT), Microsoft's .NET Core has become increasingly popular in building robust IoT applications. .NET Core provides developers with a comprehensive set of tools and libraries for building powerful applications that can run on devices like Raspberry Pi, BeagleBoard, and more.
MQTT is the standard lightweight messaging protocol for IoT, and MQTTnet is the leading, high-performance .NET/C# library that implements the MQTT protocol. It is open source on GitHub and supports advanced features, including the latest MQTT 5.0 protocol and mandatory TLS/SSL security.
This guide provides a comprehensive C# MQTT client tutorial demonstrating how to use the MQTTnet library to establish a secure connection, subscribe, and publish messages to an EMQX Serverless MQTT Broker. The entire working project is available for download at MQTT Client Examples.
Prepare an MQTT Broker
EMQX Serverless is a fully managed, high-availability MQTT Broker offering on the public cloud with all the serverless advantages. It is the perfect backend solution for your C# MQTT applications.
You can start a Serverless deployment in seconds with just a few clicks. Additionally, users receive 1 million free session minutes every month, sufficient for testing and small IoT scenarios.
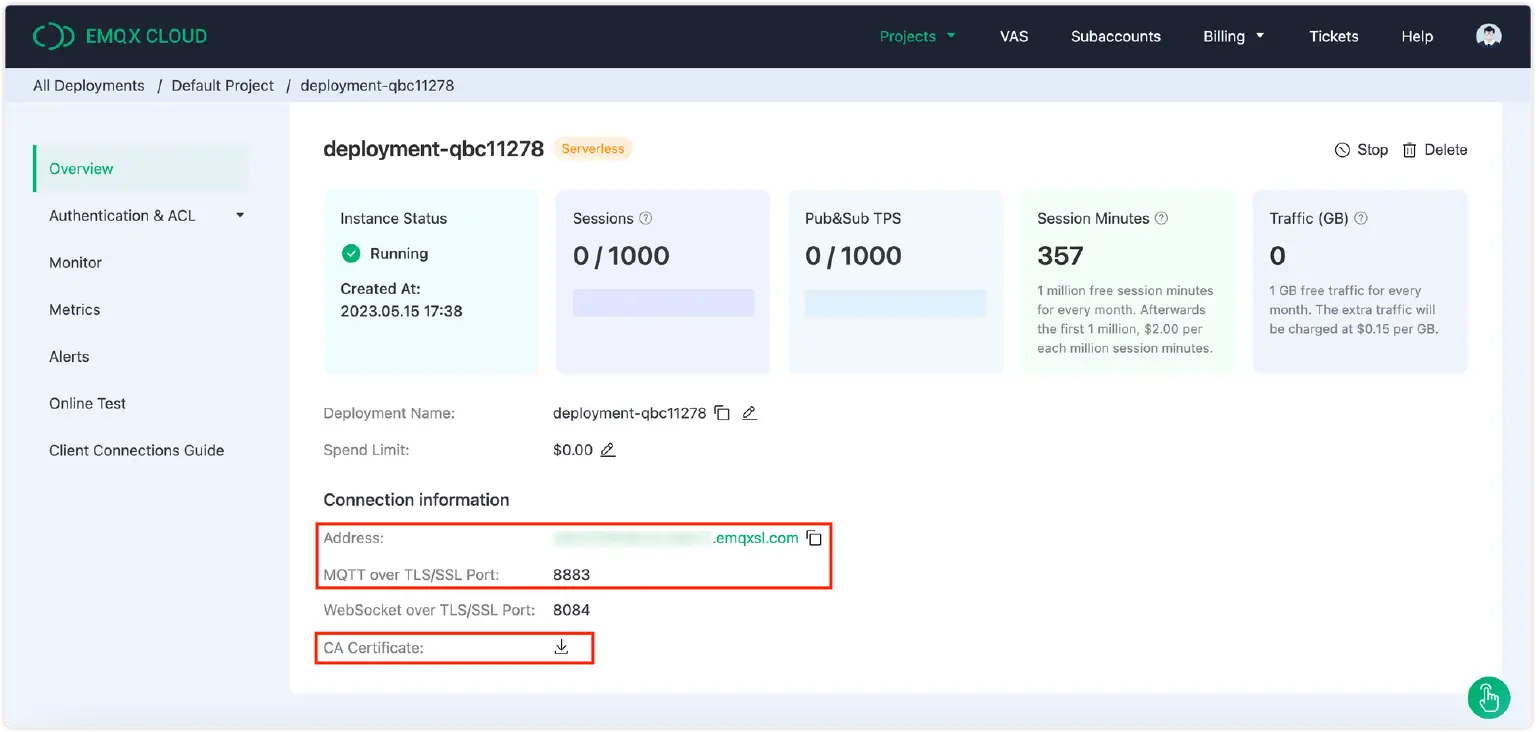
You can follow the guide in this blog to create a serverless deployment for free. Once you have completed the registration process with the online guide, you will get a running instance with the following similar information from the “Overview” in your deployment. We will use the connection information and CA certificate later.
MQTTnet C# Client Implementation Walkthrough
Step 1: Install .Net and Visual Studio
If you haven't installed the .NET environment on your computer yet, you can visit the official Microsoft documentation for detailed instructions.
Visual Studio is a comprehensive IDE for .NET developers that provides a feature-rich environment for developing, debugging, and deploying .NET applications. You can download and install it here, based on your computer's system and version.
Step 2: Install the MQTTnet Package
MQTTnet is delivered via NuGet package manager. To install it, create a Console Application and use NuGet to install the MQTTnet package. For detailed instructions on using NuGet in Visual Studio, refer to the official documentation. If you're using Visual Studio for Mac, refer to install and manage NuGet packages in Visual Studio for Mac.
Step 3: Configuring C# MQTT Client Options with MqttClientOptionsBuilder
To connect to the EMQX Serverless broker, you need to create an instance of the MqttClientOptionsBuilder class and set the necessary options like broker address, port, username, and password. The code snippet below demonstrates how to create an instance of the MqttClientOptionsBuilder:
        string broker = "******.emqxsl.com";
        int port = 8883;
        string clientId = Guid.NewGuid().ToString();
        string topic = "Csharp/mqtt";
        string username = "emqxtest";
        string password = "******";

        // Create a MQTT client factory
        var factory = new MqttFactory();

        // Create a MQTT client instance
        var mqttClient = factory.CreateMqttClient();

        // Create MQTT client options
        var options = new MqttClientOptionsBuilder()
            .WithTcpServer(broker, port) // MQTT broker address and port
            .WithCredentials(username, password) // Set username and password
            .WithClientId(clientId)
            .WithCleanSession()
            .Build();
Please replace the connection parameters with your EMQX connection information and login credentials.
- Broker and port: Obtain the connection address and port information from the server deployment overview page.
- Topic: Topics are used to identify and differentiate between different messages, forming the basis of MQTT message routing.
- Client ID: Every MQTT client must have a unique client ID. You can use
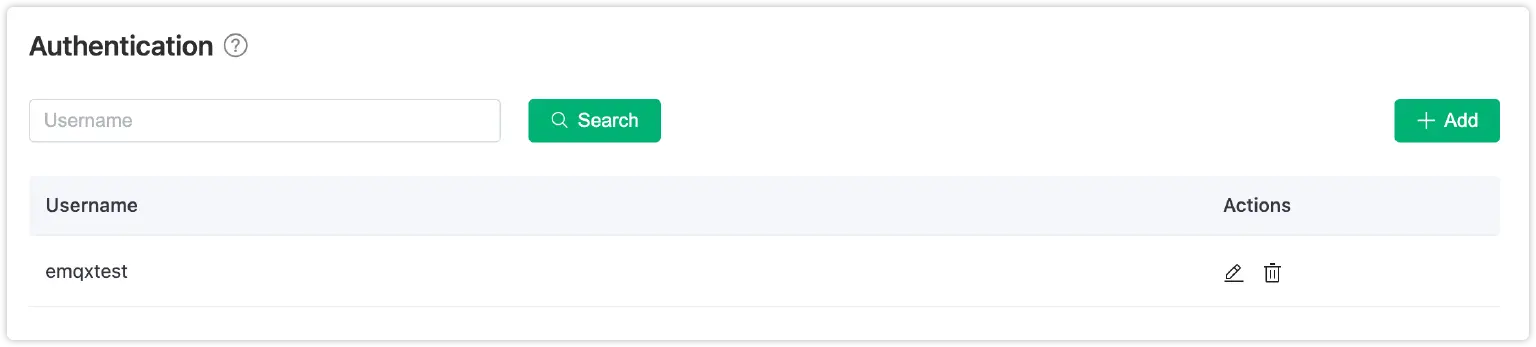
Guid.NewGuid()to generate a new unique identifier in .NET. - Username and password: To establish a client connection, please make sure that you provide the correct username and password. The following image shows how to configure these credentials under 'Authentication & ACL - Authentication' on the server side.
Step 4: Implementing Secure Connection with TLS/SSL in C# MQTTnet
When connecting to a public or multi-tenant MQTT Broker like EMQX Serverless, TLS/SSL is required to ensure secure and reliable data transmission. If the broker uses a self-signed certificate, you must download the CA file and provide it during the connection setup. This section demonstrates the C# MQTT TLS configuration.
To add TLS and set the certificate file to the MqttClientOptionsBuilder instance, you can use WithTls(). The following code snippet shows how to create a TLS instance of MqttClientOptionsBuilder:
        string broker = "******.emqxsl.com";
        int port = 8883;
        string clientId = Guid.NewGuid().ToString();
        string topic = "Csharp/mqtt";
        string username = "emqxtest";
        string password = "******";

        // Create a MQTT client factory
        var factory = new MqttFactory();

        // Create a MQTT client instance
        var mqttClient = factory.CreateMqttClient();

        // Create MQTT client options
        var options = new MqttClientOptionsBuilder()
            .WithTcpServer(broker, port) // MQTT broker address and port
            .WithCredentials(username, password) // Set username and password
            .WithClientId(clientId)
            .WithCleanSession()
            .WithTls(
                o =>
                {
                    // The used public broker sometimes has invalid certificates. This sample accepts all
                    // certificates. This should not be used in live environments.
                    o.CertificateValidationHandler = _ => true;

                    // The default value is determined by the OS. Set manually to force version.
                    o.SslProtocol = SslProtocols.Tls12; ;

                    // Please provide the file path of your certificate file. The current directory is /bin.
                    var certificate = new X509Certificate("/opt/emqxsl-ca.crt", "");
                    o.Certificates = new List<X509Certificate> { certificate };
                }
            )
            .Build();
Step 5: Connect to the MQTT Broker
Now that you have created the MQTT client and set up the connection options, you are ready to connect to the broker. Simply use the PublishAsync method of the MQTT client to establish a connection and start sending and receiving messages.
var connectResult = await mqttClient.ConnectAsync(options);
We utilize asynchronous programming (async/await) in C# .NET to prevent blocking and maintain application responsiveness.
Step 6: Subscribe to Topics
Once connected to the broker, you can verify the success of the connection by checking the value of ResultCode. If the connection is successful, you can subscribe to MQTT topics to receive messages.
if (connectResult.ResultCode == MqttClientConnectResultCode.Success)
        {
            Console.WriteLine("Connected to MQTT broker successfully.");

            // Subscribe to a topic
            await mqttClient.SubscribeAsync(topic);

            // Callback function when a message is received
            mqttClient.ApplicationMessageReceivedAsync += e =>
            {
                Console.WriteLine($"Received message: {Encoding.UTF8.GetString(e.ApplicationMessage.PayloadSegment)}");
                return Task.CompletedTask;
            };
Within this function, you can also print the the corresponding received messages. This allows you to view and process the received data as needed.
Step 7: Publish Messages
To send messages to the broker, use the PublishAsync method of the MQTT client. Here is an example for sending messages to the broker in a loop, with one message sent every second:
for (int i = 0; i < 10; i++)
            {
                var message = new MqttApplicationMessageBuilder()
                    .WithTopic(topic)
                    .WithPayload($"Hello, MQTT! Message number {i}")
                    .WithQualityOfServiceLevel(MqttQualityOfServiceLevel.AtLeastOnce)
                    .WithRetainFlag()
                    .Build();

                await mqttClient.PublishAsync(message);
                await Task.Delay(1000); // Wait for 1 second
            }
Step 8: Unsubscribe and Disconnect
To unsubscribe, call:
await mqttClient.UnsubscribeAsync(topic);
await mqttClient.DisconnectAsync();
Full C# MQTT Client Example Code using MQTTnet
The following code shows the complete implementation for connecting, subscribing, and publishing messages using the MQTTnet C# library.
For a complete demonstration of all functions, see the project's GitHub repository.
using System.Security.Authentication;
using System.Security.Cryptography.X509Certificates;
using System.Text;
using MQTTnet;
using MQTTnet.Client;
using MQTTnet.Protocol;

class Program
{
    static async Task Main(string[] args)
    {
        string broker = '******.emqxsl.com';
        int port = 8883;
        string clientId = Guid.NewGuid().ToString();
        string topic = "Csharp/mqtt";
        string username = 'emqxtest';
        string password = '**********';

        // Create a MQTT client factory
        var factory = new MqttFactory();

        // Create a MQTT client instance
        var mqttClient = factory.CreateMqttClient();

        // Create MQTT client options
        var options = new MqttClientOptionsBuilder()
            .WithTcpServer(broker, port) // MQTT broker address and port
            .WithCredentials(username, password) // Set username and password
            .WithClientId(clientId)
            .WithCleanSession()
            .WithTls(
                o =>
                {
                    // The used public broker sometimes has invalid certificates. This sample accepts all
                    // certificates. This should not be used in live environments.
                    o.CertificateValidationHandler = _ => true;

                    // The default value is determined by the OS. Set manually to force version.
                    o.SslProtocol = SslProtocols.Tls12;

                    // Please provide the file path of your certificate file. The current directory is /bin.
                    var certificate = new X509Certificate("/opt/emqxsl-ca.crt", "");
                    o.Certificates = new List<X509Certificate> { certificate };
                }
            )
            .Build();

        // Connect to MQTT broker
        var connectResult = await mqttClient.ConnectAsync(options);

        if (connectResult.ResultCode == MqttClientConnectResultCode.Success)
        {
            Console.WriteLine("Connected to MQTT broker successfully.");

            // Subscribe to a topic
            await mqttClient.SubscribeAsync(topic);

            // Callback function when a message is received
            mqttClient.ApplicationMessageReceivedAsync += e =>
            {
                Console.WriteLine($"Received message: {Encoding.UTF8.GetString(e.ApplicationMessage.PayloadSegment)}");
                return Task.CompletedTask;
            };

            // Publish a message 10 times
            for (int i = 0; i < 10; i++)
            {
                var message = new MqttApplicationMessageBuilder()
                    .WithTopic(topic)
                    .WithPayload($"Hello, MQTT! Message number {i}")
                    .WithQualityOfServiceLevel(MqttQualityOfServiceLevel.AtLeastOnce)
                    .WithRetainFlag()
                    .Build();

                await mqttClient.PublishAsync(message);
                await Task.Delay(1000); // Wait for 1 second
            }

            // Unsubscribe and disconnect
            await mqttClient.UnsubscribeAsync(topic);
            await mqttClient.DisconnectAsync();
        }
        else
        {
            Console.WriteLine($"Failed to connect to MQTT broker: {connectResult.ResultCode}");
        }
    }
}
Testing and Verification
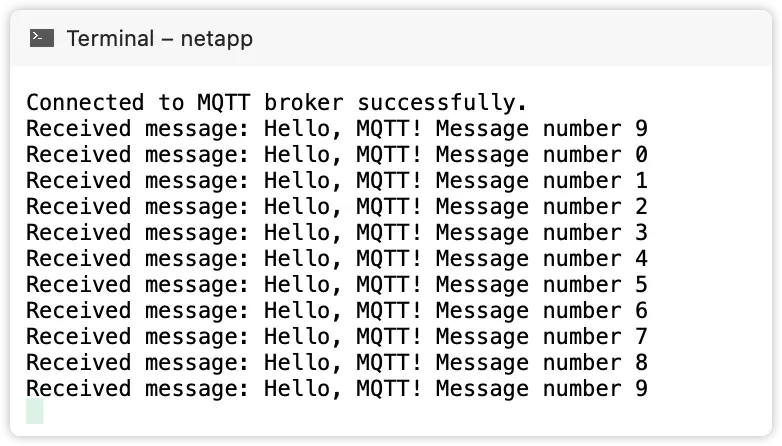
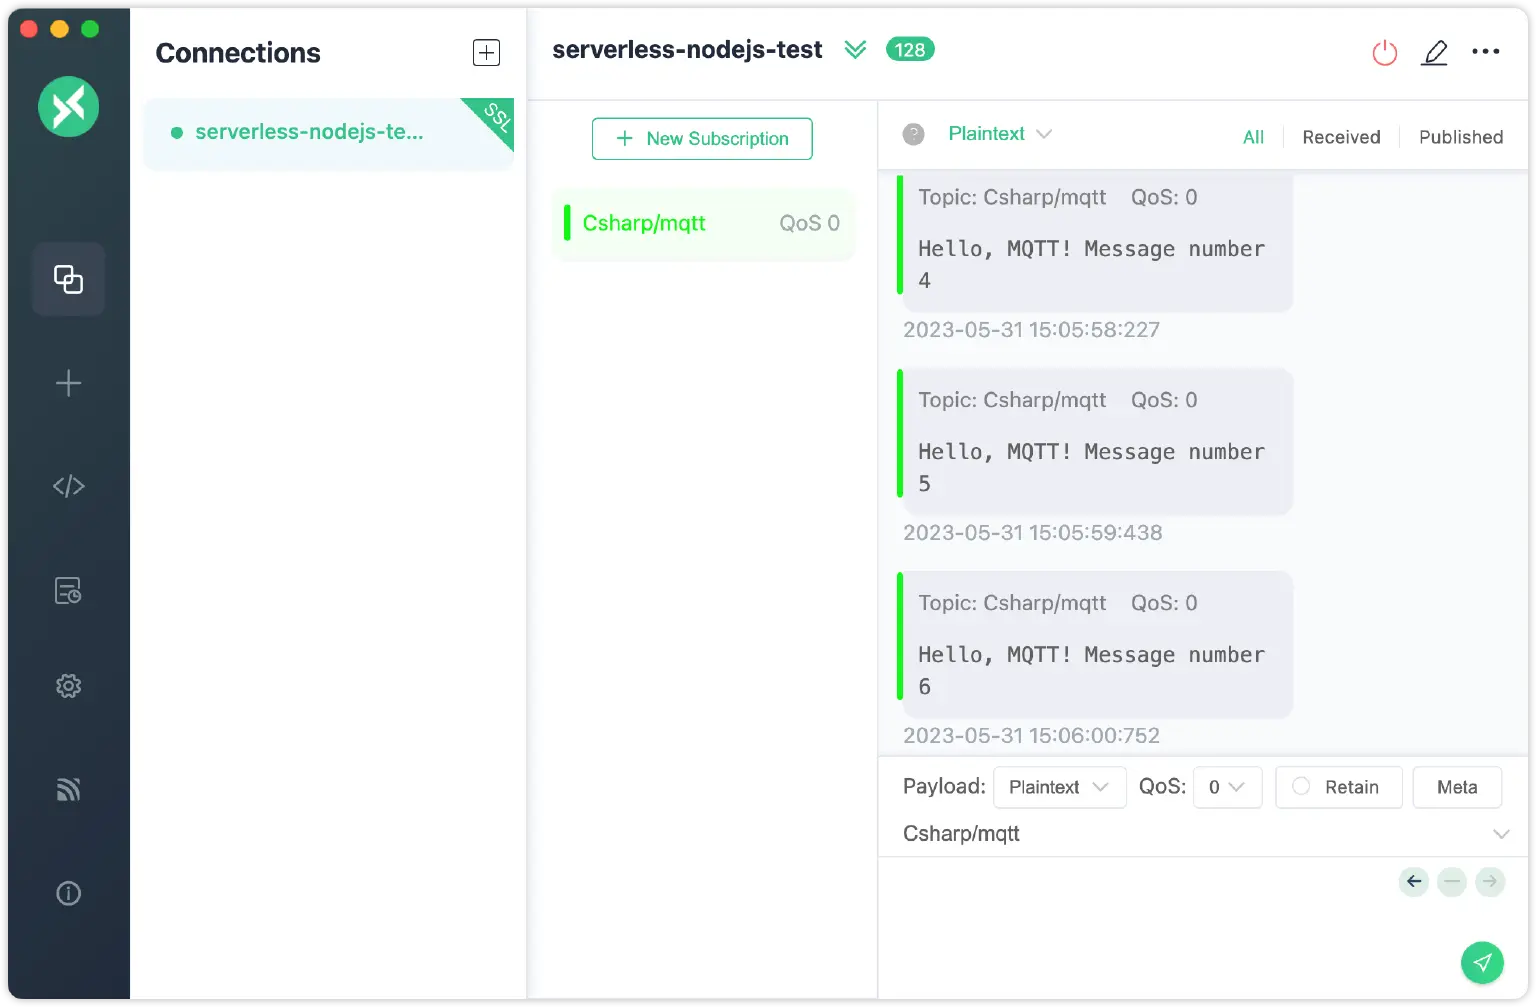
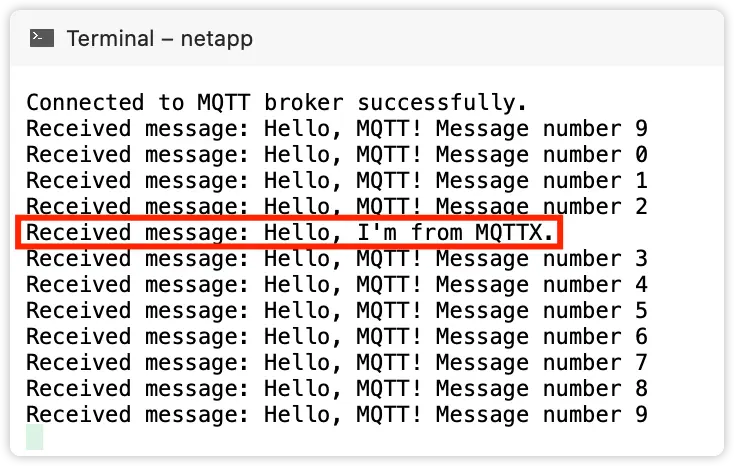
Run the project in Visual Studio. We can see the output information on the terminal window as follows. The client has successfully connected to the MQTT broker, and received a message every second.
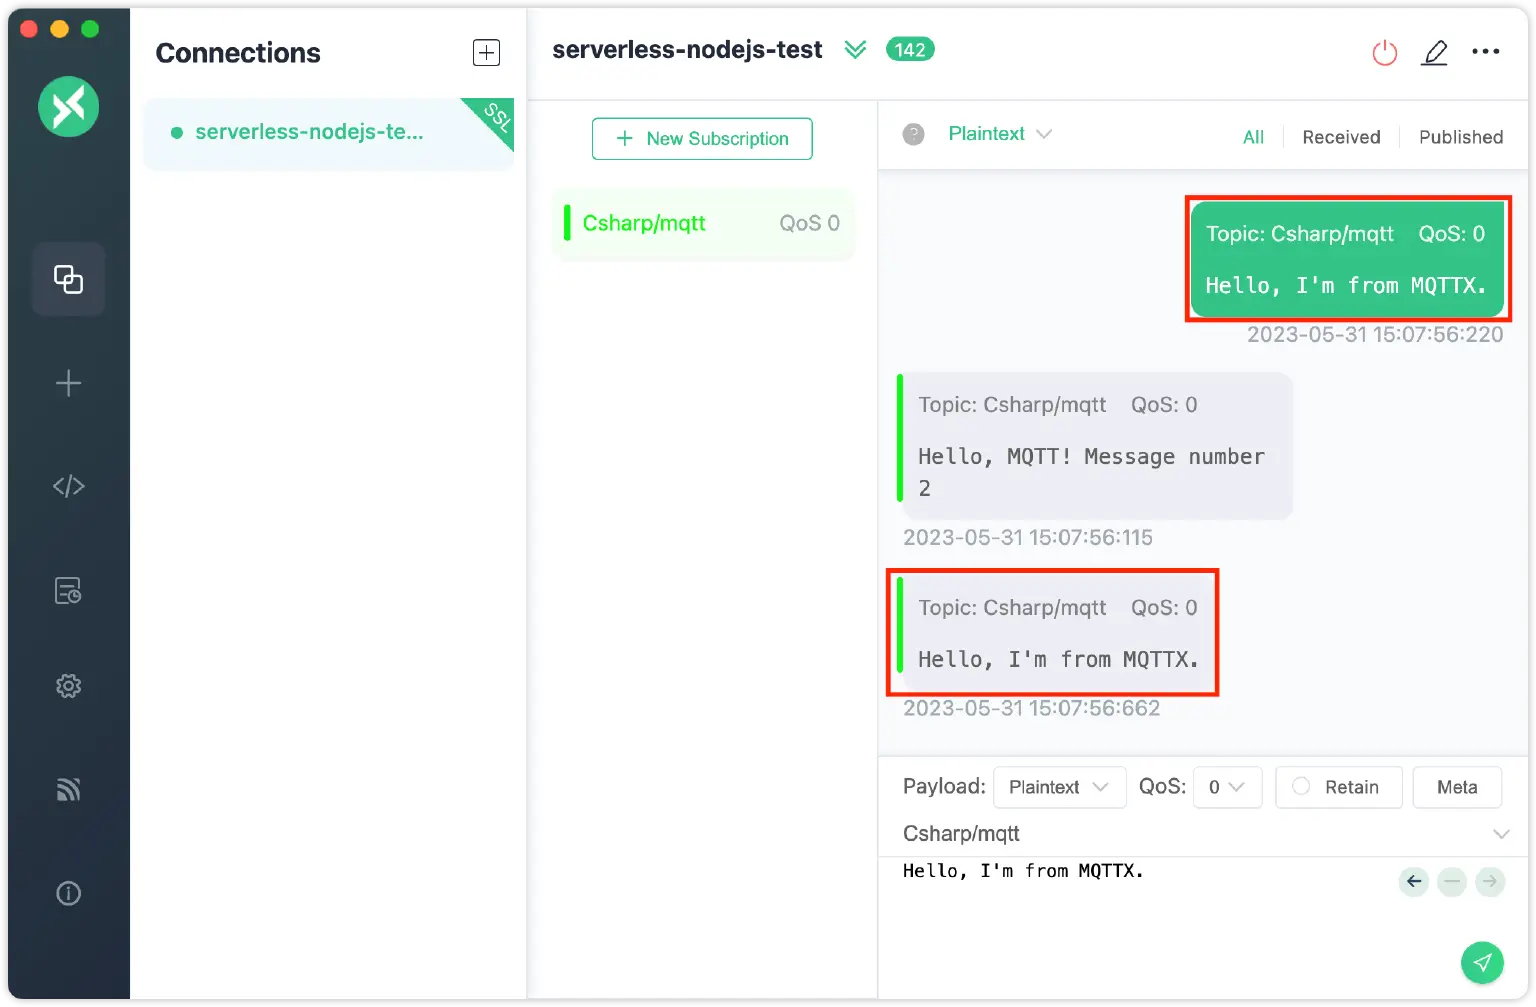
You can also use MQTT Client Tool - MQTTX as another client for the message publishing and receiving the test. If you subscribe the “Csharp/mqtt" topic in MQTTX, you will receive the message every second.
When you publish a message to the topic, the server will receive the message and you can view it both on MQTTX and in the console.
FAQ
Q1: What is the main difference between MQTTnet and other C# MQTT libraries?
A: MQTTnet is widely recognized for its robust support of the modern MQTT 5.0 protocol and its high-performance, asynchronous design, making it the preferred choice for building scalable C# MQTT clients and brokers on the .NET platform.
Q2: How should I handle disconnects and automatic reconnection in my C# MQTTnet application?
A: You should listen for the mqttClient.DisconnectedAsync event. Within this handler, implement a delayed retry mechanism (often with exponential backoff) and call mqttClient.ConnectAsync() again. This is crucial for maintaining reliability in any production C# IoT application.
Q3: Why is TLS/SSL required when connecting my C# client to EMQX Serverless?
A: TLS/SSL is required to ensure that all data transmitted between your C# client and the EMQX Broker is encrypted. This is a standard security requirement for public cloud and multi-tenant MQTT Broker services to protect your credentials and payload data from interception.
Q4: Is QoS 1 (At Least Once) the recommended setting for all C# MQTT publishing?
A: Not always. QoS 1 (At Least Once) ensures delivery but may result in duplicate messages. If your C# MQTT application requires minimal latency and can tolerate occasional loss (e.g., sensor readings), QoS 0 (At Most Once) is faster. If you need strict, guaranteed delivery with no duplicates, use QoS 2 (Exactly Once), though it incurs the highest overhead.
Summary
This guide provided a detailed, step-by-step walkthrough for building a secure C# MQTT client using the powerful MQTTnet library and connecting to the EMQX Serverless MQTT Broker. You have now successfully created a .NET application capable of publishing and subscribing to secure MQTT topics.