Connecting to Serverless MQTT Broker with Paho Java

Serverless architecture in cloud computing allows developers to focus on code development and deployment without the hassle of infrastructure management. Serverless MQTT, in particular, provides an MQTT messaging service that scales automatically based on demand, reducing the need for manual intervention.
To learn more about serverless MQTT, read our blog post Next-Gen Cloud MQTT Service: Meet EMQX Cloud Serverless. In this blog series, we'll guide you through using various client libraries to set up MQTT connections, subscriptions, messaging, and more with a serverless MQTT broker for your specific project.
Introduction
Java is widely used in IoT devices, including low-power sensors and microcontrollers. It provides a rich set of libraries and frameworks for building IoT applications, as well as robust support for networking and concurrency.
One useful library is the Paho Java Client, an MQTT client library that enables the development of applications for the JVM or other Java-compatible platforms such as Android. This blog will use the Paho Java Client to connect a serverless MQTT broker. The whole project can be downloaded at MQTT Client Examples.
Free Serverless MQTT Broker
EMQX Cloud Serverless is the latest MQTT Broker offering on the public cloud with all the serverless advantages. You can start the Serverless deployment in seconds with just a few clicks. Additionally, users can get 1 million free session minutes every month, sufficient for 23 devices to be online for a whole month, making it perfect for tiny IoT test scenarios.
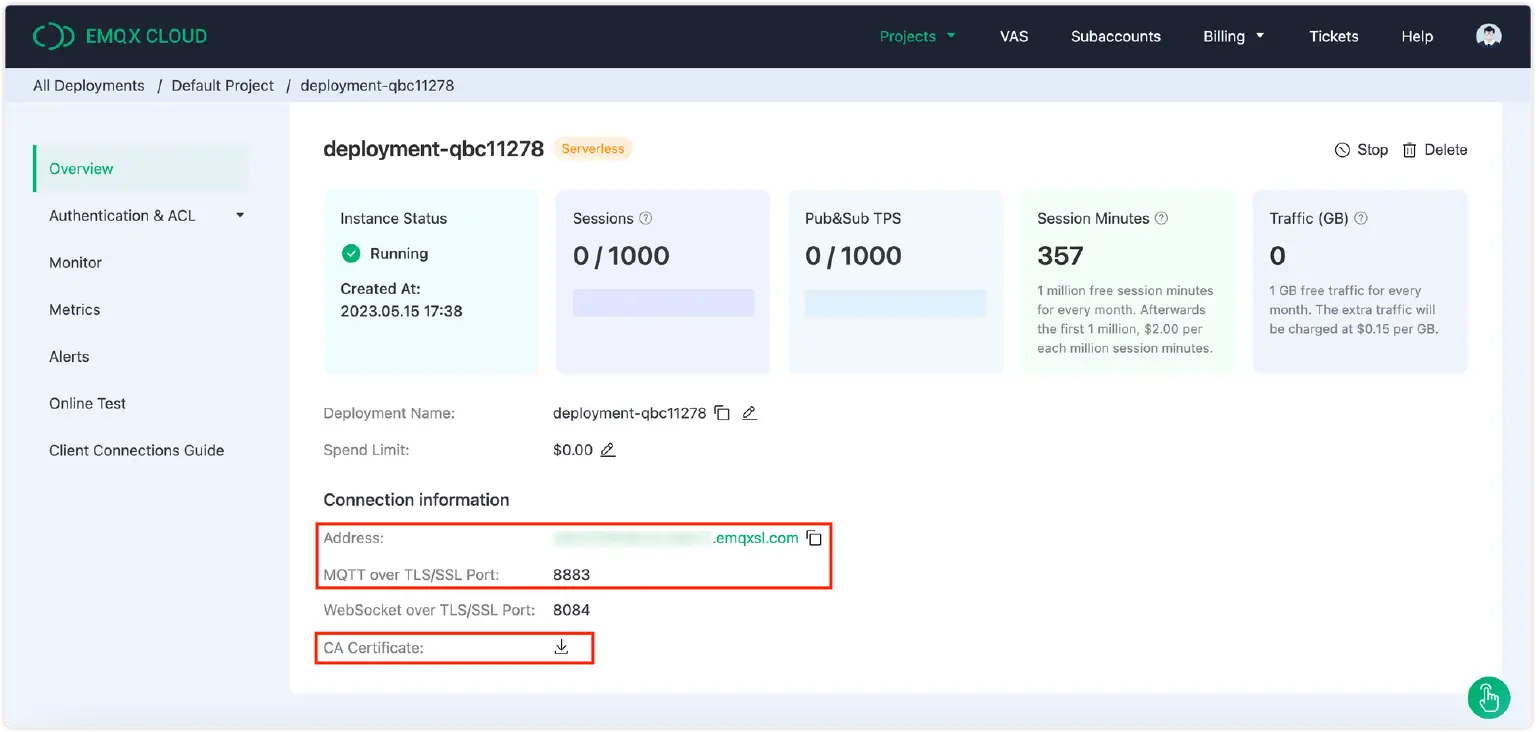
If you have not tried serverless deployment yet, please follow the guide in this blog to create one for free. Once you have completed the registration process with the online guide, you will get a running instance with the following similar information from the “Overview” in your deployment. We will use the connection information and CA certificate later.
Connection Code Demo
1. Install JDK, Apache Maven and Intellij IDEA
If you don’t have a Java environment on your computer yet, please download and install JDK.
Apache Maven is a software project management and comprehension tool. In this project, we use Maven as the build tool. You can follow the instruction to install it.
We use Intellij IDEA as the IDE. You can download it here and install it with just a few simple clicks.
2. Add MQTT dependency
To use the Paho Java Client library in your Java application, add the following dependency to the pom.xml file:
<dependency>
    <groupId>org.eclipse.paho</groupId>
    <artifactId>org.eclipse.paho.client.mqttv3</artifactId>
    <version>1.2.5</version>
</dependency>
3. Create a MqttConnectionOptions object
The MqttConnectionOptions object is used to set the various options for the MQTT connection. You can set options such as the username and password.
    private static final String USERNAME = "emqxtest";
    private static final String PASSWORD = "*******";
    private static final int CONNECT_TIMEOUT = 300;
    private static final boolean CLEAN_SESSION = true;

    MqttConnectOptions options = new MqttConnectOptions();
      options.setUserName(USERNAME);
      options.setPassword(PASSWORD.toCharArray());
      options.setConnectionTimeout(CONNECT_TIMEOUT);
      options.setCleanSession(CLEAN_SESSION);
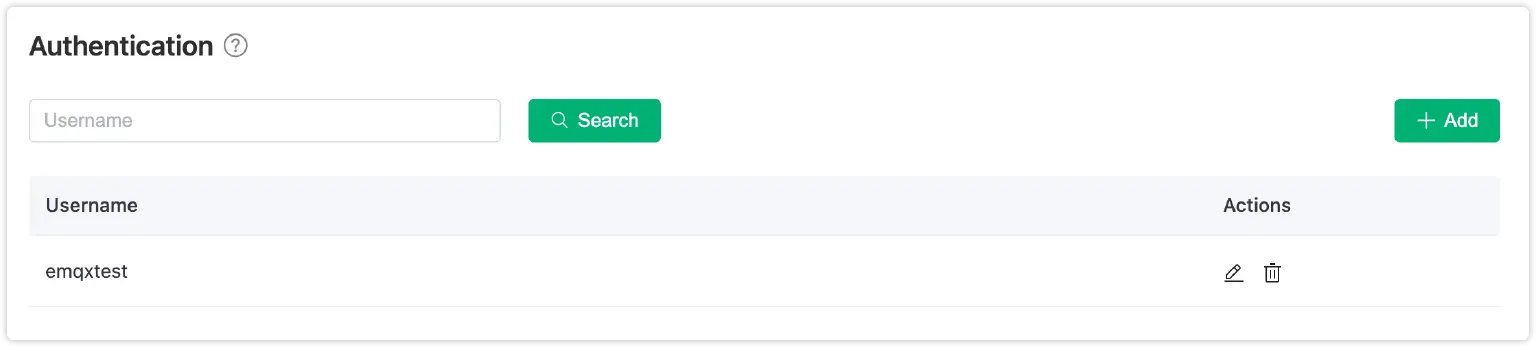
- Username and password: To establish a client connection, please make sure that you provide the correct username and password. The following image shows how to configure these credentials under 'Authentication & ACL - Authentication' on the server side.
4. Using TLS/SSL
When connecting to EMQX Serverless, it is important to note that it relies on a multi-tenant architecture, which enables multiple users to share a single EMQX cluster. In order to ensure the security and reliability of data transmission within this multi-tenant environment, TLS is required.
To set up an SSL/TLS connection, create an instance of SSLSocketFactory and set it as the socket factory for the MQTT client. If the server is utilizing a self-signed certificate, download the corresponding CA file from the deployment overview panel and provide it during the connection setup process.
//configure the CA file
private static final String CA_CERT_PATH = EmqxTlsExample.class.getResource("/broker.emqx.io-ca.crt").getPath();
options.setSocketFactory(getSocketFactory(CA_CERT_PATH));
//
public static SSLSocketFactory getSocketFactory(String caCertPath) throws Exception {
        CertificateFactory certFactory = CertificateFactory.getInstance("X.509");

        // load CA certificate into keystore to authenticate server
        Certificate caCert = certFactory.generateCertificate(new FileInputStream(caCertPath));
        X509Certificate x509CaCert = (X509Certificate) caCert;

        KeyStore caKeyStore = KeyStore.getInstance(KeyStore.getDefaultType());
        caKeyStore.load(null, null);
        caKeyStore.setCertificateEntry("cacert", x509CaCert);

        TrustManagerFactory tmFactory = TrustManagerFactory.getInstance(TrustManagerFactory.getDefaultAlgorithm());
        tmFactory.init(caKeyStore);

        SSLContext sslContext = SSLContext.getInstance("TLSv1.2");
        sslContext.init(null, tmFactory.getTrustManagers(), null);

        return sslContext.getSocketFactory();
    }
For project configuration, you need to add bcpkix-jdk15on to the pom.xml file.
    <!-- https://mvnrepository.com/artifact/org.bouncycastle/bcpkix-jdk15on -->
    <dependency>
        <groupId>org.bouncycastle</groupId>
        <artifactId>bcpkix-jdk15on</artifactId>
        <version>1.70</version>
    </dependency>
5. Create an MqttClient Object
The MqttClient object is used for connecting to the EMQ X Cloud Serverless broker. To create an MqttClient object, you need to pass in the broker address, port, and client ID.
private static final String BROKER = "******.emqxsl.com";
private static final String PORT = "8883";
private static final String CLIENT_ID = MqttClient.generateClientId();
private static final String TOPIC = "java-mqtt/tls";

String server = "ssl://" + BROKER + ":" + PORT;
client = new MqttClient(server, CLIENT_ID);
- Broker and port: Obtain the connection address and port information from the server deployment overview page.
- Client ID: Every MQTT client must have a unique client ID. You can use the MqttClient.generateClientId() function in the Phao Java library to generate a new unique identifier.
- Topic: Topics are used to identify and differentiate between different messages, forming the basis of MQTT message routing. It will be used when subscribing and publishing.
6. Connect to the broker
Now that you have created the MQTT client and set up the connection options, you are ready to connect to the broker. Simply use the connect method of the MQTT client to establish a connection and start sending and receiving messages.
client.subscribe(TOPIC, QoS);
System.out.println("Subscribed to topic: " + TOPIC);
7. Subscribe to topics
Set the topic for subscription and the QoS Level of the topic.
MqttMessage msg = new MqttMessage(PAYLOAD.getBytes());
msg.setQos(QoS);
client.publish(TOPIC, msg);
System.out.println("Message published");
8. Publish messages
Inform MQTT Broker about the topic and payload when publishing messages.
client.setCallback(new MqttCallback() {

    public void connectionLost(Throwable cause) {
        System.out.println(MessageFormat.format("Connection lost. Cause: {0}", cause));
    }

    public void messageArrived(String topic, MqttMessage message) throws Exception {
        System.out.println(MessageFormat.format("Callback: received message from topic {0}: {1}",
                topic, message.toString()));
    }

    public void deliveryComplete(IMqttDeliveryToken token) {
        try {
            System.out.println(MessageFormat.format("Callback: delivered message to topics {0}",
                    Arrays.asList(token.getTopics())));
        } catch (Exception e) {
            e.printStackTrace();
        }
    }
}
9. Receive Messages
This code sets up an event listener for incoming messages in the MQTT client. When a message is received, it triggers a callback function that prints the message content and topic to the console.
client.setcallback(new mqttcallback() {

    public void connectionlost(throwable cause) {
        system.out.println(messageformat.format("connection lost. cause: {0}", cause));
    }

    public void messagearrived(string topic, mqttmessage message) throws exception {
        system.out.println(messageformat.format("callback: received message from topic {0}: {1}",
                topic, message.tostring()));
    }

    public void deliverycomplete(imqttdeliverytoken token) {
        try {
            system.out.println(messageformat.format("callback: delivered message to topics {0}",
                    arrays.aslist(token.gettopics())));
        } catch (exception e) {
            e.printstacktrace();
        }
    }
}
10. Unsubscribe to Topics
Use the following codes to unsubscribe to topics.
client.unsubscribe(topic);
11. Disconnect
To disconnect, call:
System.out.println("Disconnect from broker: " + server);
client.disconnect();
Test
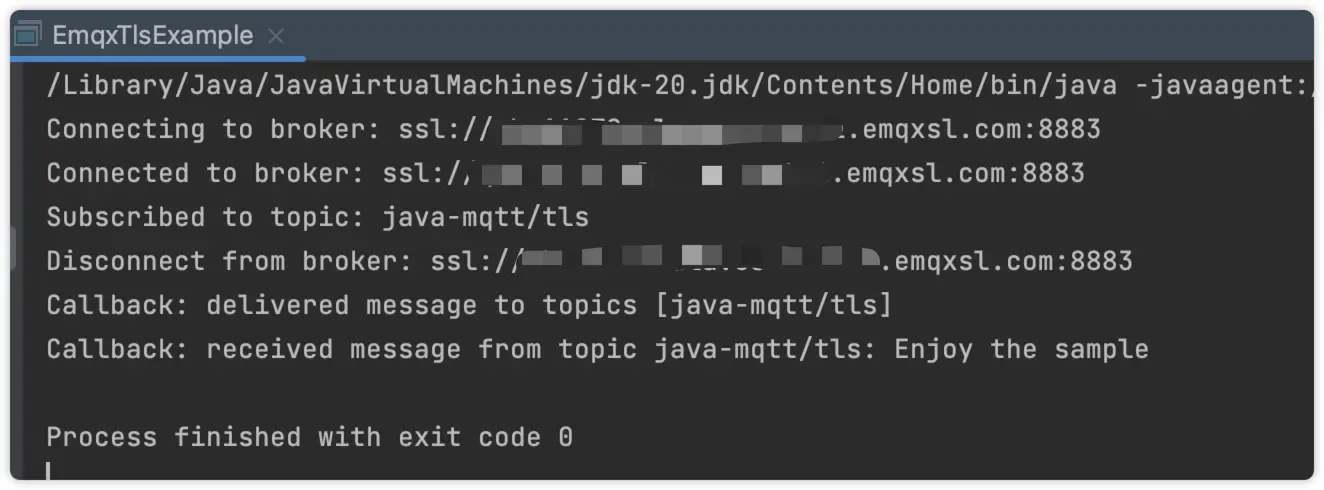
Run the project in IntelliJ IEDA, we can see the output information as follows. The client has successfully connected to the MQTT broker. After the connection was disconnected, the received message was printed through the callback function.
Complete Code
The following code shows how to connect to the server, subscribe to topics, and publish and receive messages. For a complete demonstration of all functions, see the project's GitHub repository.
package io.emqx.mqtt;

import org.eclipse.paho.client.mqttv3.*;

import javax.net.ssl.SSLContext;
import javax.net.ssl.SSLSocketFactory;
import javax.net.ssl.TrustManagerFactory;
import java.io.FileInputStream;
import java.security.*;
import java.security.cert.Certificate;
import java.security.cert.CertificateFactory;
import java.security.cert.X509Certificate;
import java.text.MessageFormat;
import java.util.Arrays;

public class EmqxTlsExample {
    private static final String BROKER = "qbc11278.ala.us-east-1.emqxsl.com";
    private static final String PORT = "8883";
    private static final String CLIENT_ID = MqttClient.generateClientId();
    private static final String USERNAME = "emqxtest";
    private static final String PASSWORD = "123456";
    private static final int CONNECT_TIMEOUT = 300;
    private static final boolean CLEAN_SESSION = true;
    private static final String TOPIC = "java-mqtt/tls";
    private static final int QoS = 1;
    private static final String PAYLOAD = "Enjoy the sample";
    private static final String CA_CERT_PATH = EmqxTlsExample.class.getResource("/broker.emqx.io-ca.crt").getPath();

    public static void main(String args[]) {
        MqttClient client = null;
        try {
            String server = "ssl://" + BROKER + ":" + PORT;
            client = new MqttClient(server, CLIENT_ID);

            client.setCallback(new MqttCallback() {

                @Override
                public void connectionLost(Throwable cause) {
                    System.out.println(MessageFormat.format("Connection lost. Cause: {0}", cause));
                }

                @Override
                public void messageArrived(String topic, MqttMessage message) throws Exception {
                    System.out.println(MessageFormat.format("Callback: received message from topic {0}: {1}",
                            topic, message.toString()));
                }

                @Override
                public void deliveryComplete(IMqttDeliveryToken token) {
                    try {
                        System.out.println(MessageFormat.format("Callback: delivered message to topics {0}",
                                Arrays.asList(token.getTopics())));
                    } catch (Exception e) {
                        e.printStackTrace();
                    }
                }

            });

            MqttConnectOptions options = new MqttConnectOptions();
            options.setUserName(USERNAME);
            options.setPassword(PASSWORD.toCharArray());
            options.setConnectionTimeout(CONNECT_TIMEOUT);
            options.setCleanSession(CLEAN_SESSION);
            options.setSocketFactory(getSocketFactory(CA_CERT_PATH));

            System.out.println("Connecting to broker: " + server);
            client.connect(options);

            if (!client.isConnected()) {
                System.out.println("Failed to connect to broker: " + server);
                return;
            }
            System.out.println("Connected to broker: " + server);

            client.subscribe(TOPIC, QoS);
            System.out.println("Subscribed to topic: " + TOPIC);

            MqttMessage msg = new MqttMessage(PAYLOAD.getBytes("UTF-8"));
            msg.setQos(QoS);
            client.publish(TOPIC, msg);

            System.out.println("Disconnect from broker: " + server);
            client.disconnect();
        } catch (Exception ex) {
            ex.printStackTrace();
        } finally {
            if (client != null) {
                try {
                    client.close();
                } catch (MqttException e) {
                    e.printStackTrace();
                }
            }
        }
    }

    public static SSLSocketFactory getSocketFactory(String caCertPath) throws Exception {
        CertificateFactory certFactory = CertificateFactory.getInstance("X.509");

        // load CA certificate into keystore to authenticate server
        Certificate caCert = certFactory.generateCertificate(new FileInputStream(caCertPath));
        X509Certificate x509CaCert = (X509Certificate) caCert;

        KeyStore caKeyStore = KeyStore.getInstance(KeyStore.getDefaultType());
        caKeyStore.load(null, null);
        caKeyStore.setCertificateEntry("cacert", x509CaCert);

        TrustManagerFactory tmFactory = TrustManagerFactory.getInstance(TrustManagerFactory.getDefaultAlgorithm());
        tmFactory.init(caKeyStore);

        SSLContext sslContext = SSLContext.getInstance("TLSv1.2");
        sslContext.init(null, tmFactory.getTrustManagers(), null);

        return sslContext.getSocketFactory();
    }
}
Summary
This blog provides a step-by-step guide on connecting to a serverless MQTT deployment via the Paho Java Client. By following these instructions, you have successfully created a Java application capable of publishing and subscribing to Serverless MQTT.
Join the EMQ Community
To dive deeper into this topic, explore our GitHub repository for the source code, join our Discord for discussions, and watch our YouTube tutorials for hands-on learning. We value your feedback and contributions, so feel free to get involved and be a part of our thriving community. Stay connected and keep learning!